
Configuring Scan Settings in MF Toolbox
You can change the preset settings, such as the type of scan (color or black and white), file format, and resolution, to suit your intended use. You can also specify a destination to save the scanned document, an application as a forward destination, and other settings.
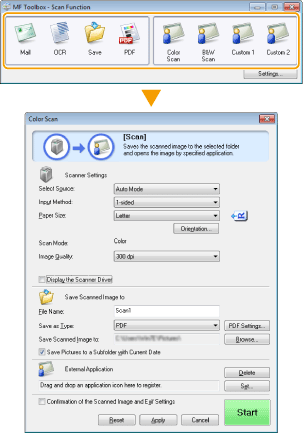
 |
|
For Mac OS users, available functions vary.
|
Configuring Scan Settings
Configure the scan settings such as the original document size, color mode, and resolution.
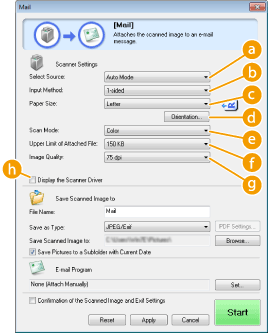
 [Select Source]
Select a setting based on whether you place your documents on the platen glass or in the feeder.
|
[Platen Glass]
|
Select when placing documents on the platen glass.
|
|
[ADF]
|
Select when placing documents in the feeder.
|
|
[Auto Mode]
|
When documents are placed in the feeder, they are scanned. When nothing is placed in the feeder, documents placed on the platen glass are scanned.
|
 [Input Method]
Select whether you want to scan a 1-sided or 2-sided document placed in the feeder.
 [Paper Size]
Select the document size. If you select an option for a custom size, the [Paper Size Settings] screen opens. You can then enter a custom size.

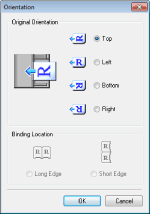
 [Orientation]
If documents are placed in the feeder, set the orientation of the documents. You can also set [Binding Location] if 2-sided documents are placed in the feeder.
 [Scan Mode]
Select the image type to scan documents. Available items vary depending on the type of scan, such as [Mail] or [PDF].
|
[Black and White]
|
The document is scanned as a black and white image (in black and white only, with no intermediate shades of gray).
|
|
[Black and White (OCR)]
|
The document is scanned as a black and white image optimized for processing by OCR (optical character recognition) software.
|
|
[Grayscale]
|
The document is scanned as a grayscale image (in black and white with intermediate shades of gray, similar to a black and white photograph).
|
|
[Color]
|
The document is scanned as a color image.
|
|
[Color (Magazine)]
|
The document is scanned as a color image. The color unevenness and moire that occurs when scanning print material is reduced. It takes more time to scan when using this setting than when using [Color].
|
 [Upper Limit of Attached File:]
This item is displayed when [Mail] is selected for the type of scan (Scanning Using MF Toolbox). The quality of the scanned image is automatically adjusted so that the file size does not exceed the maximum limit that you specify here.
 [Image Quality]
Select the resolution of the scanned image that suits your intended use.

Available resolutions vary on whether the document is placed in the feeder or on the platen glass, and whether the file format is PDF or JPEG.
A resolution of 75 dpi is a rough guide for displaying the scanned image on a computer, and 300 dpi for printing or creating a searchable PDF.
If you double the output resolution, the image file size increases by a factor of 4. If the file size is too large, a memory shortage or other error may occur. Set the resolution to the minimum required for your intended use.
 [Display the Scanner Driver]
Select this check box to enable you to configure advanced scan settings with ScanGear MF. To start ScanGear MF, click [Start] (Configuring Scan Settings in ScanGear MF).This item is not displayed when [OCR] is selected for the type of scan.
Configuring Storing Settings
Specify settings for the scanned data, such as the file name, file format (PDF, JPEG, etc.) and save destination.
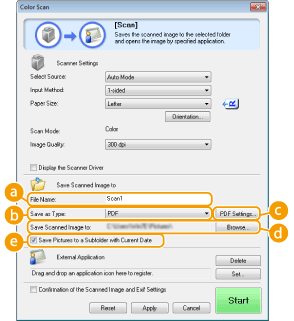
 [File Name]
Enter the name for the scanned data file.

If a file with the same name already exists in the save destination, a unique sequential four-digit number (for example, "0001") is appended to the new file name.
 [Save as Type]
Select the file format.
|
[BMP]
|
The scanned document is converted into a bitmap image.
|
|
[JPEG/Exif]
|
The scanned document is converted into a JPEG/Exif image. This setting is available when [Grayscale], [Color], or [Color (Magazine)] is selected for [Scan Mode] (Configuring Scan Settings).
|
|
[TIFF]
|
The scanned document is converted into a TIFF image.
|
|
[PDF]
|
A PDF file is created. If you scan a multi-page document, these pages are merged into one PDF file.
|
|
[PDF (Single Page)]
|
A one-page PDF file is created for each page of the scanned document. For example, if you scan a three-page document, three separate one-page PDF files are created.
|
|
[PDF (Multiple Pages)]
|
One PDF file is created from multiple documents. For example, if you scan a three-page document, one three-page PDF file is created.
|
|
[PDF (Add Page)]
|
Newly scanned document data is added as additional pages to an existing PDF file that you specify. Adding Pages to an Existing PDF file
|

Available file formats for each scan type

|
Scan type
|
BMP
|
JPEG/Exif
|
TIFF
|
PDF
|
PDF (Single Page)
PDF (Multiple Pages)
PDF (Add Page)
|
|
[Mail]
|
 * * |
 |
|||
|
[OCR]
|
 |
 * * |
 |
||
|
[Save]
|
 |
 * * |
 |
 |
|
|
[PDF]
|
 |
||||
|
[Color Scan]
|
 |
 |
 |
 |
|
|
[B&W Scan]
|
 |
 |
 |
||
|
[Custom 1]
|
 |
 * * |
 |
 |
|
|
[Custom 2]
|
 |
 * * |
 |
 |
|
|
*Not available if [Scan Mode] is set to [Black and White] or [Black and White (OCR)]. Configuring Scan Settings
|
|||||
If a message indicating the image size is too large is displayed
Lower the [Image Quality] value. Configuring Scan Settings
 [PDF Settings]
If you select [PDF], [PDF (Single Page)], [PDF (Multiple Pages)], or [PDF (Add Page)] for [Save as Type] ( ), you can configure advanced settings for PDF files.
 ), you can configure advanced settings for PDF files.
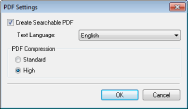
[Create Searchable PDF]
Specify whether you want to convert the scanned document into a searchable PDF. Characters in the scanned document are converted into text data and the text can be searched using a computer. Text can also be edited with a word-processing application. To create a searchable PDF, select [300 dpi] for [Image Quality] (Configuring Scan Settings).
Specify whether you want to convert the scanned document into a searchable PDF. Characters in the scanned document are converted into text data and the text can be searched using a computer. Text can also be edited with a word-processing application. To create a searchable PDF, select [300 dpi] for [Image Quality] (Configuring Scan Settings).
[Text Language]
Select the language that matches the document.
Select the language that matches the document.
[PDF Compression]
Select the level of the data compression. If you select [High], the data size of images such as photographs or illustrations are reduced more than if you select [Standard]. However, the image quality may degrade depending on the document type.
Select the level of the data compression. If you select [High], the data size of images such as photographs or illustrations are reduced more than if you select [Standard]. However, the image quality may degrade depending on the document type.
 [Save Scanned Image to]
Click [Browse], and specify the save destination for the scanned data. If you select [PDF (Add Page)] for [Save as Type] ( ), [Save Scanned Image to] is switched to [Create PDF File Based On]. In this case, specify an existing PDF file to which you want to add the newly scanned document data. The data is added to the existing file as additional pages (Adding Pages to an Existing PDF file).
 ), [Save Scanned Image to] is switched to [Create PDF File Based On]. In this case, specify an existing PDF file to which you want to add the newly scanned document data. The data is added to the existing file as additional pages (Adding Pages to an Existing PDF file).
 [Save Pictures to a Subfolder with Current Date]
If you select the [Save Pictures to a Subfolder with Current Date] check box, a subfolder named with the scanning date is created in the folder specified in [Save Scanned Image to] ( ), and the data is saved to that folder.
 ), and the data is saved to that folder.
Specifying External Applications to Forward Scanned Data
If you specify an application to which you want to forward the scanned data, the specified application automatically starts when scanning is complete. For example, you can specify Adobe Photoshop or other image-processing application. If you select [Mail] for the type of scan and specify an e-mail application, the scanned data is automatically attached to a new e-mail message. To scan with [OCR] selected, you must specify an OCR software.
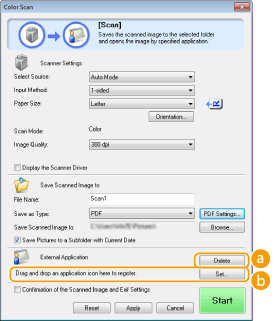
 [Delete]
If you do not want to forward the scanned document to an application, such as when you want to save it, click this button.
 [Set]
[Set]
Click this button, and select an application. Alternatively, you can specify an application by dragging its icon here if it is not an e-mail application.

Supported e-mail applications
Microsoft Outlook Express
Microsoft Outlook
Microsoft Exchange
EUDORA
Netscape Messenger
Windows Mail
Becky! Ver.2
Mozilla Thunderbird