Scanning Using MF Toolbox
 |
|
You can save scanned documents to a computer, forward them to a specified application to edit them, or attach them to an e-mail message. MF Toolbox features preset settings for each purpose, including conversion to PDF and color scanning. You can scan easily by selecting a preset.
|
 |
|
When <Auto Online for Remote Scan> is set to Off
Tap <Scan>
 <Remote Scanner> in the <Home> Screen to bring the machine online before operating the machine. System Management Settings <Remote Scanner> in the <Home> Screen to bring the machine online before operating the machine. System Management SettingsScanning is not possible in the following instances.
During printing, copying, etc.
When cleaning the fixing unit
When the toner cover is open
Scan after these operations are completed or remedying the error.
|
1
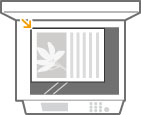
Place the document(s). Placing Documents
2
Double-click the [Canon MF Toolbox] icon on the desktop.
MF Toolbox starts.
3
Select the scan type.
Click the icon for the type of scan you want to perform.

 [Mail]
The scanned document is sent as an e-mail attachment. You can also save it to the computer and manually attach it to an e-mail later.
 [OCR]
[OCR]Characters in the document are extracted as text data through OCR (optical character recognition) processing. You can edit the extracted data by using an OCR software. Specify the OCR software in advance.
 [Save]
The scanned document is saved to the computer.
 [PDF]
[PDF]The scanned document is converted into a PDF file. You can also forward it to an application. By default, the scanned document is converted into a searchable PDF file where text can be searched using a computer.
 [Color Scan]/[B&W Scan]/[Custom 1]/[Custom 2]
You can register frequently used settings in advance (Configuring Scan Settings in MF Toolbox). You can also specify an application as a forwarding destination. When you scan by using the operation panel, the settings registered here are applied (Scanning from the Machine).

To switch a scanner
If two or more machines are installed and you want to switch to another machine, click [Settings], and select the machine. Configuring Settings for MF Toolbox and the Scanner

4
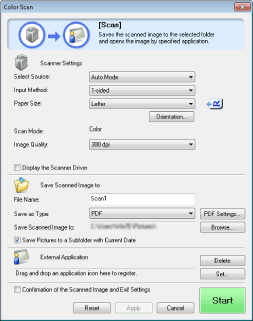
Configure the scan settings as necessary. Configuring Scan Settings in MF Toolbox
5
Click [Start].
Scanning starts.
To cancel, click [Cancel].
 When placing documents on the platen glass in step 1
If the screen shown below is displayed, you can continue scanning documents (When you can only scan one page at a time, such as when the JPEG format is specified, this screen is not displayed.)

|
1
|
If there are additional pages of documents to be scanned, place the next document on the platen glass, and click [Next].
Repeat this step until you finish scanning all of the pages.
When there is only one page to be scanned, proceed to the next step.
|
|
2
|
Click [Finish].
When scanning is complete, the scanned document is saved to a folder on a computer or forwarded to an application. Configuring Storing Settings Specifying External Applications to Forward Scanned Data
|
 |
If the scanning results are not achievedIf the expected scanning results are not achieved, for example, if the image is too dark or the color tone is different from that in the original, you can configure advanced scan settings with ScanGear MF. Place the document again, select the [Display the Scanner Driver] check box on the screen in step 4, and click [Start] to start ScanGear MF.
|
Previewing Scanned Images Before Specifying File Format and Saving
You can preview the scanned images before specifying the file format and save destination. This procedure is not available when [OCR] is selected in step 3. Place the document, start MF Toolbox, and proceed with this procedure.
1
Select the scan type.
Click an icon other than the [OCR] icon.

2
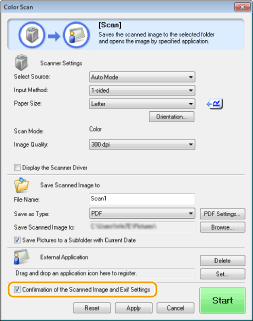
Select the [Confirmation of the Scanned Image and Exif Settings] check box.
If you selected [PDF] in step 1, select the [Confirm the Scanned Image] check box.
3
Click [Start].
Scanning starts.
To cancel, click [Cancel].
The scanned images are displayed as thumbnails on the [Scanned Image] screen.
4
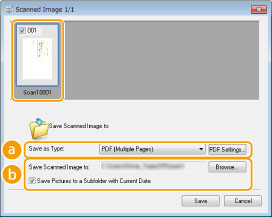
Set the file format and save destination.
 [Save as Type]
Select a file format, such as PDF or JPEG. Available formats vary depending on the type of scan you selected in step 1.

Adding comments to a JPEG file
If you select [JPEG/Exif], you can add information such as the date or comments to JPEG files when saving them. Select the scanned image, click [Exif Settings], and enter your comments on the displayed screen.
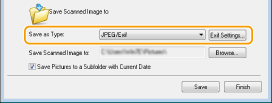
 [Save Scanned Image to]
Specify a save destination folder. If you select the [Save Pictures to a Subfolder with Current Date] check box, a subfolder named with the scanning date is created in the specified folder, and the data is saved to that folder.

If you select [PDF (Add Page)] for [Save as Type] ( ), [Save Scanned Image to] is switched to [Create PDF File Based On]. In this case, click [Browse], and specify an existing PDF file to which you want to add the newly scanned document data. The data is added to the existing file as additional pages.
 ), [Save Scanned Image to] is switched to [Create PDF File Based On]. In this case, click [Browse], and specify an existing PDF file to which you want to add the newly scanned document data. The data is added to the existing file as additional pages.
5
Click [Save] or [Forward].
The scanned data is saved to a folder on a computer or forwarded to an application. Configuring Storing Settings Specifying External Applications to Forward Scanned Data
Adding Pages to an Existing PDF file
Specify an existing PDF file to which you want to add the newly scanned document data. The data is added to the existing file as additional pages. Place the document, start MF Toolbox, and proceed with this procedure. The PDF file you select must be created with MF Toolbox. Newly scanned document data cannot be added to PDF files created with other applications.
1
Select the scan type.
Click the [Mail], [Save], or [PDF] icon.

2
Select [PDF (Add Page)] for [Save as Type].
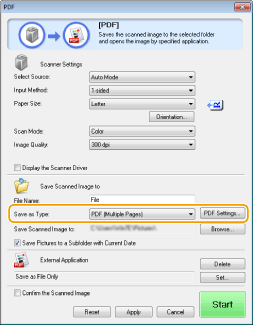
Click [PDF Settings], and configure the scan settings as necessary. Configuring Storing Settings
3
Click [Browse], and select the PDF file to which you want to add the pages.
The newly scanned document data is added to the PDF file you select.
4
Click [Start].
Scanning starts.
To cancel, click [Cancel].
 When placing documents on the platen glass
The screen shown below is displayed.

|
1
|
If there are additional pages of documents to be scanned, place the next document on the platen glass, and click [Next].
Repeat this step until you finish scanning all of the pages.
When there is only one page to be scanned, proceed to the next step.
|
|
2
|
Click [Finish].
When scanning is complete, the scanned document is saved to a folder on the computer or forwarded to an application. Configuring Storing Settings Specifying External Applications to Forward Scanned Data
|
Configuring Settings for MF Toolbox and the Scanner
You can switch to another scanner by using the [Settings] button. You can also configure settings such as the name of the computer to save documents.
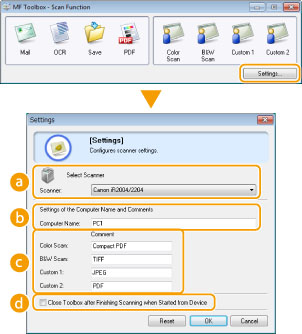
 [Select Scanner]
Select the scanner (machine) to use with MF Toolbox.
 [Computer Name]
When scanning by using the operation panel of the machine, there is a procedure to specify a destination to save the scanned document (Scanning from the Machine). You can edit the computer name that appears on the display of the machine during this procedure.
 [Comment]
You can enter a comment for each type of scan. Edit the comment as necessary.
 [Close Toolbox after Finishing Scanning when Started from Device]
When you scan by using the operation panel of the machine, MF Toolbox starts. You can specify whether you want to automatically close the MF Toolbox screen when you finish scanning.