Registering Address Book from Remote UI
You can register or edit the Address Book of the machine by using the computer. Specify the shared folder destination here.
 |
You can change the settings only when you have logged on in System Manager Mode. |
1
Start the Remote UI. Starting Remote UI
2
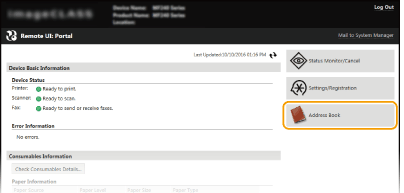
Click [Address Book].


If the enter PIN page is displayed
The Address Book is protected by a PIN. Enter the [PIN] and click [OK].
3
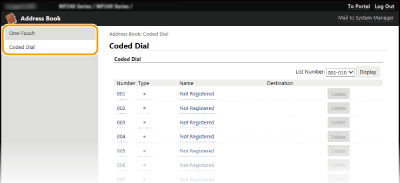
Click [Coded Dial].
You can also register destinations in One-Touch. In this case, click [One-Touch] instead of [Coded Dial]. Registering in the Address Book

4
Click the text link under [Number], [Type], or [Name] for an item named "Not Registered."


You can edit a registered item by clicking the corresponding text link under [Number], [Type] or [Name].
You can delete a registered item by clicking the corresponding [Delete] button.
5
Select [Destination Type to Register] and click [OK].
To register the shared folder destination, select [File].

6
Specify the destination.
 To register the fax destination

[Name]
Enter the name of the destination.
[Fax Number]
Enter the fax number of the destination.
[ECM TX]
Select the check box to make the following possible: if an error occurs in an image that is being sent, the error is checked and corrected to prevent an improper image from being sent.
[Speed]
If it takes time for transmissions to start, such as when there is a poor telephone connection, you can adjust the transmission start speed downward incrementally starting from [33600 bps].
[Long Distance]
Specify [International (1)] to [International (3)] according to the transmission conditions when registering overseas fax numbers.

You can also specify [ECM TX] and [Speed] from <Fax Settings> (Fax Settings ) on the operation panel. However, settings made from <Address Book> are enabled for the detailed settings of destinations registered in the Address Book.
 To register the e-mail destination

[Name]
Enter the name of the destination.
[E-Mail Address]
Enter the e-mail address of the destination.
 To register the shared folder destination

[Name]
Enter the name for the destination.
[Host Name]
Enter the computer name or IP address using up to 120 characters. You can include a path to the shared folder with the computer name or IP address (e.g. "\\swan\share" or "\\192.168.2.100\share").

Using a DNS server
You can also enter the host name (or FQDN) instead of the computer name or IP address (e.g. for a shared folder: "\\swan.organization.company.com\share").
[Folder Path]
Enter the location of the folder to which the data will be sent (up to 120 characters).
Use "\" as a separator. Specify the level that follows the path specified in [Host Name].
[User Name]
Enter the user name set for the shared folder (up to 32 characters).
[Set Password]
To set a password for the shared folder, select this check box and enter a [Password] of up to 32 characters.
 |
Ensure that the same display language is selected on both the computer and the Remote UI.[Host Name] and [Folder Path] may not be displayed correctly or may not be referenceable. |
7
Click [OK].