Specifying the Machine’s IP Address
Before specifying the machine’s protocol settings, you must assign the machine an IP address to enable communication between the machine and computers.
|
IMPORTANT
|
|
Before you perform the operations described in this section, make sure that the machine is turned ON and physically connected to the network.
If you are configuring the settings for the first time, use the machine’s control panel. After configuring the settings, you can change them using the Remote UI. For more information on Remote UI, see Управление аппаратом.
Changes made to IP Address Settings become effective when the machine is restarted. To restart the machine, turn it OFF, wait at least 10 seconds, and then turn it ON. For instructions on how to turn the machine ON and OFF, see Chapter 2, “Before You Start Using the Machine,” in the User’s Guide.
Functions that communicate with external servers on the internet may not be able to access them due to firewall settings, etc. In this case, consult your network administrator.
|
|
NOTE
|
|
For instructions on how to enter characters using the on-screen keyboard, see Основные операции.
|
Setting IPv4 Address
This section describes how to set the IPv4 address from the control panel. After configuring the TCP/IPv4 settings, make sure that the network connections are properly set. (Checking the Network Connection)
|
NOTE
|
|
‘DHCP’ is selected as default.
|
1
Press  (Additional Functions) → [System Settings] → [Network Settings].
 (Additional Functions) → [System Settings] → [Network Settings].
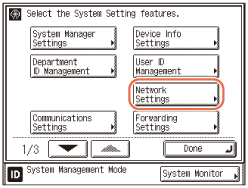
2
Press [TCP/IP Settings] → [IPv4 Settings] → [IP Address Settings].
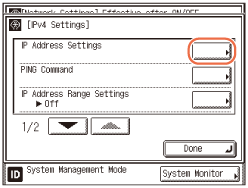
3
Specify the relevant items for your system.
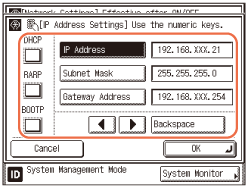
Using a fixed IP address:
|
1
|
Disable [DHCP], [RARP], and [BOOTP].
|
|
2
|
Press [IP Address].
|
|
3
|
Enter the IP address using
 - -  (numeric keys). (numeric keys). |
|
4
|
Specify the [Subnet Mask] and [Gateway Address] settings in the same way.
|
Using DHCP:
|
1
|
Press [DHCP].
|
|
2
|
Enter the IP address, subnet mask, and gateway address.
If this information cannot be obtained via DHCP after you restart the machine, the settings entered in this step are used.
|
Using RARP:
|
1
|
Press [RARP].
|
|
2
|
Enter the IP address, subnet mask, and gateway address.
If this information cannot be obtained via RARP after you restart the machine, the settings entered in this step are used.
|
Using BOOTP:
|
1
|
Press [BOOTP].
|
|
2
|
Enter the IP address, subnet mask, and gateway address.
If this information cannot be obtained via BOOTP after you restart the machine, the settings entered in this step are used.
|
|
NOTE
|
|
Only one of the DHCP, BOOTP, or RARP settings can be selected at any one time.
Even if you press [DHCP], [BOOTP], or [RARP], enter an IP address, subnet mask, and gateway address. If this information cannot be obtained from the DHCP, BOOTP, or RARP server, the settings entered in this step are used.
If the machine is restarted after DHCP, BOOTP, or RARP settings are complete, the TCP/IP Settings screen displays the IP address setting values obtained from the DHCP, BOOTP, or RARP server. (If the IP address, host name, and domain name have been previously set, these will be overwritten by the setting values obtained from DHCP, BOOTP, or RARP.)
If you use DHCP without the DNS dynamic update function, it is recommended that an identical IP address be assigned to the machine at all times. (If the IP address is not identical, the host name for the machine will not be able to correspond to the IP address.)
It takes about two minutes to check whether the DHCP, BOOTP, or RARP settings can be used. If you do not plan to use one of these settings, it is recommended that you turn them off.
|
4
Confirm the settings you specified → press [OK].
5
Restart the machine.
Turn OFF the machine, wait at least 10 seconds, and then turn it ON.
Setting IPv6 Address
This section describes how to set the IPv6 addresses from the control panel. After configuring the TCP/IPv6 settings, make sure that the network connections are properly set. (Checking the Network Connection)
With IPv6 communication, multiple IPv6 addresses can be used at the same time. The machine can use up to seven of the following IPv6 addresses:
Link local address (1)
An address that is only valid within a subnet or link. A link local address is automatically set using a specific prefix (fe80::) and an interface identifier generated from the MAC address of the machine. When the machine is using the functions of IPv6, one link local address is always registered.
Manual address (0 or 1)
A fixed address that is set from the control panel.
Stateless address (0 to 6)
A stateless address is automatically set using the machine’s MAC address and the prefix (information indicating the network belonged to) included in the RA (Router Advertisement) notified by the router when the machine is started.
Stateful address (0 or 1)
A stateful address can be obtained from a DHCP server using DHCPv6.
|
IMPORTANT
|
|
You should always use the functions of IPv4 even when using that of IPv6.
You can specify an IPv6 address from the machine’s control panel in abbreviated form, but it cannot be displayed on the touch panel display in abbreviated form.
|
1
Press  (Additional Functions) → [System Settings] → [Network Settings].
 (Additional Functions) → [System Settings] → [Network Settings].
For help, see step 1 in Setting IPv4 Address.
2
Press [TCP/IP Settings] → [IPv6 Settings] → [Use IPv6].
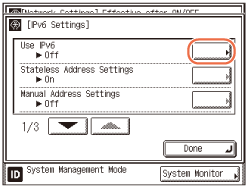
3
Press [On] or [Off] for <Use IPv6>.
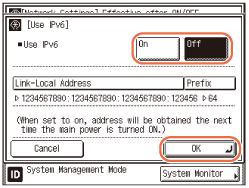
If you want to use IPv6:
|
1
|
Press [On] → [OK].
|
|
2
|
Proceed to step 4.
|
If you do not want to use IPv6:
|
1
|
Press [Off] → [OK].
|
|
2
|
Proceed to step 10.
|
NOTE:
If you press [On], a link local address is automatically set.
4
Press [Stateless Address Settings].
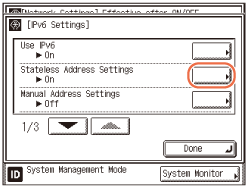
5
Press [On] or [Off] for <Use Stateless Address>.
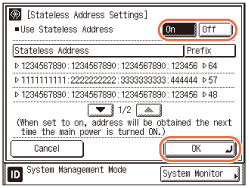
If you want to use Stateless Address:
|
1
|
Press [On] → [OK].
|
If you do not want to use Stateless Address:
|
1
|
Press [Off] → [OK].
|
NOTE:
The stateless address is discarded when the machine is restarted (the next time the machine’s main power switch is turned ON).
6
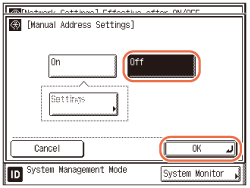
Press [Manual Address Settings].
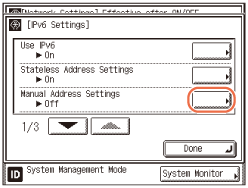
7
Specify manual address settings.
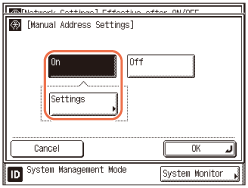
If you want to set the IPv6 address manually:
|
1
|
Press [On] → [Settings].
|
|
2
|
Press [Manual Address] → enter the IPv6 address value → press [OK].
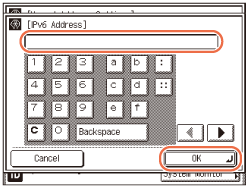 |
|
3
|
Press [-] or [+] to specify the IPv6 address prefix length.
You can also specify the prefix length using  - -  (numeric keys). (numeric keys).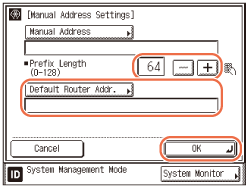 |
|
4
|
Press [Default Router Addr.] → enter the default router address value → press [OK].
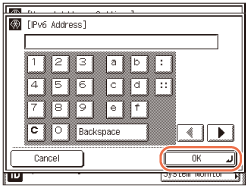 |
|
5
|
Confirm the settings you specified → press [OK].
|
|
6
|
Press [OK].
|
If you do not want to set the IPv6 address manually:
|
1
|
Press [Off] → [OK].
 |
8
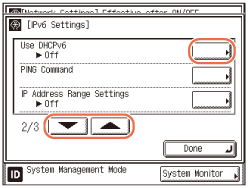
Press [ ] or [
 ] until [Use DHCPv6] appears → press [Use DHCPv6].
 ] or [
 ] until [Use DHCPv6] appears → press [Use DHCPv6].
9
Specify the use of DHCPv6.
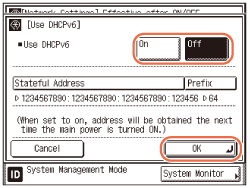
If you want to use DHCPv6 to obtain a stateful address from a DHCP server:
|
1
|
Press [On] → [OK].
|
If you do not want to use DHCPv6:
|
1
|
Press [Off] → [OK].
|
10
Restart the machine.
Turn OFF the machine, wait at least 10 seconds, and then turn it ON.
Checking the Network Connection
After specifying IP addresses, make sure that the network connections are properly set.
|
IMPORTANT
|
|
If you set the startup time of the machine’s network function, execute the PING command after the startup time elapses. (Setting Startup Time)
When you connect the machine to a switching hub, the machine may not be able to connect to the network even if the network settings are correctly set. This problem may be resolved by delaying the startup of network communications for the machine. (Setting Startup Time)
|
Checking TCP/IPv4 Network Connection
1
Press  (Additional Functions) → [System Settings] → [Network Settings].
 (Additional Functions) → [System Settings] → [Network Settings].
For help, see step 1 in Setting IPv4 Address.
2
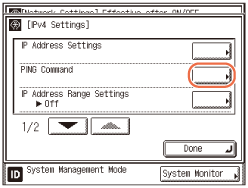
Press [TCP/IP Settings] → [IPv4 Settings] → [PING Command].
3
Enter the IP address of a device on the network that you want to connect the machine to → press [Start].
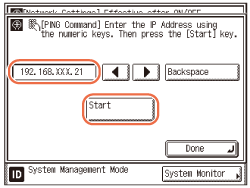
The result of the PING command is displayed on the touch panel display.
If this result is inappropriate, check the settings described in Interface Settings (Ethernet Driver) and Setting IPv4 Address.
4
Press  (Reset) to return to the top screen.
 (Reset) to return to the top screen.
Checking TCP/IPv6 Network Connection
1
Press  (Additional Functions) → [System Settings] → [Network Settings].
 (Additional Functions) → [System Settings] → [Network Settings].
For help, see step 1 in Setting IPv4 Address.
2
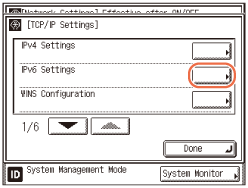
Press [TCP/IP Settings] → [IPv6 Settings].
3
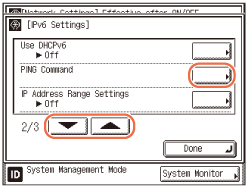
Press [ ] or [
 ] until [PING Command] appears → press [PING Command].
 ] or [
 ] until [PING Command] appears → press [PING Command].
4
Enter the IP address of a device on the network that you want to connect the machine to, or the machine’s host name → press [Start].
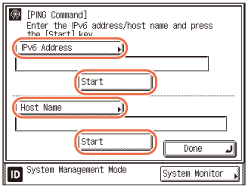
The result of the PING command is displayed on the touch panel display.
If this result is inappropriate, check the settings described in Interface Settings (Ethernet Driver) and Setting IPv6 Address.
5
Press  (Reset) to return to the top screen.
 (Reset) to return to the top screen.