Adding Documents to an IWB Document by Dragging and Dropping Them
You can add a document to an IWB document created with Desktop Editor by dragging and dropping it.
|
IMPORTANT
|
|
When you import a PDF document with Reader Extensions, the Reader Extensions function is deleted.
When you import an IWB document with Reader Extensions created in an older version of Desktop, the Reader Extensions function is deleted. However, the Reader Extensions function is not deleted from the original document.
If you import a PDF document in the PDF/A format, the document will no longer conform to the PDF/A format.
|
|
NOTE
|
|
Drag and drop operations can be performed from the following locations.
Documents/folders in a library
Pages of the PDF document selected in the Preview Window of the Desktop Browser screen or the Edit Pages Mode
Documents/folders in a Windows Folder
Documents/folders on the desktop
msg documents/e-mail folders in Microsoft Outlook
If you dragged and dropped a folder, the documents in the folder are added to an IWB document.
Depending on the position where you drag and drop, the following actions occur.
When dragging and dropping to the [Page Tree] tab on the Navigation Window: A chapter can be added to the selected position.
When dragging and dropping to the [Thumbnails] tab on the Navigation Window: Added as the final chapter in an IWB document.
When dragging and dropping to the Work Window: Can be added as the first or last chapter of the IWB document.
When the [Also import files attached to Outlook message files (.msg)] check box is selected in [System Settings], files attached to e-mail are also added to the IWB document.
[File] menu > [Option] > [System Settings] > [Common Settings] > [Import] > [Also import files attached to Outlook message files (.msg)]
Documents cannot be added to an IWB document with the drag and drop operation when the following modes are running.
Mail Merge Print Settings Mode
Digital Stamps Mode
Edit Original Pages Mode
Redaction Mode
Specify Area Not to Edit Mode
For information on how to import documents saved in Therefore to Desktop Editor, see the following.
Importing Documents Saved in Therefore to Desktop Editor (Administrator Guide)
|
1.
Open an IWB document with Desktop Editor.
For information on how to open a document with Desktop Editor, see the following.
2.
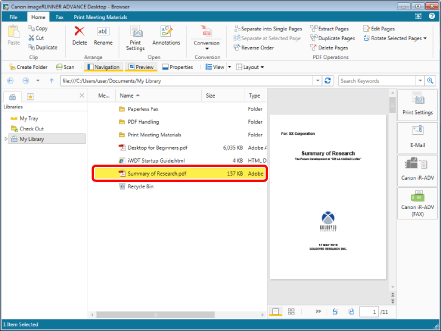
In the Desktop Browser screen, select the documents/folders/pages to add.
Or, follow one of the steps described below.
Select the pages to add in the Edit Pages Mode.
Using Windows Explorer or other means, select the documents/folders to add.
Select the documents/folders to add on the desktop.
On the Microsoft Outlook screen, select the msg documents/e-mail folders to add.

|
NOTE
|
|
Pages can only be selected for PDF documents.
Use the Preview Window of the Desktop Browser screen or the Edit Pages Mode to select pages.
You can select multiple documents, folders, or pages. To select multiple pages, do one of the following.
Switch the Preview Window to the thumbnail view.
Start the Edit Pages Mode.
For information on starting the Edit Pages Mode, see the following.
|
3.
Drag and drop the selected documents/folders/pages onto the Navigation Window of Desktop Editor, or the Work Window.
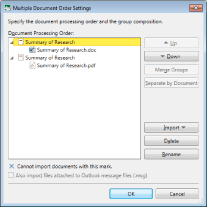
When you drag and drop multiple documents, Outlook message files, or folders, the [Multiple Document Order Settings] dialog box is displayed. In this case, proceed to step 4.
If you have performed a drag and drop operation on a password protected PDF document, the [Enter Password] dialog box opens. Enter the password and click [OK].
The documents/folders/pages that you dragged and dropped are added to the currently edited IWB document. In this case, proceed to step 6.
|
NOTE
|
|
Documents, folders, and pages can be dropped to the top half of the Work Window to be added as the first chapter of the IWB document.
Documents, folders, and pages can be dropped to the bottom half of the Work Window to be added as the last chapter of the IWB document.
Documents/folders/pages cannot be dragged and dropped to the following tabs on the Navigation Window.
[Annotation List] tab
[Signature List] tab
The [Multiple Document Order Settings] dialog box is displayed when the [Display dialog box for document order settings when importing multiple documents] check box is selected in [System Settings].
[File] menu > [Option] > [System Settings] > [Editor] > [Options] > [Display dialog box for document order settings when importing multiple documents]
The [Printing] dialog box or the [Print] dialog box of the application used to create the document may be displayed. In this case, select Desktop Document Writer as the output printer and print.
|
4.
Specify the document order in the [Multiple Document Order Settings] dialog box.

|
[Document Processing Order]
|
Displays a list of the documents to add.
If you selected multiple documents to add: A chapter is created for each document. The document name is used for the chapter name. For msg documents, the subject is used for the chapter name.
If you selected a folder to add: A chapter is created with the folder name. When you add a folder, one chapter is created for the folder and the documents in the folder are added as the chapter pages.
If you selected a Microsoft Outlook e-mail folder to add: A chapter is created for each msg document.
|
|
[Up]
|
Moves the selected chapter/document up one level.
Chapter: Can be moved when there are multiple chapters.
Document: Can be moved when there are multiple documents inside a chapter.
|
|
[Down]
|
Moves the selected chapter/document down one level.
Chapter: Can be moved when there are multiple chapters.
Document: Can be moved when there are multiple documents inside a chapter.
|
|
[Merge Groups]
|
When multiple chapters are selected, they can be merged. To select multiple chapters, click them while holding down the [Ctrl] key on the keyboard. The name of the first chapter is used as the name for the merged chapter.
|
|
[Separate by Document]
|
If a chapter has multiple documents, it can be divided. The document names are used for the divided chapter names.
|
|
[Import]
|
Adds documents/folders. The documents/folders are added to the bottom of the list.
|
|
[Delete]
|
Deletes the selected chapter or document.
|
|
[Rename]
|
Changes the name of the selected chapter.
|
|
[Also import files attached to Outlook message files (.msg)]
|
Select this check box to also import files attached to msg documents.
This option can only be selected when adding msg documents.
|
|
NOTE
|
|
When you drag and drop a folder, only the first level of the folder is added. The second and subsequent levels are not added.
You can add documents/folders/pages to the [Multiple Document Order Settings] dialog box by dragging and dropping them. In this case, you can specify the position to add them.
You cannot check whether files are attached to an msg document in the [Multiple Document Order Settings] dialog box.
|
5.
Click [OK].
If the PDF document is password protected, the [Enter Password] dialog box opens. Enter the password and click [OK].
The documents/folders/pages that you dragged and dropped are added to the currently edited IWB document.
|
NOTE
|
|
You can add all of the documents/folders/pages which can be printed with the computer in use. However, adding a document from certain applications may result in an import error.
For an Excel document, all sheets are added to an IWB document.
The names of chapters added to the IWB document are as follows.
If you dragged and dropped a document or folder: The same name as the document or folder (up to 128 characters)
If you dragged and dropped a page: The name of the document that includes the page plus "_<the page number of the selected page>" (up to 128 characters)
If you dragged and dropped multiple pages: The name of the document that includes the pages plus "_<the page number of the first page of selected pages>" (up to 128 characters)
The [Print] dialog box or the [Printing] dialog box of the application used to create the document may be displayed. In this case, select [Desktop Document Writer] as the output printer and print.
If you configured to save original documents in the IWB document, attachment files are also saved in the msg documents.
If characters that cannot be used in Desktop are included in the subject of an msg document, those characters are converted to single-byte spaces.
If the subject of an msg document is blank, "(No Subject)" is used for the chapter name when the msg document is added to the IWB document.
When you also import files attached to msg documents, the attachment files are added after the e-mail body.
|
6.
Save the IWB document.
For information on how to save an IWB document, see the following.