Changing the Settings of the [Change Document Index Data] Output Button
1.
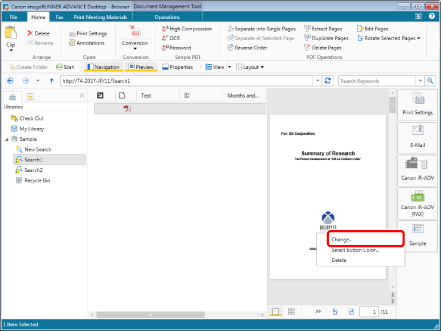
Right-click the [Change Document Index Data] Output Button whose settings you want to change, and select [Change].
Or, select the [File] menu > [Tools] > [Output Bar Settings] > (Change Document Index Data button name) > [Change].
The [Settings for Change Document Index Data] is displayed.
|
NOTE
|
|
You can also perform the same operation by clicking ▼ for [Change Document Index Data] output button displayed on the ribbon or toolbar and selecting [Change]. If an output button is not displayed on the ribbon or toolbar, see the following to display one.
[Change Document Index Data] output button can also be set from Desktop Editor. To set a [Change Document Index Data] output button from Desktop Editor, follow one of the steps below.
[File] menu > [Settings/Management] > [Settings for Button to Change Document Index Data] > (Change Document Index Data button name) > [Change]
Click ▼ for the [Change Document Index Data] output button displayed on the ribbon or toolbar, and select [Change]
|
2.
Change the advanced [Settings for Change Document Index Data].
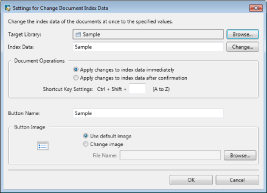
The following items are displayed in the [Settings for Change Document Index Data]:
|
[Target Library]
|
Click [Browse], and select the Therefore Library.
|
|
[Index Data]
|
Enter the value of the index to change in the dialog box displayed by clicking [Change].
|
|
[Document Operations]
|
Select a document, and set the operation that is performed when the [Change Document Index Data] output button is clicked.
|
|
[Apply changes to index data immediately]
|
Reflects the properties set in the [Change Document Index Data] output button to the index data.
|
|
[Apply changes to index data after confirmation]
|
Displays the properties set in the [Change Document Index Data] output button. Click [OK] to reflect them.
|
|
[Shortcut Key Settings]
|
Set a keyboard shortcut key to use instead of clicking the [Change Document Index Data] output button. Keys A to Z can be assigned.
|
|
[Button Name]
|
Enter a name for the output button using up to 40 characters.
|
|
[Button Image]
|
Specify the image to display in the button.
|
|
[Use default image]
|
Select to use the default image. The icons of an external application are used.
|
|
[Change image]
|
Select to specify an image to use. Click [Browse] and select the desired image in the displayed dialog box.
|
|
NOTE
|
|
The [Change Document Index Data] output button settings can be configured for each button.
Enter the path (up to 259 characters) for the image that you will edit in [Change image].
|
3.
Click [Change].
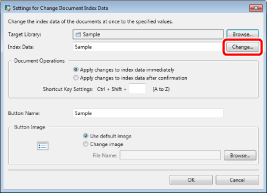
A dialog box for entering the value of the index is displayed.
4.
Enter the value of the index, and click [OK].
The [Settings for Change Document Index Data] appears again.
5.
Click [OK].