Installing Using the Installer
You can manually specify the port or IP address to use for network connected or locally connected devices and install the driver. Install according to this procedure when you cannot automatically discover a device on the network or when unique settings are required.
As well as using an existing port, you can add a port.
Prerequisites
Confirm the port to be specified
Specify a standard TCP/IP port, network printer port, or local port. You can specify an already registered port. You can select a temporary port ([LPT1] etc.) and set it after installation is complete.
Confirm the host name, name, or IP address of the device (if adding a standard TCP/IP port).
If you are installing by adding a standard TCP/IP port, you need to enter the host name, name, or IP address of the device. For the host name or name of the device, use the name by which the device is known on the network. If you do not know the name or value to be specified, check with your network administrator.
Confirm the shared printer (if adding a network printer port)
The shared printer selected when adding the port must match the device selected via the installer. Also, confirm that the version of the driver installed in the shared printer and the version of the installer match.
Make sure to log on to the computer in which the specified shared printer is installed beforehand.
When starting the computer, logon as a member of Administrators.
[Desktop] screen display (when using Windows 8.1/Server 2012 R2)
Procedures
1.
Double-click [Setup.exe].
2.
If you want to change the language displayed by the installer, select [Language] → click [Next].
The driver will be installed according to the selected language.
3.
Read the CANON SOFTWARE LICENSE AGREEMENT → click [Yes].
4.
If the following screen is displayed, select [Add new printers] → click [Next].
[Add new printers and update existing printer drivers]: Select this when you want to update already installed drivers at the same time that you add a new driver.
[Update existing printer drivers]: Select this if you want to update drivers only. For details, refer to the procedure for updating drivers.

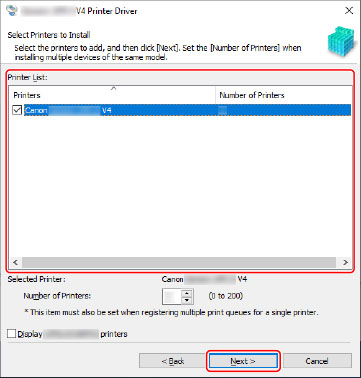
Select the device to install from [Printer List] → click [Next].
[Number of Printers]: Enter the number of printers to be installed for the selected device. By specifying multiple printers, multiple devices can be registered at the same time.
 NOTE
NOTEWhen multiple printers are assigned the same port for a single device, multiple print queues are registered for the selected device. Different default settings can be specified for each print queue to distinguish between them when printing. However, you can assign only one port to one device when a network printer port is specified.
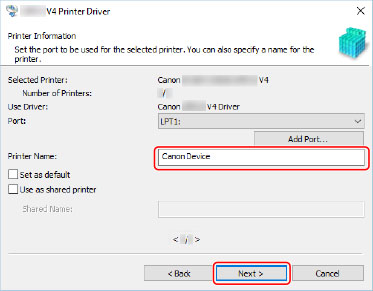
Set the port.
If you have entered multiple printers for one device in step 5., the port setting for the first printer is used as the default setting for the second and subsequent printers.

(1) Click [Add Port] → select [Standard TCP/IP Port] from [Port to Add] → click [OK].
(2) Enter the device name or IP address according to the instructions of the wizard.
[Port Name] is automatically entered. Change the port name if required.
If the [Additional port information required] screen is displayed, click the subsequent "Open details" and perform the necessary operations.
Perform one of the following.
Return to the previous screen in the wizard → re-enter the information for [Printer Name or IP Address] → click [Next].
Select [Device Type] > [Standard] > [Canon Network Printing Device with P9100] → click [Next].
Depending on the device you are using, the name you select in [Device Type] > [Standard] may differ from [Canon Network Printing Device with P9100].
(3) Click [Finish].
(1) Click [Add Port] → select [Network] from [Port to Add] → click [OK].
(2) Select the network printer you are using → click [OK].
NOTEIf a network printer corresponding to the device is not displayed in the list, the operating system or device settings may be incorrect. Refer to the subsequent troubleshooting to enable the device to be displayed in the printer list.
When adding a local port
(1) Click [Add Port] → select [Local Port] from [Port to Add] → click [OK].
(2) Enter the port name → click [OK].
Select a port from [Port].
Change [Printer Name] if necessary → click [Next].
[Set as default]: Select this to set the device as the device that is normally used.
[Use as shared printer]: Select this if you want to share the device.
If you added or selected a network printer port, you cannot set [Printer Name] and [Use as shared printer].
If you have selected multiple devices or you have entered multiple printers for one device in step 5., repeat steps 6. and 7.
8.
Check [List of Printers for Installation] → click [Start].
Proceed with the installation according to the instructions on the screen.
9.
Check the installation complete message → click [Exit].
You can also print a test page if required.