Reserving Jobs
You can reserve print jobs even while the machine is printing or waiting to process a job.
As an example, the procedure for printing files that are stored in the Mail Box is explained in this section.
You can reserve printing in the following cases:
While the Machine Is Waiting
You can specify print settings while the machine is in the waiting state. This can be directly after you turn the machine ON, or after you clear a paper jam. Printing begins automatically when the machine is ready.
While the Machine Is Printing
You can specify print settings for a new job while the machine is printing. Printing begins after the current job is complete.
NOTE |
You can reserve printing while the machine is in the waiting state at the following times: Between the time that the machine is turned ON and when it is ready to print After you clear a paper jam Directly after you close a cover on the main unit or an optional unit, such as a finisher |
Flow of Reserved Printing
1.
Press  (Main Menu) → [Access Stored Files] → [Mail Box].
(Main Menu) → [Access Stored Files] → [Mail Box].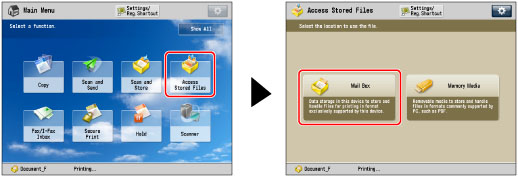
If the pop-up screen that appears while the machine is printing or waiting to print is displayed, press [Close].
2.
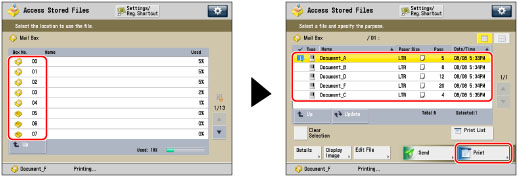
Select the desired Mail Box → select the desired file → press [Print].
3.
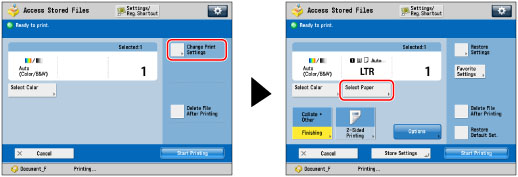
Press [Start Printing].
If you want to change the print settings, specify the desired print settings → press [Start Printing].
If you reserve a print job while the machine is printing, printing begins as soon as the current job is complete. If you exceed the maximum number of jobs that can be reserved, follow the message that appears to perform the operation again.
Reserving a Print Job Using the Stack Bypass-C
You can reserve the paper type to use in the Stack Bypass-C when printing a series of jobs using the Stack Bypass-C in sequence.
Example: You can reserve LTR paper to use in the Stack Bypass-C when using 11" x 17" paper in the Stack Bypass-C to print the current job.
1.
Press (Main Menu) → [Access Stored Files] → [Mail Box].
(Main Menu) → [Access Stored Files] → [Mail Box].If the pop-up screen that appears while the machine is printing or waiting to print is displayed, press [Close].
2.
Select the desired Mail Box → select the desired file → press [Print].
3.
Press [Change Print Settings] → [Select Paper].
4.
Press [Change MP Tray Paper].
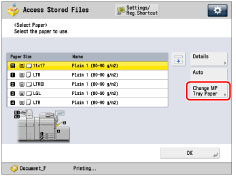
If you do not reserve a job, the Change MP Tray Paper screen appears when paper is loaded into the Stack Bypass-C. (See "Loading Paper into the Stack Bypass-C.")
5.
Select the desired paper type and paper size.
If the desired paper type is not shown on the Select Paper screen, press [Detailed Settings] and select the desired paper type on the Detailed Settings screen.
If you want to print on the back side of a previously printed sheet, press [2nd Side of 2-Sided Page].
IMPORTANT |
Be sure to correctly set the paper type. If the type of paper is not set correctly, it could adversely affect the quality of the image. Moreover, the fixing unit may become dirty, or the paper could jam, and a service repair may be needed. |
NOTE |
You can register paper types that are not displayed on the detailed settings list in <Change Multi-Purpose Tray Paper: Paper Type>. For more information on storing the paper type, see "Registering Custom Paper Types." If there is more than one reserved job waiting to print, only the last paper size/type specified for the reserved print job appear on the Paper Select screen. If [Multi-Purpose Tray Defaults] is set to 'On' in [Preferences] (Settings/Registration), the stored default values appear. (See "Registering Multi-Purpose Tray Defaults.") |
Selecting a standard paper size:
Select the paper type → press [Next].
Select the paper size → press [OK].
NOTE |
[Transparency] can be selected only if you select [LTR] as the paper size. |
Selecting a custom size paper:
Select the paper type → press [Next].
Press [Custom Size].
Press [X] and [Y] → enter each value → press [OK].
You can also select a size button ([S1] to [S5]) containing a stored paper size setting, instead of entering values.
NOTE |
To recall paper sizes from size buttons ([S1] to [S5]), register the paper sizes in advance. (See "Registering/Editing/Deleting Custom Paper Sizes.") |
Press [OK].
Selecting an envelope:
Press [Next] → [Envelope].
Select the desired envelope type → press [OK].
IMPORTANT |
If the envelope type is not set correctly, a paper jam will occur. If you use envelopes that have glue attached to their flaps, the glue may melt due to the heat and pressure of the fixing unit. For more information on how to load envelopes into the POD Deck Lite-C, see "Loading Envelopes into the POD Deck Lite-C." |
Press [OK].
6.
Press [OK].
7.
Press [Start Printing].
This completes the settings for a reserved print job using the Stack Bypass-C. The subsequent steps show you how to load paper into the Stack Bypass-C and complete the scanning and printing process of the reserved job.
8.
When it is time for the reserved print job to be printed, load the specified paper into the Stack Bypass-C.
If any paper for the completed job is remaining in the Stack Bypass-C, remove the paper, and then load the specified paper into the Stack Bypass-C. For information on how to load paper into the Stack Bypass-C, see "Loading Paper into the Stack Bypass-C."
NOTE |
Make sure to load the same paper size and type selected in step 5 into the Stack Bypass-C. Printing does not start if paper of a different size or type is loaded. |
NOTE |
You can specify up to six jobs to be reserved, including the current job. If you select seven or more files to print at one time, the confirmation screen appears. Interrupt print jobs are not included in this count. You can set different print modes and paper sources, including the Stack Bypass-C, for each reserved job. If [Multi-Purpose Tray Defaults] is set to 'On' in Device Use Settings, reserved printing can be performed only for the registered paper size and type. (See "Registering Multi-Purpose Tray Defaults.") For more information on paper types, see "Available Paper Stock." You cannot reserve a print job if the memory of the machine becomes full. |