Registering a Fax Number
This mode can be set when the Remote Fax function is available for use. For information on the optional products required to use the Remote Fax function, see "Optional Products Required for Each Function."
1.
Press  (Settings/Registration).
(Settings/Registration).2.
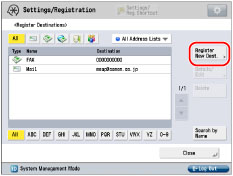
Press [Set Destination] → [Register Destinations].
3.
Press [Register New Dest.].
4.
Press [Fax].
5.
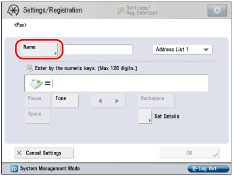
Press [Name].
6.
Enter a name for the destination → press [Next].
7.
Press the drop-down list → select an address list from Address List 1 to 10.
Address lists are a convenient way to classify destinations.
The fax number that you enter will be stored in the selected address list.
8.
Enter the recipient's fax number using  -
-  (numeric keys),
  , and
, and  .
.
- (numeric keys), , and .For instructions on performing this operation from the Fax screen, see "Fax Basic Features Screen" in "Overview of This Function."
IMPORTANT |
You cannot insert a pause or a space at the beginning of a number. |
NOTE |
If you enter a pause at the end of the number, the pause is always 10 seconds long. Press [Set Details] to set the subaddress, password, ECM TX, Sending Speed, and Long Distance. If the machine is set to use multiple lines, you can also select the line to use when sending. |
Press [Set Details] → specify each setting → press [OK].
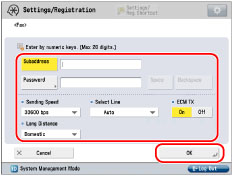
[Subaddress], [Password]:
Press [Subaddress] → enter the recipient's password using - (numeric keys), , and .
- (numeric keys), , and .Press [Password] → enter the recipient's password using - (numeric keys), , and .
- (numeric keys), , and .Press [Confirm] → enter the recipient's password again for confirmation → press [OK].
If the recipient did not set a password for the target subaddress, you do not need to enter a password.
<Sending Speed>:
Press the <Sending Speed> drop-down list → select <Sending Speed>.
If your document transmissions are slow in starting, this may mean that the telephone lines in your area are in poor condition. Select a slower speed. You can select [33600 bps], [14400 bps], [9600 bps], or [4800 bps].
<Select Line>:
Press the <Select Line> drop-down list → select the line.
IMPORTANT |
The number of lines you can select is determined by the setting for [No. of TX Lines] in [Remote Fax TX Settings] in [Function Settings] (Settings/Registration). (See "Remote Fax TX Settings.") |
[Auto]: A line is selected according to the settings you made for [Priority TX] in Select TX Line in [Function Settings] (Settings/Registration). (See "Remote Fax TX Settings.")
<Long Distance>:
Press the <Long Distance> drop-down list → select the desired setting.
Select [Long Distance (1)] if transmission errors occur frequently when you make overseas calls (when the number is stored in the Address Book). If errors persist, try selecting [Long Distance (2)] or [Long Distance (3)].
<ECM TX>:
Select [On] if you want to perform ECM transmission.
Select [On] if you want to perform ECM transmission.
IMPORTANT |
If you want to attach a subaddress to your send job, make sure that the recipient's fax machine supports ITU-T standard subaddresses. (See "Sending with a Subaddress.") |
9.
Press [OK] → [Close].
If you are performing Access Number Management for the Address Book, perform the following operation.
Press [Next] → [Access No.] → [Access No.].
Enter the access number using - (numeric keys) → press [Confirm].
- (numeric keys) → press [Confirm].Enter the access number again for confirmation → press [OK] → [OK].