Setting Up Using the Setup Guide
1660-009
When the machine is turned on (
Turning ON the Machine) for the first time, the Setup Guide starts up to assist you to configure the initial settings of the machine by following the on-screen guidance. In the Setup Guide, the setting screens are displayed in the following order.
Step 1 | Setting the Display Language and the Country or Region |
| Set the language to be displayed on the operation panel screen or in reports, as well as the country or region where the machine will be used. 1 | Select a language. | 2 | Select <Yes>. | 3 | Select a country or region. |
|
Step 2 | Setting the Date and Time |
| Adjust the machine's date/time. 1 | Select a time zone. What is UTC? Coordinated Universal Time (UTC) is the primary time standard by which the world regulates clocks and time. The correct UTC time zone setting is required for Internet communications. | 2 | Enter the date and time, and select <Apply>. Tap the entry field, and enter the date and time. |
|
Step 3 | Setting the Access Security Measures |
| Set a PIN to access the Remote UI. Because the Remote UI can be used to change the machine settings from a computer, setting of a PIN is recommended. 1 | Select <Yes>. If you select <No>, PIN is not set, and the Setup Guide proceeds to step 4. | 2 | Enter a PIN, and then select <Apply>. | 3 | Enter the same PIN, and then select <Apply>. |
|
Step 4 | Performing the Color Adjustment |
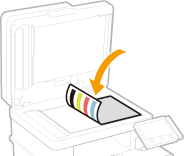
| To achieve good copy quality, adjust the gradation. 1 | Select <Yes>. If you select <No>, color adjustment is not performed, and the Setup Guide proceeds to step 5. | 2 | Check that the size and type of paper displayed on the screen is loaded in the machine, and select <OK>. | 3 | Confirm the procedure, and select <Start>. An adjustment image is printed. | 4 | Open the feeder after the screen displayed during printing is closed. | 5 | Place the adjustment image on the platen glass. Place the adjustment image with the print side facing down and the black stripe toward the back side of the machine. | 6 | Gently close the feeder. | 7 | Select <Start Scanning>. Adjustment starts. When adjustment is complete, remove the adjustment image from the platen glass. |
|
|
Step 5 | Configuring Automatic Cleaning of the Fixing Assembly |
| If the model of your machine is MF746Cx, configure to automatically clean the fixing assembly. If you are using MF645Cx / MF643Cdw / MF641Cw, the Setup Guide proceeds to step 6. 1 | Check the message displayed on the screen, and select <Yes>. If you select <No>, automatic cleaning is not set, and the Setup Guide proceeds to step 6. | 2 | Select <On>. If you select <Off>, automatic cleaning is not set, and the Setup Guide proceeds to step 6. | 3 | Set available paper sources to <On>. When cleaning is performed, paper is fed from the paper source for which you set <On>. You can use the following paper for cleaning. Paper sizes: A4/Letter Paper types: Plain 1 to 3/Recycled 1 or 2 | 4 | Select <Apply>. |
|
Step 6 | Setting the Wireless LAN |
| Configure the settings to connect to the network using the wireless LAN. 1 | Select <Yes>. If you select <No>, wireless LAN is not set, and the Setup Guide proceeds to step 7. | 2 | Select <OK>. | 3 | Select the setting method. |
|
Step 7 | Viewing Application Library |
| The one-touch button referred to as "Application Library" is provided in the Home screen. You can read the description of each function. 1 | To finish the Setup Guide, select <End>. |
When the Setup Guide is complete, the Home screen appears. |