
Paper Jams in the Staple Finisher-V/Booklet Finisher-V
Check the location of the paper jam on the touch panel display, and remove it. The Staple Finisher-V/Booklet Finisher-V are optional. Optional Equipment
 |
Confirm before handlingClose any covers that are open. If there is any paper in the booklet tray, remove it. |
Inside the Front Cover
1
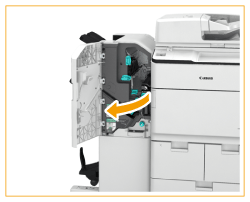
Open the front cover of the finisher.
2
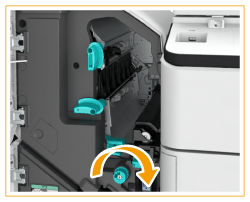
Turn the delivery knob and feed any jammed paper to Tray C.
3
Remove the jammed paper from the paper output area of Tray C.
 | Open the output guide and use your finger to keep it open. |
 | Gently pull out the paper in the direction of the arrow. 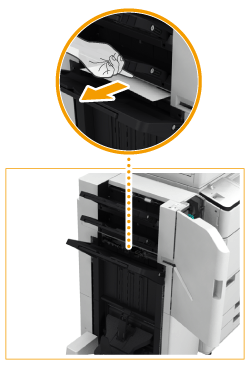 |
 | Close the output guide. |
4
Open the escape guide.
 | Open the lower escape guide. 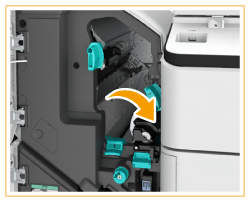 |
 | Open the upper escape guide. 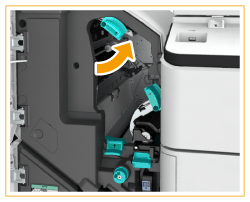 |
5
Check whether paper is jammed.
 | If paper is jammed, gently pull it out in the direction of the arrow. 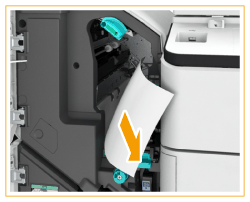 |
 | Close the upper escape guide. |
6
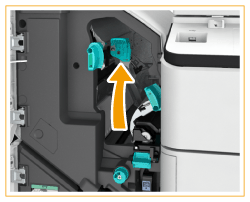
Lift the first flap.
7
Check whether paper is jammed.
 | If paper is jammed, gently pull it out in the direction of the arrow. 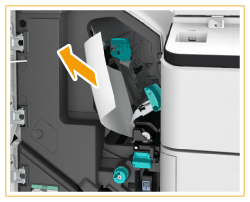 |
 | Lower the first flap. |
 | Close the lower escape guide. |
8
Check whether paper is jammed in the puncher unit or entrance guide.
 When the 2/3 Hole Puncher Unit-A or 2/4 Hole Puncher Unit-A (for the 230 V machine only) is attached.
 | Lift the puncher unit. |
 | If paper is jammed, gently pull it out in the direction of the arrow. 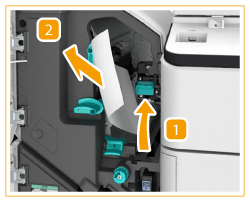 |
 | Lower the puncher unit. |
 When the 2/3 Hole Puncher Unit-A or 2/4 Hole Puncher Unit-A (for the 230 V machine only) is not attached.
 | Open the entrance guide. |
 | If paper is jammed, gently pull it out in the direction of the arrow. 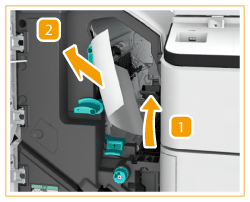 |
 | Close the entrance guide. |
9
Close the front cover of the finisher.
Continue following the instructions on the screen to proceed with the interrupted operation or continue clearing paper jams.
Saddle Stitcher Unit of the Booklet Finisher-V
1
Open the front cover of the finisher.

2
Pull out the saddle stitcher unit.
 | Turn the knob at the top of the saddle stitcher unit about 10 times. |
 | Pull out the saddle stitcher unit. 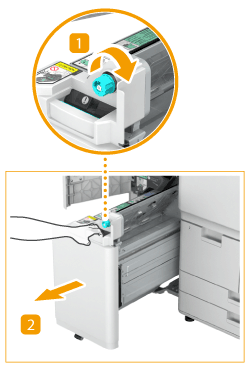 |
3
Check whether paper is jammed.
 | Open the transparent guide. |
 | If paper is jammed, gently pull it out in the direction of the arrow. 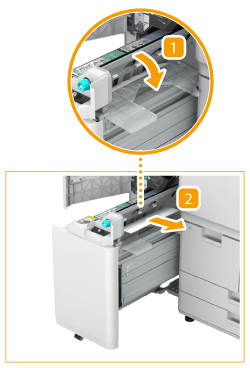 |
 | Close the transparent guide. |
4
Gently push the saddle stitcher unit back into its original position.
5
Close the front cover of the finisher.
Continue following the instructions on the screen to proceed with the interrupted operation or continue clearing paper jams.