
Clearing Paper Jams
0UUY-0JR 0UW1-0J5 0YRY-0JX 0X7F-0LL 0X7H-0L3 1100-0K1 0X6E-0LL 0X6W-0L3 10XJ-0K1 0X7C-0LL 0X7A-0L3 1106-0K1 0WXY-0LR 0X7E-0L3 10YY-0K1 10H3-0JY 0WR6-0LX 0WR7-0L8 108A-0K0 1116-0K0 10H4-0JY 0WR5-0LX 0WR8-0L8 0YWJ-0K2 0YWH-0L3 0YWR-0JW 0YWK-0L3 0YWE-0LL 0YWF-0L3 0YAS-0JF
If a paper jam occurs, the <Paper is jammed.> message appears on the touch panel display, along with the location of the paper jam and solutions. If it is difficult to find solutions on the display, see the link corresponding to the paper jam location in Location of the Paper Jam. If paper jams occur repeatedly, see If Paper Jams Repeatedly.
|
When all paper jams have been cleared, immediately remove your hands from the machine and optional equipment so that your clothing and hands do not get caught in the rollers. |
IMPORTANT |
Cautions when clearing paper jamsWhen clearing paper jams, do not turn the power OFF. Data being printed is erased when you turn the power OFF. Take particular care when a fax is being received. When the paper gets torn, be sure to remove all of it so that no pieces remain. Do not forcibly remove the jammed paper from the machine. Forcibly removing the paper may damage parts of the machine. If you cannot remove the paper, contact your local authorized Canon dealer. Copies and prints may be output to optional equipment while you are clearing paper jams. Take care when handling optional equipment that is installed. |
Location of the Paper Jam
If a paper jam occurs, the location of the jam and solutions are displayed on the touch panel display. Follow the on-screen instructions to solve the problem. For details on how to clear the paper jams, see the following sections.
Main unit
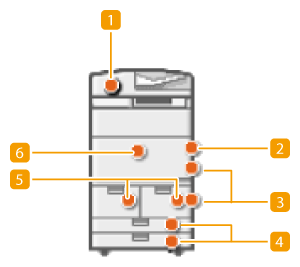
 Document Jams in the Feeder
 Paper Jams in the Multi-Purpose Tray
 Paper Jams inside the Right Covers of the Main Unit
 Paper Jams in the Paper Drawer
 Paper Jams in the Paper Deck
 Paper Jams in the Main Unit (Fixing Transport Unit)
When Staple Finisher-W PRO/Booklet Finisher-W PRO is attached
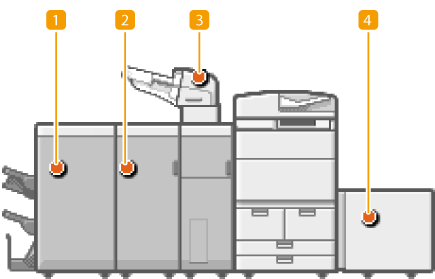
Paper Jams in the Staple Finisher-W PRO/Booklet Finisher-W PRO
Paper Jams in the Paper Folding Unit-J
Paper Jams in the Document Insertion Unit-N
Paper Jams in the POD Deck Lite-C/Paper Deck Unit-E
When Staple Finisher-X/Booklet Finisher-X is attached
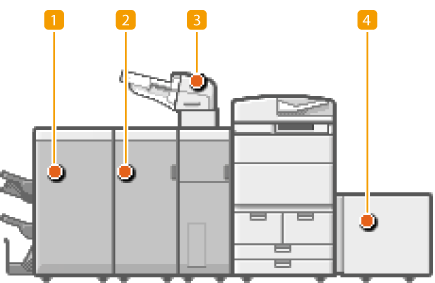
Paper Jams in the Staple Finisher-X
Paper Jams in the Booklet Finisher-X
Paper Jams in the Paper Folding Unit-J
Paper Jams in the Document Insertion Unit-N
Paper Jams in the POD Deck Lite-C/Paper Deck Unit-E
When Staple Finisher-V/Booklet Finisher-V is attached
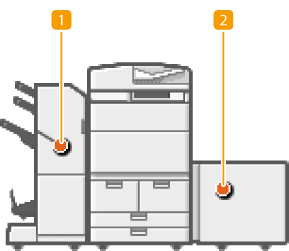
Paper Jams in the Staple Finisher-V/Booklet Finisher-V
Paper Jams in the POD Deck Lite-C/Paper Deck Unit-E
When Copy Tray-R is attached
Paper Jams in the Copy Tray-R
IMPORTANT |
When removing the jammed paper, do not turn OFF the machineTurning OFF the machine deletes the data that is being printed. Be especially careful when receiving fax documents. If paper tearsRemove all the paper fragments to prevent them from becoming jammed. Do not forcibly remove the jammed document or paper from the machineForcibly removing the paper may damage parts. If you are not able to remove the paper, contact your local authorized Canon dealer. After clearing all paper jamsTo prevent your clothes or hands from being caught between the rollers, immediately remove your hands from the main unit and optional devices. |
NOTE |
Even if you check the paper jam location, paper may not actually be jammed. In such a case, check all locations according to the instructions on the touch panel display. The touch panel display indicating a paper jam is continuously displayed until the paper jam issue has been rectified completely. If you press <Close> on the touch panel display indicating a paper jam, operation and setting may continue without immediate correction of the paper jam. If a paper jam occurs during printing while the stapler is set for operation, do not remove paper in the places other than the locations displayed on the touch panel display. For example, if a paper jam occurs in the main unit, you do not need to remove paper from the finisher where a paper jam has not occurred. If a paper jam in the main unit is cleared, paper inside the finisher will be stapled continuously. |
If Paper Jams Repeatedly
When paper jams occur repeatedly in spite of no malfunctions in the main unit or optional devices, the following causes are suspected.
Jammed paper fragments remain in the machine
If you forcibly remove the jammed paper, torn scraps of paper may remain in the main unit or optional devices. If paper tears, check that there are no scraps of paper inside and try to remove all of the scraps.
If you forcibly remove the jammed paper, torn scraps of paper may remain in the main unit or optional devices. If paper tears, check that there are no scraps of paper inside and try to remove all of the scraps.
The paper is not appropriate for the machine
Use a paper type appropriate for the machine. Set paper size and type in accordance with the paper being used.
Available Paper
Specifying Paper Size and Type
Use a paper type appropriate for the machine. Set paper size and type in accordance with the paper being used.
Available Paper
Specifying Paper Size and Type
The paper is not properly loaded
Check whether or not the paper size matches the paper guide indicator. Load paper after aligning it against a flat surface. Loading Paper
Check whether or not the paper size matches the paper guide indicator. Load paper after aligning it against a flat surface. Loading Paper