General
This section describes general error messages, not related to a specific function.
Load paper.
Cause 1 | Printing cannot be performed because the paper has run out. |
Remedy | Load paper. (See "Loading Paper.") |
Cause 2 | The paper drawer is not correctly inserted into the machine. |
Remedy | Insert the paper drawer in all the way. (See "Loading Paper.") |
The most proper size A4 is not available.
Cause 1 | The optimal paper size selected with automatic paper selection is not loaded. |
Remedy | Load paper of the displayed size. |
Cause 2 | [Paper Drawer Auto Selection On/Off] is set to 'Off'. |
Remedy 1 | Manually specify the paper drawer. |
Remedy 2 | Set [Paper Drawer Auto Selection On/Off] to 'On' for the paper drawer in which the displayed paper size is loaded. (See "Aktivering af automatisk papirskuffevalg.") |
Cause 3 | A paper type not supported by automatic paper selection is loaded. |
Remedy 1 | Manually specify the paper drawer. |
Remedy 2 | Set [Consider Paper Type] in [Paper Drawer Auto Selection On/Off] to 'Off' when copying. (See "Aktivering af automatisk papirskuffevalg.") |
 Return the originals to their correct order, then press the [Start] key.
Cause | Scanning stopped because an unspecified problem occurred in the feeder. |
Remedy | Return the originals to their correct order, place them in the original loading area of the feeder again, and press  . . |
Return the originals to their correct order, then press the [Start] key. (The data size of the scanned original exceeded the limit. Settings will be automatically corrected and the originals will be scanned again.)
Cause | Scanning was canceled because the data size of the scanned originals exceeded the maximum size that the machine can handle. |
Remedy | Scan the originals again from the first page. If you still cannot scan the originals, you may be able to resolve the problem by decreasing the setting for [Sharpness] or setting the original type to [Text]. |
Scanning was canceled because the data size of the scanned original exceeded the limit. Scanning may be possible if sharpness is reduced, or Original Type is set to Text.
Cause | Scanning was canceled because the data size of the scanned originals exceeded the maximum size that the machine can handle. |
Remedy | You may be able to resolve the problem by decreasing the setting for [Sharpness] or setting the original type to [Text]. |
Place the original on the platen glass.
Cause | A mode requiring an original to be placed on the platen glass is set. There is no original on the platen glass. |
Remedy | Place the original on the platen glass. |
Remove the original from the platen glass.
Cause | An original remains on the platen glass. |
Remedy | Remove the original remaining on the platen glass, and place the original again. |
Remove the original from the feeder.
Cause | There is an original loaded in the feeder and on the platen glass when a mode that cannot scan originals loaded in the feeder is set. |
Remedy | Remove the original from the feeder. |
Original scanning area (thin glass strip) is dirty.
Cause | The original scanning area (thin glass strip) is dirty due to dust and grime. |
Remedy | Clean the original scanning area of the feeder. (See "Scanned Originals Become Dirty (Manual Feeder Cleaning).") |
Original scanning area (Feeder) is dirty.
Cause | The original scanning area of the Duplex Color Image Reader Unit-M is dirty due to dust and grime. |
Remedy | Clean the original scanning area of the Duplex Color Image Reader Unit-M. (See "Scanned Originals Become Dirty (Manual Feeder Cleaning).") |
 Replace toner cartridge. (Magenta)
Cause | Printing will soon not be possible because the toner of the displayed color is running out. |
Remedy | Replace the displayed color's toner cartridge. (See "Replacing the Toner Cartridge.") |
Replace toner cartridge. (Black)
Cause | Printing will soon not be possible because the toner of the displayed color is running out. |
Remedy | Replace the displayed color's toner cartridge. (See "Replacing the Toner Cartridge.") |
Insert the toner cartridge. (Cyan)
Cause | The toner cartridge of the displayed color is not inserted properly. |
Remedy | Make sure that the toner cartridge is inserted properly. (See "Replacing the Toner Cartridge.") |
Adjusting gradation... Wait a moment.
Cause | The machine is performing automatic adjustment. |
Remedy | Wait a few moments. When the adjustment is complete, printing will automatically resume. |
Preparing for color printing. Please wait.
Cause | The machine is performing an automatic adjustment. |
Remedy | Please wait for a moment. Color printing resumes automatically when the adjustment is finished. |
Performing multiple jobs...
Cause | Multiple jobs such as print jobs or scan jobs are being executed while performing the scan operation. |
Remedy | Wait a few moments for the machine to resume the scan operation. |
Check that covers are closed.
Cause | The cover of an optional equipment is open. |
Remedy 1 | Check whether the cover of the POD Deck Lite-C/Multi-drawer Paper Deck-C/POD Deck Lite XL-A is closed. |
Remedy 2 | Check whether the cover of the Document Insertion Unit-N/Paper Folding Unit-J/Multi Function Professional Puncher-B/Staple Finisher-W PRO/Booklet Finisher-W PRO/Staple Finisher-AC/Booklet Finisher-AC is closed. |
Load staples into the stapler unit.
Cause | There are no staples in the staple cartridge of the stapler unit in the Staple Finisher-W PRO/Booklet Finisher-W PRO/Staple Finisher-AC/Booklet Finisher-AC. |
Remedy | Replace the staple cartridge of the Staple Finisher-W PRO/Booklet Finisher-W PRO/Staple Finisher-AC/Booklet Finisher-AC. (See "Replacing the Staple Cartridge (For Optional Products).") |
Remove the paper from the output tray.
Cause 1 | Previous prints remain in the tray. |
Remedy | Remove the paper that remains in the tray. Printing will start or resume automatically. |
Cause 2 | The prints in the output destination of the external finisher are full. |
Remedy | Remove the prints from the output destination of the external finisher. Printing automatically resumes after removing the prints from the output tray. |
Remove the paper from the booklet tray.
Cause | Previous prints remain in the tray. |
Remedy | Remove the paper that remains in the booklet tray. Printing will start or resume automatically. |
Check punch waste tray.
Cause1 | The punch waste tray of the Staple Finisher-W PRO/Booklet Finisher-W PRO is full. |
Remedy | Empty the punch waste tray of the Staple Finisher-W PRO/Booklet Finisher-W PRO. (See "Removing Punch Waste (Puncher Unit-BT/Puncher Unit-BU).") |
Cause2 | The punch waste tray of the 2/4 Hole Puncher Unit-A/4 Hole Puncher Unit-A is full. |
Remedy | Empty the punch waste tray of the 2/4 Hole Puncher Unit-A/4 Hole Puncher Unit-A. (See "Removing Punch Waste (2/4 Hole Puncher Unit-A/4 Hole Puncher Unit-A).") |
Load staples into the saddle stitch unit.
Cause | There are no staples in the staple cartridge of the Booklet Finisher-W PRO or Booklet Finisher-AC. |
Remedy | Replace the staple cartridge of the Booklet Finisher-W PRO or Booklet Finisher-AC. (See "Replacing the Staple Cartridge (For Optional Products).") |
Empty the trim waste tray.
Cause | The trim waste tray of the Booklet Trimmer-F/Booklet Trimmer-F and Two-Knife Booklet Trimmer-A is full. |
Remedy | Empty the trim waste tray of the Booklet Trimmer-F/Booklet Trimmer-F and Two-Knife Booklet Trimmer-A. For more information, see the instruction manual for the Booklet Trimmer-F and Two-Knife Booklet Trimmer-A. |
Remove the paper from the stack area of the trimmer.
Cause | Output from a previous job remains in the output tray of the Booklet Trimmer-F/Booklet Trimmer-F and Two-Knife Booklet Trimmer-A. |
Remedy | Remove the paper in the output tray of the Booklet Trimmer-F/Booklet Trimmer-F and Two-Knife Booklet Trimmer-A. For more information, see the instruction manual for the Booklet Trimmer-F or Two-Knife Booklet Trimmer-A. |
Insert the trim waste tray.
Cause | The trimm waste tray of the Booklet Trimmer-F/Booklet Trimmer-F and Two-Knife Booklet Trimmer-A is not inserted. |
Remedy | Insert the trimm waste tray of the Booklet Trimmer-F/Booklet Trimmer-F and Two-Knife Booklet Trimmer-A. For more information, see the instruction manual for the Booklet Trimmer-F or Two-Knife Booklet Trimmer-A. |
Check staple waste tray.
Cause | The staple waste tray of the Staple Finisher-W PRO or Booklet Finisher-W PRO stapler unit is full or almost full. |
Remedy | Empty the staple waste tray of the Staple Finisher-W PRO or Booklet Finisher-W PRO stapler unit. (See "Removing Staple Waste (Staple Finisher-W PRO/Booklet Finisher-W PRO).") |
 Check the trim waste tray of the perfect binder.
Cause | The trim waste tray of the Perfect Binder-E is full. |
Remedy | Remove the trim waste in the trim waste tray of the Perfect Binder-E. For more information, see the instruction manual for the Perfect Binder-E. |
Insert the trim waste tray of the perfect binder.
Cause | The trim waste tray of the Perfect Binder-E is not inserted. |
Remedy | Insert the trim waste tray of the Perfect Binder-E. For more information, see the instruction manual for the Perfect Binder-E. |
Add glue to the perfect binder.
Cause | There is no glue in the Perfect Binder-E. |
Remedy | Add glue to the Perfect Binder-E. For more information, see the instruction manual for the Perfect Binder-E. |
Remove paper from the stacker of the perfect binder.
Cause | Output from a previous job remains in the stacker of the Perfect Binder-E. |
Remedy | Remove the paper in the stacker of the Perfect Binder-E. For more information, see the instruction manual for the Perfect Binder-E. |
Insert the drawer (stack area) of the perfect binder.
Cause | The stacker of the Perfect Binder-E is not inserted. |
Remedy | Insert the stacker of the Perfect Binder-E. For more information, see the instruction manual for the Perfect Binder-E. |
The front covers of the perfect binder are open.
Cause | The front covers of the Perfect Binder-E are open. |
Remedy | Check that the covers of the Perfect Binder-E are closed. For more information, see the instruction manual for the Perfect Binder-E. |
The top cover of the perfect binder is open.
Cause | The top cover of the Perfect Binder-E is open. |
Remedy | Check that the top cover of the Perfect Binder-E is closed. For more information, see the instruction manual for the Perfect Binder-E. |
Printing was canceled because the horizontal length of the cover for Perfect Binding is too long. Check the spine width and finishing size, then shorten the horizontal length.
Cause 1 | The trimming width of the fore edge is over 49.5 mm when you trim with the Perfect Binding mode. 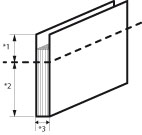 *1 Trimming width (Less than 49.5 mm) *2 Finishing size *3 Thickness of the main document |
Remedy 1 | Change the paper for cover with shorter length in order to set the trimming width less than 49.5 mm. Measure the thickness of the main document in advance, apply to the following formulas and judge. (Length of the paper for the cover* - Thickness of the main document) / 2 - Length of the Finishing Size* ≤ 49.5 mm * Horizontal length to the feeding direction. |
Remedy 2 | Basically, Remedy 1 is priority. However, if you have is no cover paper of other size, change the thickness of the main document to change the trimming width less than 49.5 mm Change the paper for the main document into thick ones. Add the number of the page of main document. However, if the thickness of the main document exceeds 25 mm, since another error occurs, cautions are required. |
Cause 2 | The width of the booklet is over 221 mm when you trim without the Perfect Binding mode. 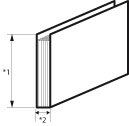 *1 Booklet width upper limit: 221 mm *2 Thickness of the main document |
Remedy 1 | Change the paper for cover page with shorter length in order to set the booklet width less than 221 mm. Measure the thickness of the main document in advance, apply to the following formulas and judge. (Length of the paper for the cover* - Thickness of the main document) / 2 ≤ 221 mm * Horizontal length to the feeding direction |
Remedy 2 | Basically, Remedy 1 is priority. However, if you have no cover paper of other size, change the thickness of the main document to change the trimming width less than 221 mm. Change the paper for the main document into thick ones. Increase the number of the page of the main document. However, if the thickness of the main document exceeds 25 mm, since another error occurs, cautions are required. |
Printing was canceled because the volume of the content pages exceeds the limit. Reduce the number of content pages to print, or change to thinner paper, then try again.
Cause | The thickness of the main document is over 25 mm. |
Remedy | Follow the solutions below to change the thickness of the main document less than 25 mm. Change the paper for the main document into thin ones. Reduce the number of the page of the main document. Before performing perfect bookbinding, we recommend you to check the curl state of a paper. You need to print out the main document and a cover to the finisher or stacker, and check that curl is within the specified value. |
Booklet was canceled because paper jammed. This operation may be possible if you perform Curl Correction.
Cause | Since the paper of the printed main document or a cover had curled more than specified value, perfect binding could not be performed. The specified value are as follows: 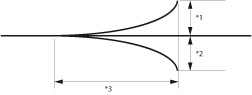 *1 Height of curl: Less than +3 mm *2 Height of curl: Less than -3 mm *3 Length of curl: More than 15 mm |
Remedy | Adjust the curl correction level of currently using paper source (See "Krølningskorrektion for hver papirkilde."), or change the level of curl correction of currently using paper type. (See "Justering af niveauet for krølningskorrektion.") If the curl cannot be corrected within the specified range by following the adjustment above, load other paper type into the paper source. Before performing perfect bookbinding, we recommend you to check the curl state of a paper. You need to print out the main document and a cover to the finisher or stacker, and check that curl is within the specified value. |
Remove the paper from the stack area of the stacker.
Cause | Prints remain in the tray. |
Remedy | Remove the prints remaining in the output tray. Printing automatically resumes. |
The right cover on the front of the stacker is open.
Cause | The right cover on the front side of the High Capacity Stacker-H is open. |
Remedy | Close the right cover on the front side of the High Capacity Stacker-H. For more information, see the instruction manual for the High Capacity Stacker-H. |
The left cover on the front side of the stacker is open.
Cause | The left cover on the front side of the High Capacity Stacker-H is open. |
Remedy | Close the left cover on the front side of the High Capacity Stacker-H. For more information, see the instruction manual for the High Capacity Stacker-H. |
The top cover of the stacker is open.
Cause | The top cover of the High Capacity Stacker-H is open. |
Remedy | Close top cover of the High Capacity Stacker-H. For more information, see the instruction manual for the High Capacity Stacker-H. |
An error occurred in the external finisher.
Cause | A paper jam or other error has occurred in the external finisher. |
Remedy | See the instruction manual for the external finisher. Remove the prints when a paper jam occurs. If the message appears on the display, you cannot submit a job which requires the external finisher. |
Check the finisher.
Cause | Processing a job was stopped due to a problem with the external finisher. |
Remedy | Check the external finisher. For more information, see the instruction manual for the external finisher. If the message appears on the display, you cannot submit a job. |
The Dept. ID or PIN is incorrect.
Cause | The entered Department ID or PIN is incorrect. |
Remedy | Contact the System Manager for the department to find out the Department ID/PIN. |
The hard disk needs to be replaced. (Call service rep.)
Cause | The hard disk is damaged or is not attached. |
Remedy 1 | Contact your local authorized Canon dealer. |
Remedy 2 | If the REMOVABLE HDD KIT is attached, check the hard disk. |
Waste toner is near full. Replacement not yet needed.
Cause | The waste toner will be full soon. |
Remedy | Prepare the waste toner container for replacement. |
Replace the waste toner container.
Cause | Printing will not possible soon because the waste toner container is full. |
Remedy | Replace the waste toner container. (See "Replacing the Waste Toner Container.") |
The puncher unit die needs to be lubricated. Follow the instructions in the manual to lubricate the die, then remove the warning about lubrication.
Cause | The Multi Function Professional Puncher-B die needs to be lubricated. |
Remedy | Follow the instruction manual for the Multi Function Professional Puncher-B to lubricate the die, and then press [Remove Warning] to remove the warning about lubrication. |