
Registering Buttons on the Quick Menu
You can register Personal buttons for your own use, or Shared buttons that can be shared with all users on the Quick Menu.
|
To register a Personal button, you need to log in with personal authentication management. Configuring the Personal Authentication Management Settings If you select <Device Login Authentication Information> for <Information Used for File TX/Browsing Authentication>, a password for a file destination is not stored in a personal button or a shared button in the Quick Menu. <Information Used for File TX/Browsing Authentication> Settings that can be registered in the Quick Menu buttonsFunctions and settings that can be registered in the Quick Menu buttons are as follows. Settings that can be registered in <Favorite Settings> for the <Copy> function Reducing Copying Operations <Fax> function settings of the machine Basic Operations for Sending Faxes Settings that can be registered in <Favorite Settings> for the <Scan and Send> function Useful Scanning Functions Settings that can be registered in <Favorite Settings> for the <Scan and Store> function Setting Screen and Operations for Scanning to Save Save locations for the <Scan and Store> and <Access Stored Files> functions Using Storage Space Shortcuts to the Basic Features screen for the <Print>, <Scanner>, <Fax/I-Fax Inbox>, and <Mobile Portal> functions Access to a server and the login password can be registered to the Quick Menu. This is convenient for skipping password entry when recalling the registered button. If you want to set password in the settings stored in the registered button, as you often import settings in a Personal button or Shared button to another machine and you want to prevent users from pretending to be other users, exclude a password when registering. Importing/exporting the registered buttonsYou can import and export the registered Personal/Shared buttons from the Remote UI. Importing/Exporting All Settings |
Example: Registering copy function
1
Press <Copy>  specify the copy settings. <Main Menu> Screen
2
Press  <Register to Quick Menu> when the setting is complete.

3
Confirm the settings and press <Next>.

4
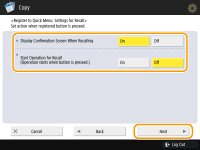
Specify the action that is performed when the registered button is pressed, and press <Next>.
The setting described below results in a different operation immediately after pressing the button on the Quick Menu. For more information, see Using the Quick Menu.
If you select <On> for <Display Confirmation Screen When Recalling>, the confirmation screen below is displayed when you press the button on the Quick Menu. Select <Off> if you do not want to display the confirmation screen.

If you select <On> for <Start Operation for Recall (Operation starts when button is pressed.)>, copying starts when you press the button on the Quick Menu without pressing  (Start). Select <Off> if you want to start copying manually by pressing (Start).
(Start). Select <Off> if you want to start copying manually by pressing (Start).If you select <On> for both <Display Confirmation Screen When Recalling> and <Start Operation for Recall (Operation starts when button is pressed.)>, copying starts after you select <Yes> on the confirmation screen.
5
Press <Personal> or <Shared>.
.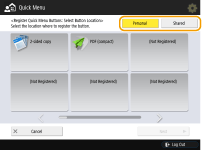
Select <Personal> to register the button for your own use and select <Shared> to register it as a shared button for all users.
If the administrator restricts the use of Personal buttons and Shared buttons, they cannot be registered. Restricting Usage of the Quick Menu
6
Select the display position of a button and press <Next>.
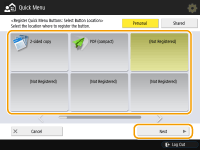
You can select a button that has already been registered and overwrite it with a new button.
7
Enter the button name and a comment, and press <OK>.
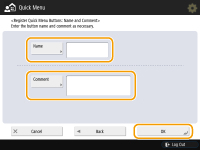
Press <Name> or <Comment> to enter. As both inputs are displayed on a button on the Quick Menu, it is convenient if you enter a setting name in <Name> and a memo in <Comment>.
8
Press <Close>.
Using the Quick Menu
The procedure for using buttons on the Quick Menu vary depending the registered function and settings.
|
If you are not logged in with personal authentication management, the login screen is displayed when you press <Personal>. Logging into the Machine The destinations registered in the one-touch buttons on the Quick Menu of the client machine are not updated even if those registered in the one-touch buttons of a server machine are updated. Confirm if the destination is updated when you cannot send to the registered destinations. |
1
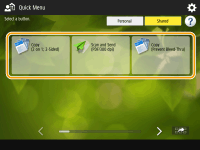
Press  to display the Quick Menu, and press <Personal> or <Shared>.
to display the Quick Menu, and press <Personal> or <Shared>.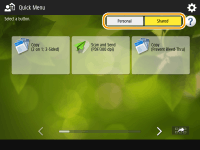
Each icon indicates the function type as shown below.
 <Copy>
 <Fax>
<Fax> <Scan and Send>
 <Scan and Store>
 <Access Stored Files>
 <Print>
 <Scanner>
 <Fax/I-Fax Inbox>
 <Mobile Portal>
If <12 small buttons per page; 5 pages> is selected (Editing the Quick Menu), the comments entered for the buttons are not shown.
2
Press the button you want to use.
 When <Display Confirmation Screen When Recalling> is set to <On>
A confirmation screen asking whether to recall the settings is displayed.
If <Start Operation for Recall (Operation starts when button is pressed.)> is set to <On>, operations registered in the button start when you press <Yes>.
If <Start Operation for Recall (Operation starts when button is pressed.)> is set to <Off>, the setting screen is displayed when you press <Yes>. This enables you to change the settings before pressing (Start) to start.
(Start) to start.When <Display Confirmation Screen When Recalling> is set to <Off>
If <Start Operation for Recall (Operation starts when button is pressed.)> is set to <On>, operations registered in the button start immediately.
If <Start Operation for Recall (Operation starts when button is pressed.)> is set to <Off>, the setting screen is displayed. This enables you to change the settings before pressing (Start) to start.
(Start) to start.When you select <Scan and Store> function button
The folder specified as the save location for the scanned documents is displayed. Scan the documents you want to save.
Using as a Simple File Server
Working with Other Devices
Making Simple Edits to Files
Using as a Simple File Server
Working with Other Devices
Making Simple Edits to Files
When you select <Access Stored Files> function button
The specified save folder is displayed. Select a file in the folder for sending or printing.
Using as a Simple File Server
Working with Other Devices
Making Simple Edits to Files
Using as a Simple File Server
Working with Other Devices
Making Simple Edits to Files
When you select the <Print>, <Scanner>, <Fax/I-Fax Inbox>, or <Mobile Portal> function button
The registered settings screen is displayed. Proceed with the operation that you want to perform.
Advanced Functions for Printing
Using Your Computer to Scan (Remote Scan) (Windows)
Printing Documents in the Memory RX Inbox
Keeping Received Documents Private
Connecting with Mobile Devices
Advanced Functions for Printing
Using Your Computer to Scan (Remote Scan) (Windows)
Printing Documents in the Memory RX Inbox
Keeping Received Documents Private
Connecting with Mobile Devices