Superimposing Images
 | You can register images such as logos and decorated frames as image forms, and superimpose them on the output. This function enables you to print company logos on handouts for meetings or unify the design of business proposals by adding frames. |
 |
When setting <Superimpose Image> with the Cascade Copy mode* (8700 Series / 6700 Series / 4700 Series Only)You need to register the same name in both the machine and the cascade copy printer in advance. If the same image form with the same name is not registered in both machines, the job is canceled. If multiple image forms with the same name are registered in the cascade copy printer, a different image may be used for Superimpose Image. |
Registering Form Images
Register form images from the Settings/Registration. Prepare the original document with the form image.
1
Press  (Settings/Registration)
  <Function Settings>
  <Common>
  <Print Settings>
  <Register Form>
  <Register>.
 (Settings/Registration)
  <Function Settings>
  <Common>
  <Print Settings>
  <Register Form>
  <Register>.
2
Select the size of the original for the form image and press <Next>.
3
If the screen for selecting the combination type appears, select the combination type, and then press <Next>.
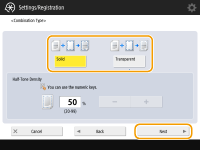
To superimpose the form image without adjusting the density, press <Solid>. To superimpose the form image with the density decreased, press <Transparent> and adjust the density.
4
Specify scan settings as necessary.
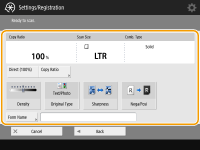 (Items shown on the screen may differ depending on your model and options.) |
For information on scan settings, see Basic Copy Operations, Enhancing and Adjusting Copy Quality.
Pressing <Form Name> enables you to set the name of the form image.

Even if you do not enter the form name, the saving date and time is automatically set as the form name. For example, if it is saved at 1:05:12 pm on October 30, 2015, the form name will be "20151030130512."
5
Place the original for the form image on the platen glass and press  (Start). Placing Documents
 (Start). Placing Documents
The form image is registered and displayed in the list.
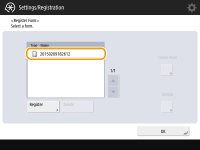
6
Press <OK>  <Close>.
 <Close>.
 |
To change the name of a form image already registered, select the form image from the list in step 5 and press <Details>  <Rename Form>. To delete a form image, select the form image from the list and press <Delete>. <Rename Form>. To delete a form image, select the form image from the list and press <Delete>.You can register up to 100 image forms. However, this number varies depending on the capacity of the storage device. |
Superimposing the Form Image
Superimpose the form image and the document to output.
1
Place the original. Placing Documents
2
Press <Copy>. <Home> Screen
3
Press <Options> on the Copy Basic Features screen. Copy Basic Features Screen
4
Press <Superimpose Image>.
5
Press <Set> in <Front Side>.

If you want to superimpose the form image on the back side when making a 2-sided copy, configure <Back Side>. To superimpose the same form image as the front side, press <Same as Front Side>. To super impose a form image different from the front side, press <Set> and proceed to step 5.
6
Select the form image to superimpose and press <OK> or <Next>.
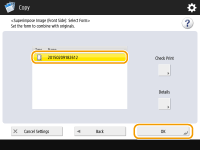

If you want to print a form image by itself to check the output, select the form image from the list and press <Check Print>. If you want to confirm the size of the form image and the overlap setting, press <Details>.
7
If the screen for selecting the combination type appears, select the combination type, and then press <OK>.
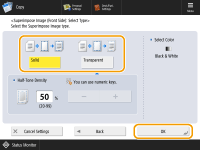
To superimpose the form image without adjusting the density, press <Solid>. To superimpose the form image with the density decreased, press <Transparent> and adjust the density.
8
Press <OK>  <Close>.
 <Close>.
9
Press  (Start).
 (Start).
Copying starts.
 |
If you changed the image position (Shifting the Image) or set to mirror the image (Mirroring Images (Mirror Image)), the settings are applied to both the form image and document. |