
Basic Paper Loading Method
This section describes the method for loading paper that is used relatively frequently such as plain paper or recycled paper. Load the paper you usually use into the paper drawer. Use the multi-purpose tray when you temporarily use a size or type of paper that is not loaded in the paper drawer.
|
For the optional Cassette Feeding Unit-AQ, follow the procedure of paper drawer to load paper. If there are instructions on the paper package about which side of the paper to load, follow those instructions. Paper may overlap when it is fed or a paper jam may occur, depending on the cut surface of the paper. Changing the paper orientation and loading it again may reduce the effect of the cut surface. If paper runs out and printing is stopped, load a new paper stack. Printing restarts after the new paper stack is loaded. |
Loading Paper in the Paper Drawer
|
You can load tab paper into the paper drawer. (Loading Tab Paper) |
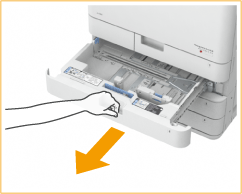
1
Hold the handle of the paper drawer and pull it out until it stops.

2
Adjust the position of the paper guides.
 | While pressing the top part of the left guide, slide it to align with the size indicator for the paper to be loaded. |
 | While pressing the top part of the front guide, slide it to align with the size indicator for the paper to be loaded.   |

Slide the guides until they click into place. If the left guide and front guide are not aligned correctly, the paper size will not correctly appear on the touch panel display. It is also necessary to adjust the guides correctly to avoid causing a paper jam, dirty prints, or making the inside of the machine dirty.

Paper size indicators
The abbreviations on the paper size indicators in the paper drawer indicate paper sizes as follows:
LGL: Legal
LTR: Letter
EXEC: Executive
STMT: Statement
Note that the paper size indicators may include paper sizes which are unavailable on the machine. For information on available paper sizes, see Available Paper.
3
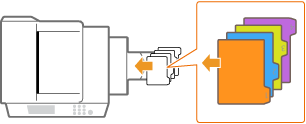
Prepare paper.
Fan the paper stack well, and tap it on a flat surface to align the edges.

Fan all four sides of the paper stack well.
Make sure that there is enough air between them.
4
Load the paper.
| Make sure that the paper size setting of the paper drawer matches the size of the paper to load in the paper drawer. |
| Load the paper stack with the print side face up, and against the side wall of the paper drawer.   |
Do not exceed the load limit line when loading paper
Make sure that the paper stack does not exceed the load limit line. Loading too much paper can cause paper jams.
Paper (excluding envelopes): |  |
Envelopes: |  |
If you use paper with a logo mark, pay attention to the orientation when loading it in the paper source. Loading Preprinted Paper
When placing envelopes, pay attention to the orientation and the preparations before placing envelopes. Loading Envelopes
For information on paper that can be loaded, see Available Paper.
5
Gently insert the paper drawer into the machine.
 |
When changing the paper size and typeIf you load a different type of paper into the machine, make sure to change the settings. If you do not change the settings, the machine cannot print properly. Specifying Paper Size and Type in the Paper Drawer When changing the paper size, change the paper size label as necessary (Attaching the appropriate paper size label). Note that the paper size label may include paper sizes which are unavailable on the machine. |
Loading Paper in the Multi-Purpose Tray
1
Open the multi-purpose tray.

Pull out the tray extension when loading large-sized paper.

2
Spread the paper guides apart.
Move the paper guides outward until they are slightly farther apart than the actual width of the paper.

3
Prepare paper.
Fan the paper stack well, and tap it on a flat surface to align the edges.
Fan all four sides of the paper stack well.
Make sure that there is enough air between them.
In particular, separate each sheet completely when using transparencies.
4
Insert the paper into the multi-purpose tray until the paper stops.
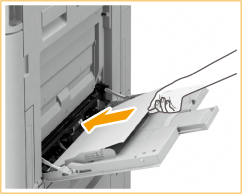
Load the paper with the print side face down.
Do not exceed the load limit line when loading paper
Make sure that the paper stack does not exceed the load limit line ( ). Loading too much paper can cause paper jams.
). Loading too much paper can cause paper jams.If you use envelopes or paper with a logo mark, pay attention to the orientation when loading them in the paper source.
Loading Envelopes
Loading Preprinted Paper
Loading Envelopes
Loading Preprinted Paper
The number of sheets that can be loaded at a time depends on the paper type. For details, see Available Paper.
When you load tab paper into the multi-purpose tray, load reverse order tab paper face down, with the tabs facing the opposite direction of the feeding direction.
5
Align the paper guides against the edges of the paper.
Move the paper guides inward until they are aligned securely against the edges of the paper.

6
Check the paper size and paper type, and press <OK>.
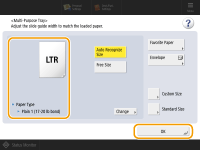
If you load free size paper, or if the displayed size or type is different from the actual paper that is loaded, see Specifying Paper Size and Type in the Multi-purpose Tray.
TIPS |
Printing on the back side of printed paper (2nd Side of 2-Sided Page) You can print on the back side of printed paper. Flatten any curls on the printed paper and insert it into the multi-purpose tray, with the side to print face down (previously printed side face up). Then press <2nd Side of 2-Sided Page> on the screen for selecting the paper type. Use only the paper printed with this machine. Loading Transparencies If a multiple sheet feed or paper jam occurs, load each sheet separately. If you leave transparencies loaded in the paper drawers or in the multi-purpose tray, the sheets may stick together and cause a multiple sheet feed or a paper jam. When printing is complete, return the remaining transparencies to their original package for storage, avoiding locations subject to high temperatures and humidity. |