Inserting Sheets and Chapter Pages (Insert Sheets)
 | You can insert sheets between content pages. For example, when you make a large amount of copies, you can easily check the number of output sheets by inserting colored paper every 50 pages. Inserted sheets can be used as chapter pages if you print on them. On models that support tab paper, you can also print on the header section of third-party tab paper and insert specified pages. |
 |
You can specify the range for the insert sheet from 1 to 30,000 pages. You can insert up to 100 insert sheets. |
Inserting Sheets
Specify the page to insert the sheets, set the number of the sheets, and select whether to print on the sheets.
 |
When inserting special types of paper such as heavy paper, make sure to set the paper size and the paper type properly before operation. Specifying Paper Size and Type |
1
Load paper used for sheets insertion. Loading Paper
2
Place the original. Placing Originals
3
Press <Copy>. <Home> Screen
4
Press <Options> on the Copy Basic Features screen. Copy Basic Features Screen
5
Press <Insert Sheets>.
6
Press <Sheets>  <Add>.
 <Add>.
7
Specify the page to insert the sheet.

Enter the page to insert the sheet using the numeric keys. For example, when copying 100 pages, if you want to insert the sheet after the 50th page, enter "51."
8
Specify detailed settings.
Press <Change> in <Select Paper> and select the paper to insert.
To insert two or more sheets, press <Number of Sheets to Insert> and enter the number of sheets using the numeric keys.
To print on the sheets, select <Print on Front Side>, <Print on Back Side>, or <Print on Both Sides> in <Print Settings>.
9
Press <OK>.
The screen returns to the screen in step 5 and the setting you specified is shown in the first line of the list.
 Inserting the sheet in another page
Select the second line onwards in the list, press <Add>, and repeat steps 6 to 8.
 Editing or deleting the sheet
Select the sheet from the list, press <Details/Edit> or <Delete>.
10
Press <OK> <Close>.
 <Close>.
11
Press  (Start).
 (Start).
Copying starts.
 |
If inserting the sheet only, it is not counted as a copy number. If you print on the sheet, it is counted as a copy number. Adding a chapter titleUsing the function to print on the sheet, you can insert chapter pages in essays, reports, etc. Include the original to be printed on the chapter page in the original document. If you do not copy anything on the back side of the chapter page and leave it blank, select <Chapter Pages> in step 5. You do not need to configure <Print Settings> because <Chapter Pages> is set to print only on one side by default. |
Inserting Tab Paper (C5800 Series Only)
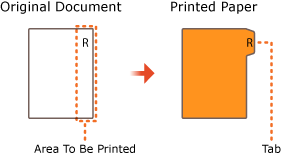
Specify the page to insert the tab paper, set the number of sheets, and select whether to print on the tab paper. If you want to print on the tab paper, include the original to be printed on the tab in the original document.
 |
If <Print on Both Sides> is selected for the front cover in the <Front Cover> and tab paper is set to insert in front of the first page, the front cover is output first, and then the tab paper is output. The front cover outputs as a blank paper and copies are made starting from the tab paper. If you select <Leave Blank> for sheet insertion, you can set a sheet and tab paper for the same page. In this case, the paper for the sheet insertion is output first, and then the tab paper is output. When you print on the tab, place the original as in the following illustration. Do not arrange unnecessary characters or images in the tab area.  |
1
Load tab paper.
2
Place the original. Placing Originals
3
Press <Copy>. <Home> Screen
4
Press <Options> on the Copy Basic Features screen. Copy Basic Features Screen
5
Press <Insert Sheets>.
6
Press <Tab>.
7
To print on the tab, set the printing position and press <OK>.
If you will not print on the tab, just press <OK> without setting anything.
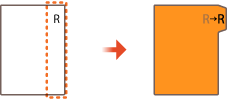
To print properly on the tab, the copy position needs to be shifted slightly as in the following illustration. Enter how far to shift.

8
Press <Add>.
9
Configure the settings for the tab paper.

Press <Tab Settings> to enter the number of sheets using the numeric keys.
Select the paper size in <Select Paper> to match the tab paper you loaded. To change the paper, press <Change>.
Press <Print Settings> to set whether to print on the tab.
10
Specify the page to insert the tab paper.
Press <Page No.> to enter the page to insert the tab paper using the numeric keys.
If you will not print on the tab and insert the tab paper before the fifth page, enter "5."
If you print on the tab and print the fifth page of the original on the tab, enter "5."
11
Press <OK>.
Returns to step 7. The setting you specified is shown in the first line of the list on the screen.
 Inserting the tab paper in another page
Select the second line onwards in the list, press <Add> and repeat steps 8 to 10.
 Editing or deleting tab paper
Select the tab paper from the list and press <Details/Edit> or <Delete>.
12
Press <OK>  <Close>.
 <Close>.
13
Press  (Start).
 (Start).
Copying starts.
TIPS |
Instead of inserting the tab paper when copying, you can print the tab paper by itself. Load the tab paper, place the original to be printed on the tab paper, and press <Print on Tab> in step 4. |