Using Memory Media
You can directly insert memory media to the machine and use it.
Memory media compliant with the USB 2.0 standard is supported. FAT32/exFAT format memory media is supported.
The following devices and usage methods are not supported.
Memory media compliant with the USB 2.0 standard is supported. FAT32/exFAT format memory media is supported.
The following devices and usage methods are not supported.
Memory media with security functions
Memory card readers connected via USB
USB extension cables or USB hubs
Preparing to Use Memory Media
When using memory media, perform the following preparations in advance.
Displaying the Memory Media as a Store Location
 (Settings/Register)
  <Preferences>
  <Display Settings>
  <Store Location Display Settings>
  <Memory Media>
  <On>
<On>Enabling Memory Media for Scanning/Printing
When Using the Scan Function
 (Settings/Register)
  <Function Settings>
  <Store/Access Files>
  <Memory Media Settings>
  <Use Scan/Print Function>
  <Use Scan Function>
  <On>
<On>When Using the Print Function
 (Settings/Register)
  <Function Settings>
  <Store/Access Files>
  <Memory Media Settings>
  <Use Scan/Print Function>
  <Use Print Function>
  <On>
<On>If memory media is not recognized although it is connected correctly, set <Use AddOn Driver for USB Storage Device> to <Off>. <Use AddOn Driver for USB Storage Device>
 |
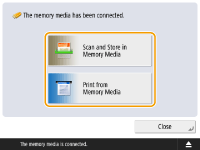
Displaying a shortcut to available functions when memory media Is InsertedSet <Select Option When Connecting Memory Media> to <On>. When memory media is inserted, a screen such as the following is displayed and the corresponding functions can be immediately executed. <Select Option When Connecting Memory Media>  *To display the shortcuts, insert the memory media after canceling the sleep mode. Exiting Sleep Mode |
Inserting/Removing Memory Media
Inserting memory media incorrectly or in the wrong direction may cause problems with the machine or the memory media.
Inserting Memory Media
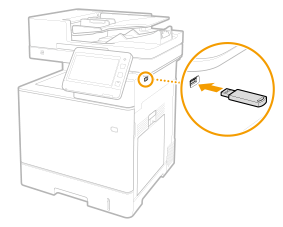
Insert the USB memory into the USB port on the right side of the machine with the correct orientation.

Removing Memory Media
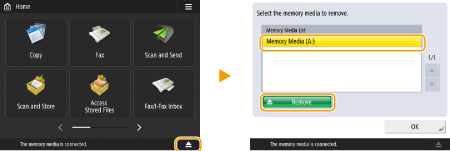
1 | Press  , select the memory media to remove, and press <Remove>. , select the memory media to remove, and press <Remove>. |
2 | When the message <Ready to safely remove the memory media.> is displayed, remove the memory media. |
Scanning Documents and Saving to Memory Media
1
Insert the memory media into the USB port of the machine. Inserting/Removing Memory Media
2
Place the original. Placing Originals
3
Press <Scan and Store>  <Memory Media>.
 <Memory Media>.
The connected memory media is displayed.
4
Select the memory media.
To go back up one folder level, press <Up>.
You can press <Check Media Information>  <Details> to check the information for the memory media.
 <Details> to check the information for the memory media.
5
Display the folder to save to, and press <Scan>.
The settings screen for scanning is displayed.
You can press <Name> or <Date/Time> to sort the display.
In <Folder Operations>, you can check the information of a folder, rename a folder, create a new folder, or delete a folder.
Press  to refresh the display.
6
Configure the scan settings.
Specify the file name and file format, and configure the scan settings as required. Scan Settings Screen in <Scan and Store>
7
Press  (Start) to start scanning and save the file.
 (Start) to start scanning and save the file.
The scanning screen is displayed. When saving is complete, the connection destination selected in step 5 is displayed.
To cancel scanning, press <Cancel> or  (Stop).
 (Stop).
If you have another original to scan, place the original and repeat the procedure in step 7.
 If <Start Storing> is displayed
When all of the originals have been scanned, press <Start Storing> to save the file.
The store location selected in step 5 is displayed.
8
Confirm that the file has been saved.
If you did not specify a file name in step 6, the date and time that the file was saved is used as the file name.
You can press <Display Image> to check the content of the file.
You can press <Status Monitor>  <Store>
  <Job Log> to check whether the file has been saved correctly. If <NG> is displayed, the file has not been saved correctly. Repeat step 7.
 <Store>
  <Job Log> to check whether the file has been saved correctly. If <NG> is displayed, the file has not been saved correctly. Repeat step 7.
9
Correctly remove the memory media. Inserting/Removing Memory Media
Incorrectly removing the memory media may cause problems with the machine or the memory media.
Printing Files on Memory Media
1
Insert the memory media into the USB port of the machine. Inserting/Removing Memory Media
2
Press <Access Stored Files>  <Memory Media>.
 <Memory Media>.
 The connected memory media is displayed.
3
Select the memory media.
To go back up one folder level, press <Up>.
You can press <Check Media Information>  <Details> to check the information for the memory media.
 <Details> to check the information for the memory media.
4
Select the file to print, and press <Print>.
You can select up to six files in the same folder to print together. The files are printed in the selected order.
You can deselect a file by selecting the file again. To deselect all files, press <Clear Selection>.
Press <Search> to search for files and folders in the folder that is currently displayed. To not include subfolders when searching, select <Do Not Include Subfolders>.
You can press <Display Image> to check the content of the file.
Press  to refresh the display.
In <Edit File>, you can check the information of a file, rename a file, or delete a file.
5
If the <Select Paper> screen is displayed, select the paper to use.
If not, proceed to the next step.
6
Enter the number of copies to make using the numeric keys.
If multiple files are selected, <Change No. of Copies> is displayed. Press this button when changing the number of copies.
7
Configure the print settings.
Configure the two-sided printing, finishing settings, and other print settings as required.
You cannot print multiple PDF files with different passwords simultaneously.
To print a PDF file with a password, press <Options>  <Password to Open Doc.>
  <Encryption Password>, and enter the password.
 <Password to Open Doc.>
  <Encryption Password>, and enter the password.
To print a PDF file linked with a policy server, press <Options>  <Password to Open Doc.>
  <Policy Password>, and enter the user name and password. Print Settings Screen in <Access Stored Files>
 <Password to Open Doc.>
  <Policy Password>, and enter the user name and password. Print Settings Screen in <Access Stored Files>
8
Press <Start Printing>.
The printing screen is displayed. When printing is complete, the file selection screen in step 4 is displayed.
If the password entry screen is displayed, enter the password set in the PDF file.
To cancel printing, press <Cancel>.
9
Correctly remove the memory media. Inserting/Removing Memory Media
Incorrectly removing the memory media may cause problems with the machine or the memory media.