
Adjusting Gradation
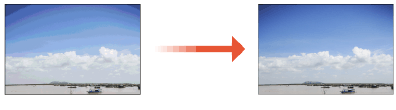
Gradation refers to the dark to light continuum of shades of a color. The more shades in the gradations of colors that are printed, the more natural printouts seem. If color reproducibility becomes poor and the density and brightness of printouts differs markedly from the originals, perform the appropriate auto adjustment. There are two options of gradation adjustment: "Full Adjust" for accurate adjustment, "Quick Adjust" for simple adjustment.
|
The machine performs automatic adjustment (automatic calibration) in accordance with changes in the usage condition or environmental conditions. A certain amount of toner in toner cartridges is used when calibration is performed, whether it is initiated automatically or manually. Frequent calibration may affect the lifetime of toner cartridges. When the remaining amount of toner in cartridges is low, performing calibration may result in disruption of color balance. If this phenomenon actually occurs after calibration, it is recommended that you replace any toner cartridges of low remaining amount. Checking the Remaining Amount of Consumables |
Full Adjust
This adjustment optimizes reproducibility for color printing. When the machine performs full adjustment, it obtains information to optimize color reproducibility. The machine maintains this information until the next time you perform full adjustment. To make a full adjustment, repeat the operation, "print out the adjustment image and scan it," multiple times. Note that you cannot perform this adjustment while performing some functions, including, scanning, and printing.
 |
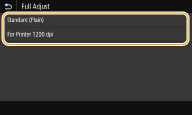
If the printed color tones are different from the color tones of the print dataDepending on the paper to use for printing and the print settings, perform correction as follows. To print on plain paper, perform correction with <Standard (Plain)>*. To print on plain paper using the Superfine function, first perform correction with <Standard (Plain)>* and then with <For Printer 1200 dpi>*. * Perform correction using plain paper. |
1
Select <Menu> in the Home screen. Home Screen
2
Select <Adjustment/Maintenance>  <Adjust Image Quality> <Auto Adjust Gradation>.
3
Select <Full Adjust>.
4
Select the item to adjust.
5
Check that the size and type of paper displayed on the screen is loaded in the machine, and select <OK>.
6
Confirm the procedure, and select <Start>.
An adjustment image is printed.

Print and scan the adjustment image 3 times if <Standard (Plain)> has been selected in step 4, or 2 times if <For Printer 1200 dpi> has been selected.
7
Open the feeder or the platen cover after the screen displayed during printing disappears.
8
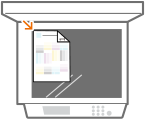
Place the adjustment image on the platen glass.
Align the top edge with the numbered black bar on the adjustment image with the back edge of the platen glass and place the adjustment image with the print image facing down.
9
Gently close the feeder or the platen cover.
10
Select <Start Scanning>.
The placed adjustment image is scanned, and then the second adjustment image is printed.
11
Open the feeder or the platen cover, remove the first adjustment image, and then place the second adjustment image on the platen glass.
In the same way as for the first adjustment image, place the adjustment image with the print side facing down while checking that the black stripe is placed on the back side of the machine.
12
Gently close the feeder or the platen cover.
13
Select <Start Scanning>.
When <Standard (Plain)> is selected in step 4, the third adjustment image is printed after the placed adjustment image is scanned.
When <For Printer 1200 dpi> is selected in step 4, the adjustment is executed after it is scanned. Proceed to step 17.
14
Open the feeder or the platen cover, remove the second adjustment image, and then place the third adjustment image on the platen glass.
In the same way as for the first adjustment image, place the adjustment image with the print side facing down while checking that the black stripe is placed on the back side of the machine.
15
Gently close the feeder or the platen cover.
16
Select <Start Scanning>.
The adjustment image is scanned and adjustment starts.
17
When a message appears notifying that adjustment is complete, open the feeder or the platen cover, and remove the adjustment image.
18
Gently close the feeder or the platen cover.
|
If the <Could not perform correction.> message is displayedDid you load the paper displayed in step 5 into the paper source? Did you place the adjustment image with the print side face down, with the black stripe toward the back side of the machine? Has a paper jam occurred? Clearing Paper Jams Is the amount remaining in toner cartridge required for correction sufficient? If the amount remaining in a toner cartridge is low, it is recommended that you replace toner cartridges. Checking the Remaining Amount of Consumables |
Quick Adjust
This adjustment maintains the optimized status that was acquired by <Full Adjust>. If the result of this adjustment is not satisfactory, perform <Full Adjust>. This adjustment may be automatically performed after you replace a toner cartridge.
|
Quick adjustment is not available while scanning or printing is performed. |
1
Select <Menu> in the Home screen. Home Screen
2
Select <Adjustment/Maintenance> <Adjust Image Quality> <Auto Adjust Gradation>.
3
Select <Quick Adjust>.
4
Select <Start>.
The adjustment starts.