Specifying E-Mail Settings
 | When attaching scanned originals to an e-mail, you can specify the subject, message, reply-to address, and priority for the e-mail before sending it. |
1
Place the original(s). Placing Originals
2
Select <Scan> in the Home screen. Home Screen
When the login screen appears, enter your user name and password and set up the authentication server. Logging in to Authorized Send.
3
Select <E-Mail> in the Scan Basic Features screen. Scan Basic Features Screen
4
Specify a destination, and configure the scan settings as necessary. Basic Operations for Scanning Originals
5
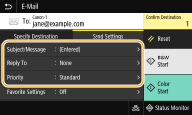
Specify the subject, message, reply-to address, and priority for the e-mail.

 To specify subject/message
1 | Select <Subject/Message> in the <Send Settings> tab. |
2 | Select <Subject>. |
3 | Enter the subject, and select <Apply>. On how to enter text, see Entering Text. |
4 | Select <Message>. |
5 | Enter the message, and select <Apply>. |
6 | Select <Apply>. |
 To specify reply-to address
Specify the reply-to address when you want to notify the recipient of an e-mail address different from that of the machine as the reply-to address. Select the target reply-to address from the destinations registered in the Address Book, and specify it. If the destination has not been registered in the Address Book, see Registering Destinations.
1 | Select <Reply To> in the <Send Settings> tab. |
2 | Select <Specify from Address Book>. |
3 | Select the check box for the desired reply-to address, and select <Apply>. |
 To specify priority
1 | Select <Priority> in the <Send Settings> tab. |
2 | Select a priority level. |
6
Select <Start>.
If the <Confirm Destination> screen is displayed, check whether the destination is correct, and then select <Start Scanning>.
Scanning of the original starts.
If you want to cancel, select <Cancel>  <Yes>. Canceling Sending Documents
 <Yes>. Canceling Sending Documents
 When placing originals in the feeder in step 1
When scanning is complete, the e-mails are sent. Select <Close> to end the procedure.
 When placing originals on the platen glass in step 1
When scanning is complete, follow the procedures below (except if you selected JPEG as a file format).
1 | If there are additional pages of originals to be scanned, place the next original on the platen glass, and select <Scan Next>. Repeat this step until you finish scanning all of the pages. When there is only one page to be scanned, proceed to the next step. When you scan originals of different paper sizes, a portion of the scanned image may be cut off or the saved image may be smaller. |
2 | Select <Start Sending>. The e-mails are sent. |
3 | Select <Close> to end the procedure. |

If the <SMTP Authentication> screen is displayed
Enter the user name and password, and select <Apply>.
Checking the communication status
If <Display Notification When Job Is Accepted> is set to <On>, a screen prompting you to check the communication status is displayed. If you select <Status Monitor>, you can confirm the send job status. <Display Notification When Job Is Accepted>
 |
If you always want to scan with the same settings: Changing the Default Settings for Functions If you want to register a combination of settings to use when needed: Registering Frequently Used Settings If you want to specify the e-mail sender name: <Register Unit Name> |