Managing Destinations
The destinations handled with Address Book Management are managed in the destination list.
Add the destinations registered to the destination list to the address lists and one-touches to distribute to the printers.
The destinations registered to this software can be checked in the destination list.
IMPORTANT |
If destinations in the destination list are edited, the changes are also reflected to the destinations in the address lists and one-touches that include those destinations. If destinations in the destination list are deleted, they are also deleted from the address lists and one-touches that include those destinations. |
Displaying the Destination List
1.
Select the [Data Management] menu > [Address Books].
2.
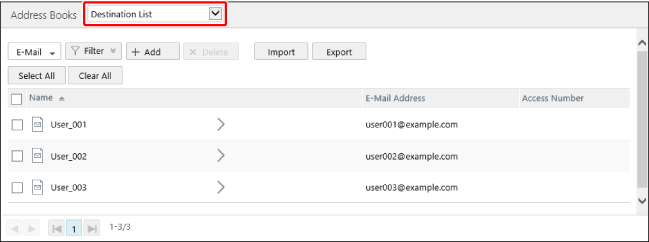
Select [Destination List] from the drop-down list on the top of the [Address Books] page.

Adding Destinations
This section describes the method for adding destinations to a destination list.
NOTE |
Destinations can also be imported from a file. For details, see the following. In order to distribute destinations in address books backed up to this software from printers, it is necessary to export the backed up address books to a file, and then import them to [Destination List]. |
1.
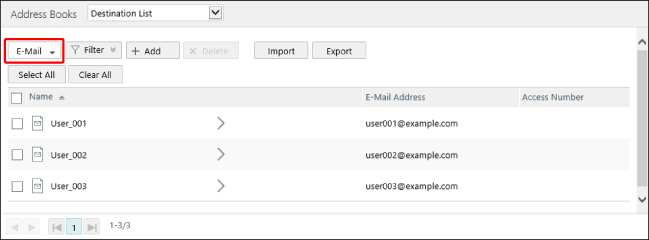
Select the type of destination to create from the drop-down list on the top of the destination list.

NOTE |
For an IP fax destination, select [Fax]. |
2.
Click [Create].
3.
Enter the destination information.
Items with [ ] displayed must be entered.
 ] displayed must be entered.
IMPORTANT |
The number of characters for each item displayed on the screen indicates the maximum number of characters that can be registered to this software. However, depending on the item, the maximum number of characters that can be registered to a printer may be less than the maximum number of characters that can be registered to this software, or some characters may not be able to be registered. Some items may not be able to be registered, depending on the type of printer. Enter the items according to the specifications of the printer. For details, see the following. |
When [Destination Type] is [E-Mail]
[Name] | Enter the destination name. |
[Furigana] | Not used. |
[E-Mail Address] | Enter the e-mail address. |
[Divide Data] | Select the sending method to use when the data size exceeds the limit. Select [On] to divide the data when sending. Select [Off] when the destination does not have a function for combining the divided data. Set the upper limit on the printer. |
[Access Number] | Enter an arbitrary number from 1 to 9999999. Leave this blank to not use an access number. For details on access numbers, see the instruction manuals of the printer. |
Enter the following items for destinations to distribute to Type I printers.
[Divide Data]
[Access Number]
When [Destination Type] is [Fax]
[Name] | Enter the destination name. |
[Furigana] | Not used. |
[Fax Number/URI] | For an intranet IP fax destination, select [URI]. Otherwise, select [Fax Number]. |
[Fax Number] | Enter the fax number. If you selected [Fax Number] in [Fax Number/URI], make sure to enter this. |
[URI] | Enter the URI. If you selected [URI] in [Fax Number/URI], make sure to enter this. |
[Subaddress] | Enter the subaddress. |
[Password] | Enter the password. |
[Communication Mode] | Select the communication mode. The following communication modes are not used. G3, G4 IP Fax (NGN) IP Fax (NGN My Number) |
[ECM TX] | Enable/disable ECM transmission. |
[Sending Speed] | Select the transmission speed. |
[Long Distance] | Select the type of international transmission. |
[Select Line Type] | Select the line to use. The following line types are not used. Logical Line 1 Logical Line 2 Logical Line 3 Logical Line 4 |
[Access Number] | Enter an arbitrary number from 1 to 9999999. Leave this blank to not use an access number. For details on access numbers, see the instruction manuals of the printer. |
Select [Fax Number] in [Fax Number/URI] for destinations to distribute to printers other than Type I printers.
Enter the following items for destinations to distribute to Type I printers.
[URI]
[Subaddress]
[Password]
[Communication Mode]
[Select Line Type]
[Access Number]
When [Destination Type] is [File]
[Name] | Enter the destination name. |
[Furigana] | Not used. |
[Protocol] | Select the protocol. |
[Host Name] | Enter the host name. |
[Folder Path] | Enter the path to the folder. If you selected [NetWare (IPX)] in [Protocol], make sure to enter this. |
[User Name] | Enter the user name. If you selected [FTP] or [NetWare (IPX)] in [Protocol], make sure to enter this. |
[Confirm Before Sending] | Select whether to require a password to be entered each time transmission is performed. Leave [Password] blank to enter the password each time. |
[Password] | Enter the password. |
[Access Number] | Enter an arbitrary number from 1 to 9999999. Leave this blank to not use an access number. For details on access numbers, see the instruction manuals of the printer. |
Enter the following items for destinations to distribute to Type I printers.
[Confirm Before Sending]
[Access Number]
When [Destination Type] is [I-Fax]
[Name] | Enter the destination name. |
[Furigana] | Not used. |
[I-Fax Address] | Enter the I-fax address. |
[Mode] | Select the mode. |
[Standard Field 1] | Enter the standard field. |
[Standard Field 2] | Enter the standard field. |
[Send via Server] | Select whether to send via a server. |
[Paper Size] | Select the paper size. |
[Compression Method] | Select the compression method. |
[Resolution] | Select the resolution. |
[Divide Data] | Select the sending method to use when the data size exceeds the limit. Select [On] to divide the data when sending. Select [Off] when the destination does not have a function for combining the divided data. Set the upper limit on the printer. |
[Receive in Color] | Set whether to send in color. Select [On] to send in color. Select [Off] when the destination does not have a function for receiving in color. |
[Paper Size] | Select the paper size. Set this when [Receive in Color] is enabled. |
[Resolution] | Select the resolution. Set this when [Receive in Color] is enabled. |
[Access Number] | Enter an arbitrary number from 1 to 9999999. Leave this blank to not use an access number. For details on access numbers, see the instruction manuals of the printer. |
Enter the following items for destinations to distribute to printers other than Type I printers.
[Name]
[I-Fax Address]
4.
Click [Add].
Editing Destinations
1.
Select the type of destination to edit from the drop-down list on the [Destination List] page.

2.
Click the destination to edit.
3.
Edit the destination.
For details, see the following.
4.
Click [Update].
Deleting Destinations
IMPORTANT |
If destinations registered in an address list or one-touch are deleted, they are also deleted from the address list and one-touch. |
1.
Select the type of destination to delete from the drop-down list on the [Destination List] page.
2.
Delete the destinations.
Select the destinations to delete.
Click [Delete].
NOTE |
The maximum number of destinations that can be deleted at once is 5,000. |