Replacing the Toner Cartridge
A warning message appears in the display when the amount remaining in the toner cartridge is low or when printing is no longer possible because of toner depletion. Note that the print quality may suffer if you continue printing without resolving this issue. You can check the amount remaining in the toner cartridges on the display (Checking the Remaining Amount of Consumables).
When a Message Appear
The message that is displayed depends on the amount remaining in the toner cartridges. Depending on which message is displayed, you will need to make sure that you have a replacement toner cartridge ready or replace the toner cartridge.
Before Replacing the Toner Cartridge
Procedure for Replacing the Toner Cartridge
Consumables
Before Replacing the Toner Cartridge
Procedure for Replacing the Toner Cartridge
Consumables
<Prepare cartridge.> 
This message notifies you that a toner cartridge needs to be replaced soon. Make sure that you have a replacement toner cartridge ready. Replace the toner cartridge if you see this message before you start to print a large job.

 When a message is displayed When printing, you can continue printing the original. If a message is displayed while an I-Fax document is being received, the machine does not perform printing so that unclear print is avoided. To continue printing even if the amount remaining in toner cartridge is running low, set <Continue Print. When Amount in Cart. Low> to <On>. <Continue Print. When Amount in Cart. Low> Specify when a message is displayed You can set any value as the percentage of the amount remaining in the toner cartridge that triggers a message. <Displ. Timing for Cartridge Prep. Notif.> |
<Low Cartridge Level>
This message notifies you that a toner cartridge needs to be replaced soon. Make sure that you have a replacement toner cartridge ready. Replace the toner cartridge if you see this message before you start to print a large job. This appears when <Action When Warning> is set to <Stop Printing> (<Action When Warning>).

<Display Recovery Steps>
Displays the procedure for replacing a toner cartridge. Follow the on-screen instructions to replace the toner cartridge.
Displays the procedure for replacing a toner cartridge. Follow the on-screen instructions to replace the toner cartridge.
<Continue Printing>
You can end a printing stoppage state and continue printing.
You can end a printing stoppage state and continue printing.
<Check Toner Cartridge Name>
You can check the toner cartridge name.
You can check the toner cartridge name.
 If a message is displayed while an I-Fax document is being received, the machine does not perform printing so that unclear print is avoided. Instead, the received data is stored in memory. To continue printing even if the amount remaining in toner cartridge is running low, set <Continue Print. When Amount in Cart. Low> to <On>. <Continue Print. When Amount in Cart. Low> |
 |
Specify when a message is displayedYou can set any value as the percentage of the amount remaining in the toner cartridge that triggers a message. <Displ. Timing for Cartridge Prep. Notif.> |
<Cart. end of lifetime. Rplcmt. recommended.> 
This message notifies you that a toner cartridge has reached the end of its lifetime. It is recommended that you replace the cartridge with a new one. You can continue printing, but the print quality cannot be guaranteed.

<Cannot print. A non-Canon or counterfeit cartridge may be in use.>
This message notifies you that the machine may not print in optimum quality. It is recommended that you replace this cartridge with a new one.

 |
When this message is displayed, you cannot continue printing. <Canon Genuine Mode> |
When Printouts are Poor in Quality
If your printouts begin to show any of the following features, one of your toner cartridges is consumed. Replace the nearly empty toner cartridge even if no message is displayed.
Before Replacing the Toner Cartridge
Procedure for Replacing the Toner Cartridge
Before Replacing the Toner Cartridge
Procedure for Replacing the Toner Cartridge
Streaks Appear/Printing is Uneven | Partially faded | Uneven density | White Spots Appear | |||
 |  |  |  |
Toner smudges and splatters appear | Blank space of originals becomes grayish in printouts | |||
 |  |
Before Replacing the Toner Cartridge
Perform the following before replacing the toner cartridge. The message may no longer appear, or print quality may be improved.
1
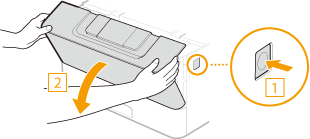
Open the front cover.
2
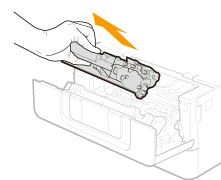
Remove the toner cartridge.
3
Shake the toner cartridge 5 or 6 times as shown below to evenly distribute the toner inside the cartridge.

4
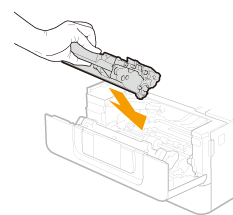
Install the toner cartridge.
Fully push it in until it cannot go any further.
5
Close the front cover.
Procedure for Replacing the Toner Cartridge
 |
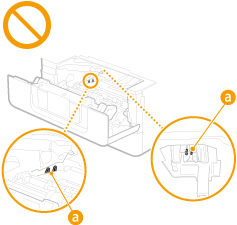
Do not touch the contacts ( |
 |
Be sure to hold the toner cartridge using the handle.  Do not touch the toner cartridge memory (  ) or the electrical contacts ( ) or the electrical contacts ( ). To avoid scratching the surface of the drum inside the machine or exposing it to light, do not open the drum protective shutter ( ). To avoid scratching the surface of the drum inside the machine or exposing it to light, do not open the drum protective shutter ( ). ). |
Read the precautions in "Important Safety Instructions" provided with this product before replacing the toner cartridges. Manuals and Their Contents
1
Open the front cover.

2
Remove the toner cartridge.

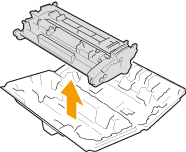
3
Remove the replacement toner cartridge from the protective case.
4
Shake the toner cartridge 5 or 6 times as shown below to evenly distribute the toner inside the cartridge.

5
Install the toner cartridge.
Fully push it in until it cannot go any further.

6
Close the front cover.
