Starting Remote UI
To operate remotely, you need to input the IP address of the machine into a Web browser and start the Remote UI. Check the IP address set to the machine in advance (Viewing Network Settings). If you have any questions, ask your Network Administrator.
1
Start the Web browser.
2
Enter "http://<the IP address of the machine>/" in the address field, and press the [ENTER] key.

If you want to use an IPv6 address, enclose the IPv6 address with brackets (example: http://[fe80::2e9e:fcff:fe4e:dbce]/).

If a security alert is displayed
A security alert may be displayed when the Remote UI communication is encrypted (Configuring the Key and Certificate for TLS). When certificate settings or TLS settings have no errors, continue browsing the Web site.
3
Log in to the Remote UI.
 When the Department ID Management is disabled
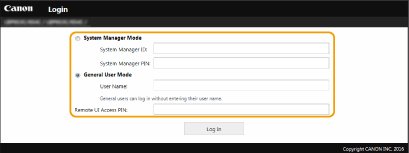
Select [System Manager Mode] or [General User Mode], and enter a value in [Remote UI Access PIN] as necessary.

[System Manager Mode]
You can perform all the Remote UI operations and settings. Enter the appropriate ID in [System Manager ID] and PIN in [System Manager PIN]. Setting the System Manager ID and PIN
You can perform all the Remote UI operations and settings. Enter the appropriate ID in [System Manager ID] and PIN in [System Manager PIN]. Setting the System Manager ID and PIN
[General User Mode]
You can check the status of documents or the machine, and you can also change some of the settings. When you want to check if a specific document of yours is in the print queue or cancel the printing of a document of yours in the print queue, enter the user name of the document in [User Name]. The user name is automatically set to print documents based on information such as your computer name or computer login name.
You can check the status of documents or the machine, and you can also change some of the settings. When you want to check if a specific document of yours is in the print queue or cancel the printing of a document of yours in the print queue, enter the user name of the document in [User Name]. The user name is automatically set to print documents based on information such as your computer name or computer login name.
[Remote UI Access PIN]
If [Remote UI Access PIN] is set, enter the PIN. Setting a Remote UI PIN
If [Remote UI Access PIN] is set, enter the PIN. Setting a Remote UI PIN
 When the Department ID Management is enabled
Enter the appropriate ID in [Department ID] and PIN in [PIN]. Setting the Department ID Management

4
Click [Log In].
The Portal page (main page) will be displayed. Remote UI Screen
Setting the Timeout Time after Logging In to the Remote UI
The user is automatically logged out if no operations are performed for a certain period of time after logging in to the Remote UI. You can set the time until the user is logged out.
Log in to the Remote UI  [Settings/Registration]
  [Network Settings]
  [Session Settings]
  [Edit]
  Set [Timeout After Logging in to Remote UI]
  [OK]
[OK]
 [Settings/Registration]
  [Network Settings]
  [Session Settings]
  [Edit]
  Set [Timeout After Logging in to Remote UI]
  [OK]
[OK]Remote UI Screen
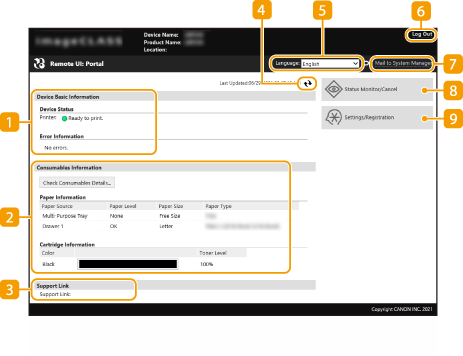
When you log in to the Remote UI, the following Portal page appears. This section describes the items displayed on the Portal page and the basic operations.

 [Device Basic Information]
Displays the current status of the machine and error information. If an error has occurred, the link to the Error Information page will be displayed.
 [Consumables Information]
Displays paper information and the amount remaining in the toner cartridges.
 [Support Link]
Displays the support link specified in [Support Link] under [License/Other].
 Refresh Icon
Refreshes the currently displayed page.
 [Language]
Selects the display language used for the Remote UI screens.
 [Log Out]
Logs off from the Remote UI. The Login page will be displayed.
 [Mail to System Manager]
Displays a window for creating an e-mail to the system manager specified in [System Manager Information] under [User Management].
 [Status Monitor/Cancel]
Displays the [Status Monitor/Cancel] page. For any of the waiting documents, you can check the status/history or cancel the processing.
 [Settings/Registration]
Displays [Settings/Registration] page. When you have logged in to System Manager Mode, you can change the settings items and save/load the registered data. Setting Up Menu Options from Remote UI