

Sending PC Faxes
This section describes the basic flow of sending PC faxes from a computer.
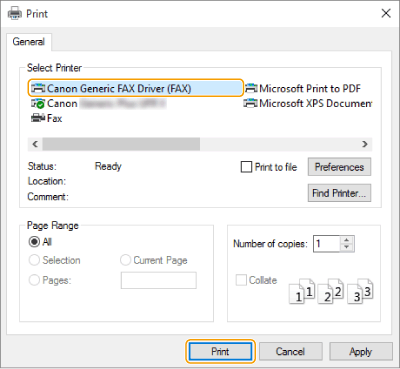
1
Open a document and display the print screen.
2
Select the machine and click [Print] or [OK].
3
Click the [Enter Destination] tab, and specify the communication mode and fax number you are using.
[* Communication Mode]: Make sure that [G3] is selected.
[* Fax Number/URI]: Make sure that [Fax Number] is selected.
[* Fax Number]: Enter a fax number.
If you need to specify a number to dial an outside line, click [Detailed Settings]  [Add Outside Dialing Prefix to G3/IP Fax Number], and enter a fax number in the [G3] text box.
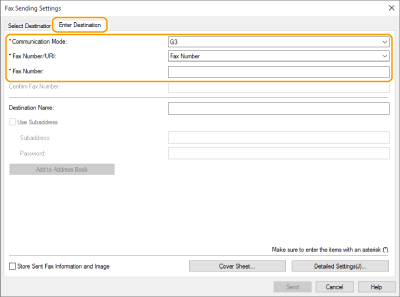
If [Confirm Fax Number/URI when Setting Destination] is set in the [Security Settings] dialog box, enter the specified fax number in the [Confirm Fax Number]. For details, see Help for fax driver.
4
Click [Send].
Sending starts.
To cancel sending, double-click the printer icon displayed in the task tray of the desktop, select the file to cancel, and click [Document] [Cancel] [Yes]. If the icon is not displayed, you can cancel from the control panel of the machine. Checking Status and Log for Sent and Received Documents
|
When the department ID and password or the user name and password input screen is displayedEnter the department ID and password or the user name and password. |

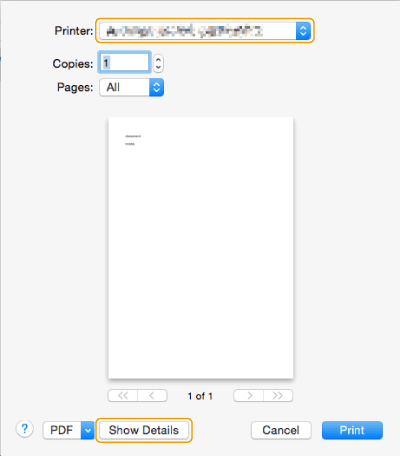
1
Open a document and display the print screen.
2
Select the machine and click [Show Details].
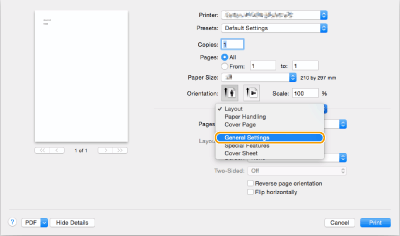
3
Click [General Settings].
4
Click [Add Destination].
5
Enter the destination name in [Destination Name] and fax number in [Fax Number], and then click [Add] [Cancel].
If you need to specify a number to dial an outside line, click [Outside Dialing Prefix] [Settings] on the [Special Features] panel, and then enter the number.
6
Click [Print].
Sending starts.
To cancel sending, click the printer icon displayed in the Dock, select the file to cancel click [Delete] or  . If the icon is not displayed, you can cancel from the control panel of the machine. Checking Status and Log for Sent and Received Documents
. If the icon is not displayed, you can cancel from the control panel of the machine. Checking Status and Log for Sent and Received Documents |
When the department ID and password input screen is displayedEnter the department ID and password. |