
Replacing the Toner Cartridges
Replace the toner cartridges at the appropriate time according to messages that appear and a change in print quality.
Before replacing the toner cartridges, check the precautions in Important Safety Instructions. Manuals of the Machine
 |
Do not touch the contacts (  ) inside the machine. Doing so may result in a fault. ) inside the machine. Doing so may result in a fault.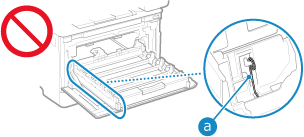 |
 |
Be sure to hold the toner cartridge using the handle. 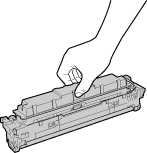 Do not scratch the drum surface (  ) or expose it to light. Also, do not touch the electrical contacts ( ) or expose it to light. Also, do not touch the electrical contacts ( ) or the toner cartridge memory ( ) or the toner cartridge memory ( ). ).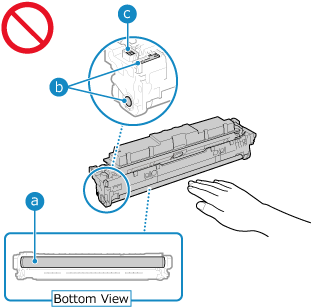 |
When to Replace the Toner Cartridges
When a Message Appears on the Screen of the Operation Panel or Remote UI
Follow the message on the screen to prepare a new toner cartridge and replace the old one. Print quality may suffer if you continue using the toner cartridges without replacing them.
For details about the message and how to resolve it, see the following:
A Message Appears
For details about the message and how to resolve it, see the following:
A Message Appears
When Print Quality Deteriorates
If printouts show any of the symptoms below, the toner cartridges are near the end of their lifetime. It is recommended to replace the toner cartridges even if a message does not appear.
Streaks appear  | Printing is uneven  | Toner smudges and splatters appear  |
White spots appear  | Partially faded  | Colors or stains appear on printouts  |
Before Replacing Toner Cartridges
Perform the following procedure before replacing the toner cartridges. The message on the screen may disappear, and the print quality may improve.
1
Open the front cover.
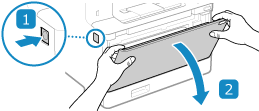
2
Pull out the toner cartridge tray.
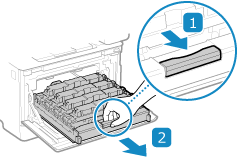
3
Pull the toner cartridge straight up and out of the machine.
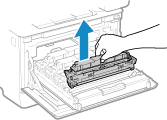
4
Shake the toner cartridge five or six times to evenly distribute the toner inside the cartridge.
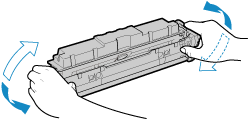
Be careful not to touch the drum surface on the bottom of the toner cartridge.
5
Install the toner cartridge.
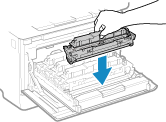
The bottom of the toner cartridge is unprotected. Be careful not to bump the bottom of the toner cartridge against the slot frame or other parts when installing.
6
Push in the toner cartridge tray, and close the front cover.
Replacing Toner Cartridges
1
Open the front cover.

2
Pull out the toner cartridge tray.

3
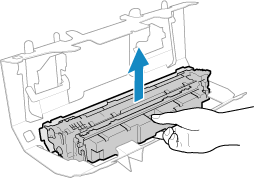
Pull the toner cartridge to be replaced straight up and out of the machine.

4
Remove the toner cartridge from the packing material.
5
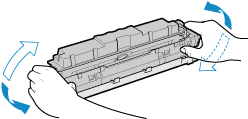
Shake the toner cartridge five or six times to evenly distribute the toner inside the cartridge.
6
Remove the protective cover of the toner cartridge.
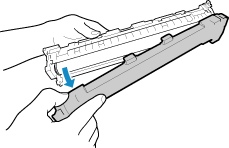
Be careful not to touch the drum surface on the bottom of the toner cartridge.
7
Install the toner cartridge.
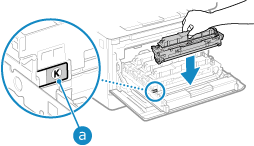
Install the toner cartridge into the slot with the same colored label ( ).
).
 ).
).The bottom of the toner cartridge is unprotected. Be careful not to bump the bottom of the toner cartridge against the slot frame or other parts when installing.
8
Push in the toner cartridge tray, and close the front cover.
When you close the front cover, a simple gradation adjustment is performed automatically.
To adjust the gradation more accurately, perform full adjustment manually. Calibrating the Gradation
To adjust the gradation more accurately, perform full adjustment manually. Calibrating the Gradation