[Print Quality]
[Image Refinement]
[On]*, [Off]
This setting smooths the jagged outlines of characters and graphics.
If [On] is selected, smoothing is performed before printing.
If [Off] is selected, jobs are printed without being smoothed.
NOTE |
The function is not available if 'Resolution' is set to [1200 dpi]. The results of image refinement may be different depending on the types of characters and graphics you want to print. |
[Density]
[Cyan] | -8 to +8; 0* |
[Magenta] | -8 to +8; 0* |
[Yellow] | -8 to +8; 0* |
[Black] | -8 to +8; 0* |
This mode is not available if you set [Toner Save] to [On].
This setting adjusts the print density.
Pressing [Dark] makes the print image darker, pressing [Light] makes the image lighter.
[Density (Fine Adjust)]
[Cyan] | [High] | -8 to +8; 0* |
[Medium] | -8 to +8; 0* | |
[Low] | -8 to +8; 0* | |
[Magenta] | [High] | -8 to +8; 0* |
[Medium] | -8 to +8; 0* | |
[Low] | -8 to +8; 0* | |
[Yellow] | [High] | -8 to +8; 0* |
[Medium] | -8 to +8; 0* | |
[Low] | -8 to +8; 0* | |
[Black] | [High] | -8 to +8; 0* |
[Medium] | -8 to +8; 0* | |
[Low] | -8 to +8; 0* |
This mode is not available if you set [Toner Save] to [On].
This setting adjusts the print density of the respective colors.
Pressing [Dark] makes the print image darker, pressing [Light] makes the image lighter.
[Toner Save]
[On], [Off]*
This setting enables you to set the Toner Save mode. Toner Save uses less toner to print documents and may result in longer toner life.
NOTE |
Depending on the data to be printed, the Toner Save mode may not be applied even if you select [On]. If you select [On] for [Toner Save], very light or finely detailed images may not be printed clearly. |
[Line Refinement]
[On], [Off]*
This setting enables clearer printing of fine lines and small characters, or when you want to print characters and lines thicker.
[Horizontal Line Refinement]
[Off]*, [Level 1], [Level 2], [Level 3], and [Level 4]
This setting adjusts the thickness of horizontal lines to express fine lines and small characters more clearly. The higher the level number, the thicker the horizontal lines printed.
NOTE |
This setting is also available when 'Line Refinement' is set to [On] in the printer driver. With this setting, horizontal lines are based on the direction in which the paper is fed. |
[Vertical Line Refinement]
[Off], [Level 1]*, [Level 2], [Level 3], and [Level 4]
This setting adjusts the thickness of vertical lines to express fine lines and small characters more clearly.
The higher the level number, the thicker the vertical lines printed.
NOTE |
This setting is also available when 'Line Refinement' is set to [On] in the printer driver. With this setting, vertical lines are based on the direction in which the paper is fed. |
[Resolution]
[1200 dpi], [600 dpi]*
This setting specifies the resolution for printing.
Resolution is expressed in units of dpi (dots per inch), indicating the number of dots in one inch. The higher the value, the greater the resolution, allowing finer expression of detail.
[1200 dpi]
The outline of characters and diagrams can be finely printed. This is suited to printing data containing fine lines and small characters.
[600 dpi]
You can perform printing suited to general documents and tables.
IMPORTANT |
If you select [1200 dpi] for [Resolution], you cannot specify the following settings: rotate collate, different paper sizes (LTR/LGL), and double stapling on the short edge of A4 and LTR size paper. |
NOTE |
When printing on large scale paper, set [Resolution] to [600 dpi]. If you select [1200 dpi], there will not be enough memory necessary to process printing and printing will not be possible. |
[Img Compress. Optimization]
[On]*, [Off]
This setting specifies the compression method when printing image data.
Image data is compressed to be stored in the machine's memory when printing with this machine.
[On]
Depending on the type of the image data, the suitable compression method is automatically selected so that the image data will be printed with an optimized balance between the image quality and the compression ratio. This is suited for printing data containing text and photo.
[Off]
Regardless of the type of the image data, you can print the image data using the compression method already specified in this machine. This is suited for printing data containing only photo.
NOTE |
For all selections within this setting, if the data is too large to be stored in the machine's memory, it will be recompressed at a high compression ratio. Depending on the image data, the image quality may not change even if the compression method is changed. |
[Sharpness]
[Low] -3 to +3 [High]; 0*
This setting adjusts the clarity of outlines for text and images on a page. Pressing [High] makes image outlines clearer, pressing [Low] blurs images. This setting has 7 levels you can adjust, with level '0' (middle level) as the default setting.
[Sharpness (Photo)]
[Low] -1 to +3 [High]
This setting enhances outlines when printing low-resolution images. Select [High] to make image outlines clearer, and [Low] to make image outlines blurred.
For information on the factory default settings, see "User's Guide."
[Toner Volume Correction]
[Normal]*, [Grad. Priority], [Text Priority]
This setting enables you to automatically adjust toner volume to fall within the internal restriction value when the toner volume has exceeded the internal restriction value of the text, line, or other type of data. Under most circumstances, it is preferable to leave this option set to [Normal].
[Normal]
Text and line data are printed with a toner volume that upholds the resolution for text and lines. Other types of data are printed with a toner volume that upholds the color.
[Grad. Priority]
All data is printed with a toner volume that upholds the color.
[Text Priority]
All data is printed with a toner volume that upholds the resolution.
NOTE |
The internal restriction value cannot be changed. This setting can only be applied to jobs in the PS mode and PDF mode. If [Grad. Priority] is selected, characters and lines may bleed. If [Text Priority] is selected, the color may not match. |
[Line Control]
[Res. Priority]*, [Grad. Priority]
This setting enables you to specify the image processing for lines. Under most circumstances, it is preferable to leave this setting as [Res. Priority].
[Res. Priority]
Image processing is performed that upholds the same resolution as text for lines.
[Grad. Priority]
Image processing is performed that upholds the same color and gradation as graphics for lines.
NOTE |
The Line Control mode can only be applied to jobs in the UFR II mode, PCL6 mode, PS mode, and PDF mode. |
[Width Adjustment]
[Width Adjustment] | [On], [Off]* |
[Horizontal] | [Off], [Level 1]*, [Level 2] |
[Vertical] | [Off], [Level 1]*, [Level 2] |
[Target Color] | [All]*, [Black Only] |
This setting enables you to adjust the width of the character and lines.
Settings can be applied separately for 'Horizontal' and 'Vertical'.
Setting to [Level 2] makes the character and lines wider than setting to [Level 1]. Set to [Level 1] at first, and then check the changed width. If the width is not wide enough that you intended to, set to [Level 2].
By switching [All] and [Black Only] for 'Target Color', you can select whether to apply width adjustment to all colors of characters and lines or to only black part of characters and lines.
NOTE |
You cannot use this function in combination with 'Trapping'. "Horizontal", "Vertical", and "Target Color" can only be selected when [On] is selected for 'Width Adjustment'. |
[Advanced Smoothing]
[Advanced Smoothing]: [Off], [Level 1]*, [Level 2]
[Apply to Graphics]: [On], [Off]*
[Apply to Text]: [On]*, [Off]
This setting smooths jagged outlines of graphics (illustrations created by application software) and characters.
[Level 2] performs a higher level of smoothing than [Level 1]. If [Level 1] is selected and the results are still not printed smoothly, select [Level 2].
By switching the on/off for 'Graphics' and 'Text', you can select whether to apply smoothing to graphics or text data.
IMPORTANT |
This setting allows you to apply smoothing to graphics data and text data. Smoothing is not applied to image data. When [Halftones] is set to [Error Diffusion], this function is disabled. |
NOTE |
"Apply to Graphics" and "Apply to Text" can only be selected when [Level 1] or [Level 2] is selected for Advanced Smoothing. Settings for "Apply to Graphics" and "Apply to Text" on the touch panel display will be effective only if 'Printer Default' is set for Advanced Smoothing in the printer driver. The results of Advanced Smoothing may differ depending on the characters and graphics patterns. |
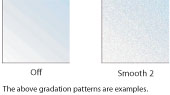
[Gradation Smoothing]
[Gradation Smoothing]: [Off]*, [Level 1], [Level 2]
[Apply to Graphics]: [On]*, [Off]
[Apply to Images]: [On]*, [Off]
Set this function when the gradation of graphics (illustrations made by software applications) or images (bitmap images) does not print smoothly (the color changes stand out).
[Level 2] performs a smoother gradation than [Level 1]. If [Level 1] is selected and gradation is still not printed smoothly, select [Level 2]. You can select whether to apply smoothing to graphics or image data.
IMPORTANT |
This setting does not apply to text data. |
NOTE |
If [Level 1] or [Level 2] is selected, and gradation is applied to halftones, graphics and images may appear grainy. "Apply to Graphics" and "Apply to Images" are only displayed when [Level 1] or [Level 2] is selected. |
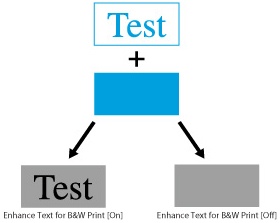
[Enhance Text for B&W Print]
[On]*, [Off]
This setting enables you to select whether to enhance text or not, when performing black-and-white printing.