Settings Menu (Common Settings)
An asterisk (*) indicates the default setting in this section.
[Number of Copies]
1 to 9999; 1*
This setting enables you to specify the number of copies printed.
[2-Sided Printing]
[On], [Off]*
This parameter enables you to select one-sided or two-sided printing. When the 2-Sided Printing mode is specified, the document is printed on both sides of the paper.
NOTE |
For information on the paper available for 2-sided copying, see "User's Guide." For information on loading the paper when printing on paper with a logo (such as a cover sheet), see "User's Guide." |
[Auto Error Skip]
[On], [Off]*
This setting enables you to automatically clear an error and continue printing when an error occurs (Skip Error).
[On]
[Skip Error] is performed automatically.
[Off]
You must perform [Skip Error] from the touch panel display.
NOTE |
To perform [Skip Error], select a job for which an error has occurred on the job status screen → press [Details] → [Skip Error]. [Skip Error] only temporarily clears an error, so the data may not print correctly. For information on types of errors that can be temporarily cleared with Auto Error Skip, see "User's Guide." This setting is valid even if multiple errors have occurred. |
[Print After Completing RIP]
[On], [Off]*
This setting sets whether to use the Print After Completing RIP mode.
RIP (Raster Image Processor) is used for advanced graphical representation.
If Print After Completing RIP is enabled, the first page is printed after all the pages in the job have been processed.
Although it may take longer to print the first page, the remaining pages in the job will be printed more quickly. This is useful when several people are using the machine or when using another function, such as the Copy function, because the printing time for a print job is reduced.
IMPORTANT |
A large print job may be automatically canceled by the machine. |
[Saddle Stitch]
[On], [Off]*
This setting enables you to bind a finished print job by stapling and folding the pages of a booklet in the center.
On |
 |
NOTE |
This function can only be selected if the Booklet Finisher is attached to the machine. This function is not available if 'Booklet' is set to [Off]. If the print job contains only one sheet of paper, the paper will be folded but not stapled. If the number of sheets exceeds the maximum that can be saddle stitched at one time, the sheets are ejected without being saddle stitched. For information on the maximum number of sheets that can be saddle stitched at one time, see "User's Guide." |
[Saddle Press]
[On], [Off]*
[Saddle Press Strength]:
-10 to 10; 0*
-10 to 10; 0*
This setting enables you to make a booklet that has many pages with a flat spine by folding the bound portion at right angles. When you set [Saddle Press] to [On], you can adjust the strength of the saddle press.
NOTE |
This function can only be selected if the Staple Finisher/Booklet Finisher is attached to the machine. |
[Creep Correction]
[Off]*, [Auto], [Correction Width]
This setting enables you to adjust the print position of each page when printing a booklet using saddle stitch.
When sheets of paper are folded in half to make a booklet, the edges of the paper protrude more the closer the pages are to the center of the booklet. Margin width at the edges is narrowed, and part of the printing may also be cut off (depending on the number of pages and paper thickness when the edges are trimmed to make them even). Using creep correction to adjust the margin of the gutter can correct such uneven printing (creep).
When sheets of paper are folded in half to make a booklet, the edges of the paper protrude more the closer the pages are to the center of the booklet. Margin width at the edges is narrowed, and part of the printing may also be cut off (depending on the number of pages and paper thickness when the edges are trimmed to make them even). Using creep correction to adjust the margin of the gutter can correct such uneven printing (creep).
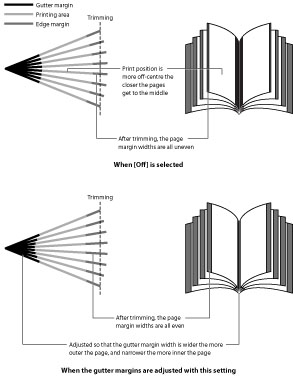
If [Auto] is selected, the gutter margins are automatically adjusted based on the number of pages and paper thickness.
If [Correction Width] is selected, the gutter widths are adjusted based on a value you enter which specifies the difference in how far the edge of the most inner page and the edge of the most outer page come when sheets of paper are folded in half to make the booklet.
NOTE |
This function is not available if 'Booklet' is set to [Off]. Pressing  increases the setting value by 0.05 mm each time the key is pressed. Pressing increases the setting value by 0.05 mm each time the key is pressed. Pressing  decreases the setting value by 0.05 mm each time. Holding down either or continuously speeds up the value alteration. decreases the setting value by 0.05 mm each time. Holding down either or continuously speeds up the value alteration.If this setting is used in combination with the 'Offset Short Edge/Offset Long Edge' or 'Gutter', the values of these three settings are added together. |
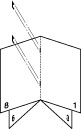
[Trim]
[On], [Off]*
Trim Method:
Vertical Trim, 3-Way Trim
Trim Width of Fore:
2.00*~20.00 mm (If [Saddle Stitch] setting is [Off])
6.50*~49.50 mm (If [Saddle Stitch] is [On])
2.00*~20.00 mm (If [Saddle Stitch] setting is [Off])
6.50*~49.50 mm (If [Saddle Stitch] is [On])
Trim Width of Top/Bottom:
2.00*~20.00 mm (If [Saddle Stitch] setting is [Off])
6.50*~39.50 mm (If [Saddle Stitch] is [On])
This setting enables you to specify whether to apply trim to the printed output.
[Trim Method]
You can set whether to apply trim or not to the printed output.
[Trim Width of Fore] or [Trim Width of Top/Bottom]
You can set each of the trim width. The values you can set are affected by "Saddle Stitch" setting.
[Use Cover Inserter]
[On], [Off]* (When the Document Insertion Unit / Document Insertion / Folding Unit is attached)
*This setting is only displayed if the Document Insertion Unit / Document Insertion / Folding Unit is attached to the machine.
It enables you to specify whether to insert a cover prepared in advance at the start of the printed output.
It enables you to specify whether to insert a cover prepared in advance at the start of the printed output.
If you select [On], a cover is automatically inserted at the start of the printed output. Using this in combination with stapling enables you to easily create materials, etc.
Load the paper to use as the cover into the Document Insertion Unit.
IMPORTANT |
You cannot print on the paper used as the cover. This setting cannot be used in conjunction with [Transparency Interleaving]. It also cannot be used if [Finishing] is set to [Off], [Collate], [Offset+Group], or [Staple + Group]. |
NOTE |
This setting can be used in conjunction with [Finishing], [Punch], and [Fold]. |
[Transparency Interleaving]
[Off]*, [Blank], [Printed]
If you are printing on transparencies, you can use this setting to output a sheet of paper after each transparency. The paper can be blank, or it can be a paper copy of the transparency.
[Off]
No sheets are interleaved with the transparencies.
[Blank]
A blank sheet of paper is inserted between each transparency.
[Printed]
A printed paper from the print job is inserted between each transparency.
NOTE |
This mode is available only if you set [Copy Set Numbering] to [Off]. When printing multiple copies, [Offset+Group] for [Finishing] cannot be used. If the Finishing mode are specified as [Rotate+Group], [Offset+Group], [Staple + Group], and [Eco (Stpl-Fr) + Group], then [Rotate+Collate], [Offset+Collate], [Staple+Collate], and [Eco (Stpl-Fr) + Group] are specified. If you select [Printed], the paper printouts are included in the Prints count. However, if you select [Blank], they are not included in the Prints count. |
[Personality]
[Auto]*, [PS], [PCL], [XPS], [Imaging], [PDF]
[PDF] is only applicable for the PDF Direct Print Printer or PS Printer. [XPS] is only applicable for the XPS Direct Print Printer.
This setting enables the machine to process data received from the host computer in the specified data format. Setting the Personality mode to [Auto] makes the machine determine the type of data received from the host on a job-by-job basis. If you are printing from applications on a computer, we recommend that you use [Auto].
NOTE |
If you find that the machine does not correctly switch to the appropriate personality when you [Personality] to [Auto], change the setting manually to match the data you are sending from the host computer. This mode is not available when printing in the UFR II mode. |
[Mode Priority]
[None]*, [PS], [PCL], [XPS], [PDF]
[PDF] is only applicable for the PDF Direct Print Printer or PS Printer. [XPS] is only applicable for the XPS Direct Print Printer.
This setting determines which personality should be used if a job is received without a specified command language or Direct Print data. The Mode Priority mode is used when you set [Personality] to [Auto].
None
This does not specify a preferred personality. If a job is received without a specified command language or Direct Print data, the current personality is used. The default setting is [None].
PS
This assigns priority to the PS personality.
PCL
This assigns priority to the PCL personality.
XPS
This assigns priority to the XPS mode.
This assigns priority to the PDF mode.
NOTE |
This mode is not available when printing in the UFR II mode. |
[Auto Select]
[PS]: [On]*,[Off]
[PCL]: [On]*,[Off]
[XPS]: [On]*,[Off]
[Imaging]: [On]*,[Off]
[PDF]: [On]*,[Off]
[PCL]: [On]*,[Off]
[XPS]: [On]*,[Off]
[Imaging]: [On]*,[Off]
[PDF]: [On]*,[Off]
[PDF] is applicable for the Direct Print Printer or PS Printer. [Imaging] and [XPS] are applicable for the Direct Print Printer.
This setting enables you to specify the operation modes that can be selected automatically if [Personality] is set to [Auto]. Specify for all modes: PS, PCL, XPS, Imaging, and PDF. If you specify [On], that mode becomes available for automatic selection. If you specify [Off], that mode does not become available for automatic selection.
NOTE |
If you set all the settings to [Off], all received data becomes invalid, and cannot be printed. This mode is not available when printing in the UFR II mode. |
[Initialize]
[Yes], [No]
The menu settings can be reset to the factory defaults by initializing the printer settings.
If you select Initialize, the confirmation message <Is it OK to initialize the settings?> appears. If you select [Yes], the settings are initialized. If you select [No], the settings are not initialized.
IMPORTANT |
Do not turn Off the machine while the settings are being initialized, as doing so may damage the machine's memory. |