
Loading Envelopes
Load envelopes in the paper deck. When printing on envelopes, to prevent paper jams and wrinkles, make sure to flatten any curls on envelopes before loading them. Also pay attention to the orientation of envelopes and which side is face up.
|
Do not load the following types of envelopes inside the envelope cassette. Doing so may cause paper jams, dirty prints, or make the inside of the machine dirty. Curled, creased, or folded envelopes Very thick or thin envelopes Damp or wet envelopes Torn envelopes Irregularly shaped envelopes Envelopes with clasps or windows Envelopes that have already been sealed Envelopes with holes or perforations Envelopes with specially coated surfaces Envelopes made of surface treated colored paper Envelopes that are self-sticking, which use ink, glue, or other substances that can melt, burn, vaporize, or emit smells under the heat of a fixing unit (approximately 418°F). Depending on the materials used for the seal, the glue may melt under the fixing unit's heat, sealing the envelopes. If you are printing on envelopes, empty the output tray when up to 10 printed envelopes accumulate in the tray. Envelopes should be stored in a place away from high-temperatures and humidity. If there is a temperature difference between the location where the envelopes are stored and the location where the envelopes are being printed, leave the envelopes in the printing location at room temperature before you use them. |
 |
This section describes how to load envelopes with the proper orientation, as well as procedures that you need to complete before loading envelopes. For a description of the general procedure for loading envelopes in the paper drawer, see Basic Paper Loading Method. You can also load envelopes in the optional "POD Deck-E/Secondary POD Deck-E." When you load envelopes into the paper deck, make sure to register the paper. Specifying Paper Size and Type in the Paper Deck |
Before Loading Envelopes
Follow the procedure below to prepare the envelopes before loading.
|
Do not use envelopes that have glue attached to their flaps, as the glue may melt due to the heat and pressure of the fixing unit. Envelopes may be creased, depending on the type of envelopes or the conditions in which they are stored, such as a high humidity environment. Streaks may appear where envelopes overlap. Using curled, creased, or folded envelopes may cause paper jams. Load envelopes after following the procedure below. Take special care to remove curls in the direction that the envelopes will be fed. Do not print on the back side of the envelopes (the side with the flap). If the envelopes become filled with air, flatten them by hand before loading them into the Envelope Feeder Attachment-F. |
1
Flatten any curls.
Pick up about five envelopes. Fan the envelopes well, flatten any curls, and then loosen the stiff areas in the four corners.
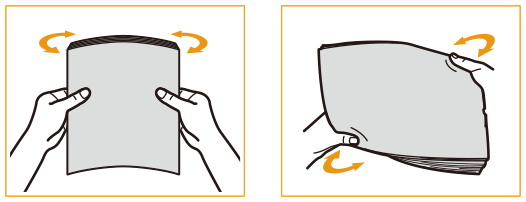
Repeat this step five times for each set of five envelopes.
2
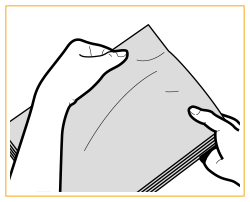
Smooth the envelopes out, and remove any air inside them.
Place the envelopes on a clean and flat surface, and move your hands in the direction of the arrows to remove the air inside the envelopes.
Repeat this step five times for each set of five envelopes.

It is recommended that you use something hard such as a ruler or a pencil to remove curls.
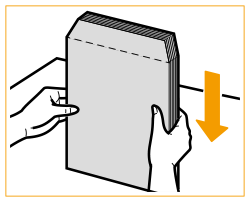
3
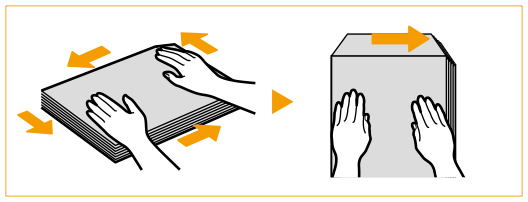
Press down on the three sides except for the flap  .
.
.In particular, carefully press down on the side facing the direction  in which the envelopes will be fed.
in which the envelopes will be fed.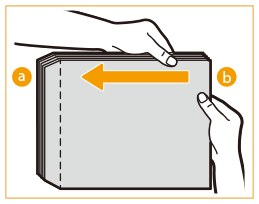

Failure to firmly press down on the flap may result in a paper jam. If this happens, press down firmly on the three sides of each individual envelope.
4
Align the envelopes on a flat surface.
Loading the Envelopes in the Paper Deck
|
Do not print on both sides of an envelope. Doing so may cause paper jams, dirty prints, or make the inside of the machine dirty. |
|
For information on envelope that can be loaded to the paper drawer attached the Envelope Feeder Attachment-F, see Available Paper. |
1
Press 
 <Preferences> <Paper Settings> <Paper Settings> and register the desired paper size.
See Specifying Paper Size and Type in the Paper Deck, and register the paper size.
2
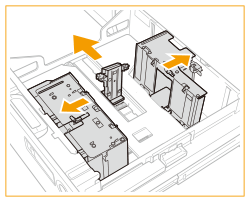
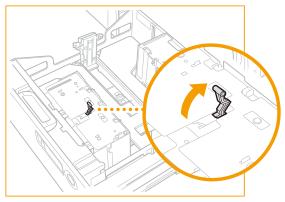
Slide the rear edge retainer and size change plates to a position that does not interfere with setting the envelopes.
Size change plates must be unlocked before sliding.
3
Load the envelopes.
Load the envelopes as indicated below, with the front side of the envelopes (the side without the glued areas) face down. Load 10 envelopes at a time.
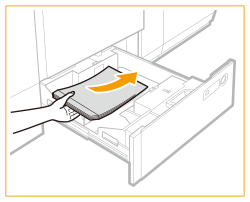
Load the envelopes so that their flaps are on the left side.
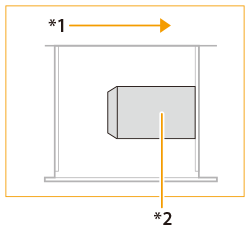
*1 Feeding Direction
*2 Print Side Down
Envelopes may not be able to be fed properly if they are loaded at an angle.
Do not print on the back side (the glued side) of the envelopes.
4
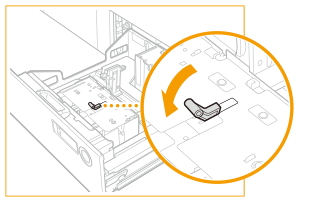
Slide the size change plates (front) and size change plates (back) to match the paper size.
Unlock when adjusting the size change plates. When you have finished making adjustments, lock it again.
|
Envelopes which have been rolled or curled must be straightened out prior to use. The maximum number of envelopes that can be set is 10. |
5
Squeeze the lever on the outer size change plate. Without releasing the lever, slide the paper holder plate to align it with the desired paper size.
6
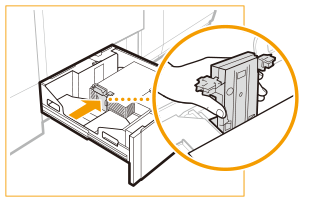
Firmly push the paper deck into the machine.
|
Envelopes which are curled must be straightened out before loading them into the paper deck. Always check that the paper deck is in place. Never place paper or any other items in the empty part of the paper deck. Doing so may cause paper jams. |
7
Change the paper size label of the paper deck as necessary.