
Loading Tab Paper
This section describes how to load tab paper.
You can load tab paper to the following paper source:
You can load tab paper to the following paper source:
Paper deck of the main unit
POD Deck-E/Secondary POD Deck-E
Document Insertion Unit-R
|
Only A4 tab paper can be used. Only 1-sided printing is supported for tab paper. 2-sided printing is not supported. |
 |
When you load tab paper into the paper deck or POD Deck-E/Secondary POD Deck-E, make sure to register the paper type. Specifying Paper Size and Type in the Paper Deck Make sure that you fan the sheets of tab paper well before placing them. Otherwise multiple sheets of tab paper may be fed at a time and images may not be printed correctly on the tab paper. |
How to Load Tab Paper
When you load tab paper, the proper feeding direction differs depending on the paper source.
Follow the instructions below to load the tab paper in a correct way.
There are two kinds of tab paper: right order tab paper and reverse order tab paper.
Follow the instructions below to load the tab paper in a correct way.
There are two kinds of tab paper: right order tab paper and reverse order tab paper.
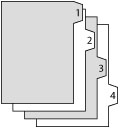 | 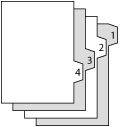 |
Right Order Tab Paper | Reverse Order Tab Paper |
|
You cannot make prints on tab paper that is loaded in the Document Insertion Unit-R. |
|
You can use tab paper set in the Document Insertion Unit-R for Add Cover, Insert Sheets or Job Separator. If you want to insert printed tab paper as a chapter pages, insert a blank paper where the tab paper will be inserted. |
Paper Source | How to Load Tab Paper | |
Paper Deck of the main unit |  | Reverse Order/Face Down |
POD Deck-E/Secondary POD Deck-E | | Reverse Order/Face Down |
Document Insertion Unit-R | | Reverse Order/Face Down |
|
The procedure for loading tab paper into the POD Deck-E/Secondary POD Deck-E is the same as the one for loading tab paper into the paper decks of the main unit. As an example, the procedure for the paper decks of the main unit is explained in this section. For more information on aligning the size change plate for the Document Insertion Unit-R, see Loading Paper into the Document Insertion Unit-R |
Loading Tab Paper
|
Make sure that you fan the sheets of tab paper well before placing them. Also, <Suspend Job When Multiple Sheet Feed Detected> must be set to <On> To confirm the setting, press <Settings/Registration> |
|
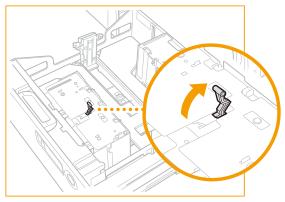
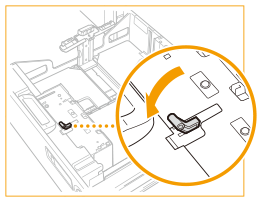
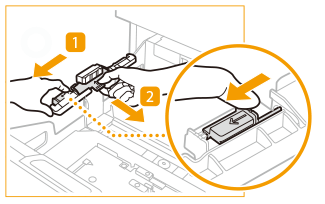
When loading tab paper into the paper deck, the Tab Feeding Attachment-E (optional) is required. The Tab Feeding Attachment-E is attached to the POD Deck-E. Detach it by following the instructions below. 1. Open the front right cover of the POD Deck. 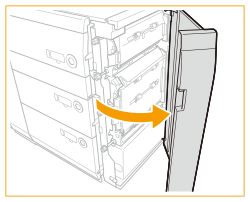 2. Press the tab area, and remove the attachment for tab paper. 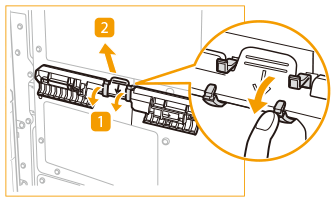 |
1
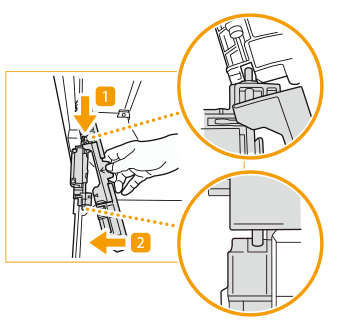
Pull out the paper deck.
1 | Press the button on the paper deck and then pull it out. 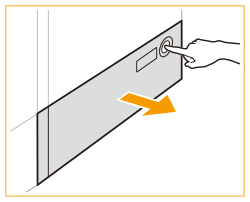 |
2 | Check that the inside lifter descends to the paper loading position. |
|
If the machine is in the Sleep mode (the touch panel is not displayed, and the main power lamp is lit), You may be unable to open the paper deck. In this case, touch the touch panel display to reactivate the machine, and then press open button on the paper deck. |
2
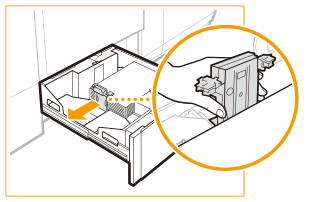
Squeeze the lever on the paper holder plate. Without releasing the lever, slide the paper holder plate until it does not catch on the paper to set.
3
Remove all of the loading paper.
4
Remove the size change plates lock.
5
Slide the outer size change plate and inner size change plate until it does not catch on the paper to set.

6
As shown below, install the attachment to the rear edge retainer.
Set the attachment so that the bar of the rear edge retainer fits into it.
|
When attaching the Tab Feeding Attachment-E, take care not to apply too much pressure on the rear edge retainer.  |
7
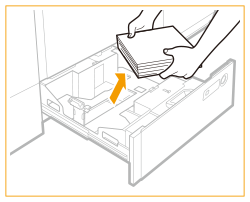
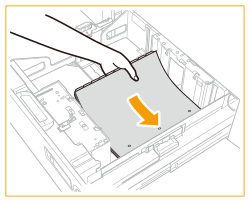
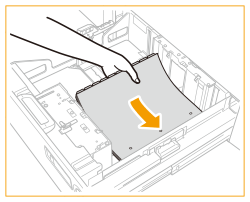
Load approximately 10 sheets of tab paper.
8
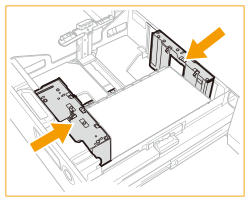
Adjust the outer size change plate and the inner size change plate to align completely with the tab paper.
9
Lock the lever of the size change plate and fix it.
10
Load all remaining tab paper.
|
Do not subject the paper holder plate to shock when loading tab paper into the paper deck, as this may result in a malfunction or damage to the machine. If the tab paper is curled, image blurring may occur. In this case, straighten out the curled paper, and reload it. Make sure that the height of the tab paper stack does not exceed the loading limit mark (  ) at the back of the paper deck. ) at the back of the paper deck. |
11
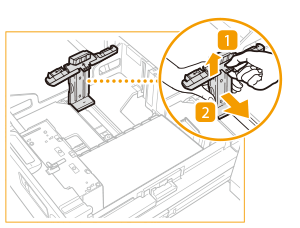
While lifting the attachment, align the rear edge retainer with the tab paper.
|
When aligning the rear edge retainer with the tab paper, do so with the attachment lifted. Failure to do so, the edges of the tab paper may become curled or creased. |
12
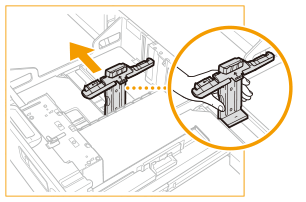
The rear edge retainer is aligned with the size of the tab paper, lower the attachment.
13
Gently push the paper deck back into the machine until it clicks into place in the closed position.
The inside lifter automatically rises, and prepares the paper deck for feeding.
|
Never place paper or any other items in the open part of the paper deck next to the paper stack. Doing so may cause a paper jam or damage the paper deck. |
|
If you set the tab paper, be sure to use the <Preferences> (Settings/Registration) in the <Paper Settings> to register the tab paper. |
Refill Tab Paper
1
Squeeze the lever on the paper holder plate and slide the paper holder plate.
2
Load the tab paper.
3
While lifting the attachment, align the rear edge retainer with the tab paper.
|
When aligning the rear edge retainer with the tab paper, do so with the attachment lifted. Failure to do so, the edges of the tab paper may become curled or creased. |
4
The rear edge retainer is aligned with the size of the tab paper, lower the attachment.
Take the attachment from the paper deck
1
Squeeze the lever on the paper holder plate and slide the paper holder plate.
2
Remove all paper from the paper deck.

3
Remove the attachment.
|
Make sure the attachment is stored after use. After using the attachment for the POD Deck-E, store it in its original position. |