
Additional Copying Features
In addition to basic copy settings, the machine also has settings for 2-sided copying, image quality adjustment, and other settings according to your original and purpose. Use the copy screen to configure these settings.
* To make copies using the ID Card Copy function, you can simply adjust the density and image quality.
|
Registering the Frequently Used Scan Settings as the Default SettingsYou can change the default copy settings according to the frequently used scan settings. Changing the Default Settings Basic Copy Operations |
Making 2-sided Copies
You can copy two 1-sided originals on both sides of one sheet of paper.
You can also copy a 2-sided original on both sides of one sheet of paper, or on two separate sheets of paper.
* 2-sided copying may not be available with some sizes and types of paper. Usable Paper
You can also copy a 2-sided original on both sides of one sheet of paper, or on two separate sheets of paper.
* 2-sided copying may not be available with some sizes and types of paper. Usable Paper
Touch Panel Model
1
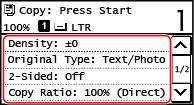
Press [2-Sided] on the copy screen.
The [2-Sided] screen is displayed.
2
Select the pattern of 2-Sided copying.
[Off]
Copies 1-sided originals to separate sheets of paper.
[1->2-Sided]
Copies two 1-sided originals on both sides of one sheet of paper.
[2->2-Sided]*
Copies the front and back of 2-sided originals on both sides of one sheet of paper.
[2->1-Sided]*
Copies the front and back of 2-sided originals on two separate sheets of paper.
* This setting is available only for MF269dw II / MF269dw VP II.
3
Set the original orientation and opening type, and copy opening type, as needed.
1 | On the copy screen, press [2-Sided] The [Orig./Finishing Type] screen is displayed. |
2 | Select the combination of the 2-Sided settings between an original and a copy, and then specify the orientation and the opening type of the copy. [1->2-Sided] 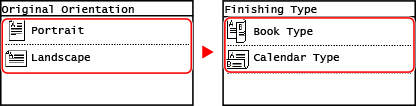 [2->2-Sided]*  [2->1-Sided]* 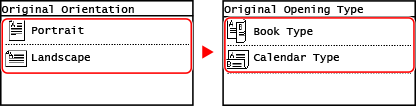 * This setting is available only for MF269dw II / MF269dw VP II. |
5 Lines LCD Model
1
On the copy screen, select [2-Sided] and press  .
.
.The [2-Sided] screen is displayed.
2
Select the way of 2-Sided copying and press .
.The copy screen is displayed.
[Off]
Copies 1-sided originals to separate sheets of paper.
[1->2-Sided]
Copies two 1-sided originals on both sides of one sheet of paper.
3
Set the original orientation and copy opening type, as needed.
1 | On the copy screen, press [2-Sided] .The [Orig./Finishing Type] screen is displayed. |
2 | Select [1->2-Sided] and press .The [Original Orientation] screen is displayed. |
3 | Select the orientation of the set original and press .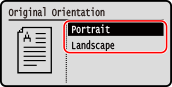 |
4 | Select the finishing type after copying and press .The copy screen is displayed. 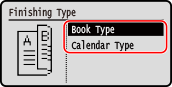 |
Copying Multiple Originals onto One Sheet (N on 1)
You can reduce the size of a multiple-page original and arrange the pages on one sheet of paper when copying.
N on 1 is convenient when you want to save paper by copying on fewer sheets of paper than the original.
If you want to save more paper by combining N on 1 copying and 2-Sided copying, Paper Save Copy is useful, allowing to perform the combination of the copy settings with a single operation. Paper Save Copy
* This cannot be set at the same time as Erase Frame.
Touch Panel Model
1
Press [N on 1] on the copy screen.
The [N on 1] screen is displayed.
2
Select the number of pages to be combined.
[Off]
Pages are not combined.
[2 on 1]
Combines a 2-page original onto one sheet of paper.
[4 on 1]
Combines a 4-page original onto one sheet of paper.
3
Select the size of the placed original.
4
Configure the layout (page order) when combining originals, as needed.
1 | Press [N on 1] on the copy screen. The [N on 1] screen is displayed. |
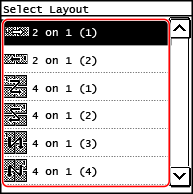
2 | Press [Select Layout], and select the page order. The [Select Layout] screen is displayed. |
3 | Select the size of the placed original. |
|
When combining pages, the copy ratio is set automatically according to the following. You can also change the copy ratio setting manually. Number of pages to be combined Original size setting Size of paper used for copying When pages are combined, a margin may be created around the copied images. |
5 Lines LCD Model
1
On the copy screen, select [N on 1] and press .
.The [N on 1] screen is displayed.
2
Select the number of pages to be combined and press .
.[Off]
Pages are not combined.
[2 on 1]
Combines a 2-page original onto one sheet of paper.
[4 on 1]
Combines a 4-page original onto one sheet of paper.
3
Select the size of the placed original.
4
Configure the layout (page order) when combining originals, as needed.
1 | Select [N on 1] and press .The [N on 1] screen is displayed. |
2 | Press [Select Layout], and press .The [Select Layout] screen is displayed. |
3 | Select the page order and press . |
4 | Select the size of the placed original. |
|
When combining pages, the copy ratio is set automatically according to the following. You can also change the copy ratio setting manually. Number of pages to be combined Original size setting Size of paper used for copying When pages are combined, a margin may be created around the copied images. |
Collating Copies by Page (Collate)
When copying multiple copies of a multi-page original, you can collate the copies in the page order of the original. This is convenient when copying handouts for meetings.
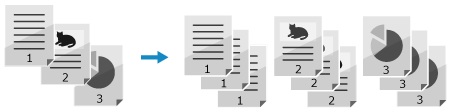
When Copying without Collating
The copies are grouped by the page of the original in the number of specified copies and not collated.
For example, when you are making three copies of a three-page original, the printouts are arranged in the following order: 1, 1, 1, 2, 2, 2, 3, 3, 3.
For example, when you are making three copies of a three-page original, the printouts are arranged in the following order: 1, 1, 1, 2, 2, 2, 3, 3, 3.
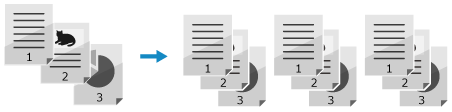
When Copying with Collating
The copies are collated into sets in the page order of the original.
For example, when you are making three copies of a three-page original, the printouts are arranged in the following order: 1, 2, 3, 1, 2, 3, 1, 2, 3.
For example, when you are making three copies of a three-page original, the printouts are arranged in the following order: 1, 2, 3, 1, 2, 3, 1, 2, 3.
Touch Panel Model
1
Press [Collate] on the copy screen.
The [Collate] screen is displayed.
2
Press [On].
5 Lines LCD Model
1
On the copy screen, select [Collate] and press .
.The [Collate] screen is displayed.
2
Select [On] and press .
.Adjusting the Density
You can adjust the density to suit the original when copying.
If text or images in the original are too faint or dark, adjust the density of the entire original.
To create clean copies of an original with a colored background or a newspaper, adjust the density of the background.
If text or images in the original are too faint or dark, adjust the density of the entire original.
To create clean copies of an original with a colored background or a newspaper, adjust the density of the background.
Touch Panel Model
1
Press [Density] on the copy screen.
The [Density] screen is displayed.
 Adjusting the Density of the Entire Original
Drag the slider to the left or right to adjust the density.
Press [+] to increase the density and [-] to lower it.
Press [+] to increase the density and [-] to lower it.
Adjusting the Density of the Background
1 | Press [Background] The [Adjust] screen is displayed. |
2 | Drag the slider to the left or right to adjust the density. Press [+] to increase the density and [-] to lower it. |
2
Press [Apply].
|
When you adjust the density of the background, parts other than the background may also be affected. |
5 Lines LCD Model
1
On the copy screen, select [Density] and press .
.The [Density] screen is displayed.
Adjusting the Density of the Entire Original
Move the slider to the left or right to adjust the density.
On the control panel, press to increase the density or press
  to lower it.
On the control panel, press
to increase the density or press to lower it.Adjusting the Density of the Background
1 | On the control panel, press [Background] .The [Adjust] screen is displayed. |
2 | Move the slider to the left or right to adjust the density. On the control panel, press to increase the density or press to lower it. |
2
Press .
. |
When you adjust the density of the background, parts other than the background may also be affected. |
Adjusting the Image Quality
You can adjust the image quality such as when the copied image is not clear or the text is difficult to read. You can also erase dark borders and shadows that appear around the edges of the original.
* Erase Frame is not available when making copies using the ID Card Copy function.
* Erase Frame is not available when making copies using the ID Card Copy function.
Selecting the Image Quality for the Original Type
Touch Panel Model
1
Press [Original Type] on the copy screen.
The [Original Type] screen is displayed.
2
Select the original type.
The copy screen is displayed.
When copying an original containing both text and photos with priority to the print speed
Select [Text/Photo (High Speed)].
When copying an original containing both text and photos with priority to the print quality
Select [Text/Photo (Quality)], adjust to make text or photos more visible, and press [Apply].
Copying Photos Containing Halftone Dots such as in Magazines
Select [Photo].
Copying Originals with Large Volumes of Text such as Research Papers
Select [Text].
5 Lines LCD Model
1
On the copy screen, select [Original Type] and press .
.The [Original Type] screen is displayed.
2
Select the original type and press .
. Copying an original containing both text and photos with priority to the copy speed
Select [Text/Photo (High Speed)] and press .
. Copying an original containing both text and photos with priority to the print quality
1 | Select [Text/Photo (Quality)] and press . |
2 | Adjust to make text or photos more visible, and press . |
Copying Photos Containing Halftone Dots such as in Magazines
Select [Photo] and press .
. Copying Originals with Large Volumes of Text such as Research Papers
Select [Text] and press .
.Erasing Dark Borders and Shadows around Edges of the Original (Erase Frame)
This function erases the dark borders and shadows that appear around the edges in the copied image when copying originals that are smaller than the paper size or thick originals.
* This cannot be set at the same time as N on 1.
* This cannot be set at the same time as N on 1.
Touch Panel Model
1
Press [Erase Frame] on the copy screen.
The [Erase Frame] screen is displayed.
2
Press [On].
The screen for specifying the frame width to erase is displayed.
3
Enter the frame width to erase, and press [Apply].
The [Scan Size] screen is displayed.
When you are copying at an enlarged or reduced size, the function automatically changes the size of the frame width to erase to match the copy ratio setting.
4
Select the size of the placed original.
5 Lines LCD Model
1
On the copy screen, select [Erase Frame] and press .
.The [Erase Frame] screen is displayed.
2
Select [On] and press .
.The screen for specifying the frame width to erase is displayed.
3
Enter the frame width to erase, and press .
.The [Scan Size] screen is displayed.
When you are copying at an enlarged or reduced size, the function automatically changes the size of the frame width to erase to match the copy ratio setting.
4
Select the size of the placed original.
Adjusting the Sharpness
You can emphasize the contours and lines to make them clearer in the copied image, or weaken them to make them softer.
Touch Panel Model
1
Press [Sharpness] on the copy screen.
The [Sharpness] screen is displayed.
2
Drag the slider to the left or right to adjust the sharpness.
Adjustment example:
To Make Blurry Text or Shapes Clearer
Press [+].
Press [+].

To reduce moire (vertical pattern noise) in photos
Press [-].
Press [-].

3
Press [Apply].
5 Lines LCD Model
1
On the copy screen, select [Sharpness] and press .
. The [Sharpness] screen is displayed.
2
Move the slider to the left or right to adjust the sharpness.
Adjustment example:
To Make Blurry Text or Shapes Clearer
Press on the control panel.
Press
on the control panel.To reduce moire (vertical pattern noise) in photos
Press on the control panel.
Press
on the control panel.3
Press .
.