Operation Examples When Using a Computer
When using the machine from a computer, you must configure the settings of the computer according to the function you are using. In addition, you may need the computer information to view the information set on the machine.
In this case, use the operation examples below to check the required settings and information on the computer.
In this case, use the operation examples below to check the required settings and information on the computer.
Creating a Shared Folder
When Using Windows
1
Create a folder in any location (such as Desktop).

2
Right-click the created folder, and click [Properties].
3
On the [Sharing] tab, click [Advanced Sharing].
The [Advanced Sharing] screen is displayed.
4
Select the [Share this folder] checkbox, and click [Permissions].
5
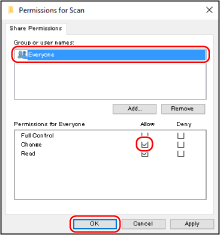
Configure the access privilege.

1 | In [Group or user names], select [Everyone]. |
2 | In [Permissions], select the [Allow] checkbox in [Change]. |
3 | Click [OK]. |
6
Click [OK]  [Close].
 [Close].
The created folder can be used as a shared folder.
When Using macOS
1
Click [ ]
]  [System Preferences]
  [Sharing].
 [System Preferences]
  [Sharing].
The [Sharing] screen is displayed.
2
Select the [File Sharing] checkbox, and click [+] in [Shared Folders].
3
Create a folder in any location (such as Desktop), and click [Add].

4
Configure the access privilege.

1 | In [Shared Folders], select the created folder. |
2 | In [Users], select [Everyone]  [Read & Write]. [Read & Write]. |
5
Close the screen.
The created folder can be used as a shared folder.
Enabling Network Discovery
1
Right-click [ ] (Start), and click [Network Connections].
The [Status] screen is displayed.
2
Click [Network and Sharing Center]  [Change advanced sharing settings].
 [Change advanced sharing settings].
The [Advanced sharing settings] screen is displayed.
3
In [Network discovery], select [Turn on network discovery], and click [Save changes].
Displaying a Shared Printer in the Print Server
When Using Windows
1
Right-click [ ] (Start), and click [File Explorer].
2
In [Network], select the print server to display the shared printer.

If nothing is displayed in [Network], enable network discovery. Enabling Network Discovery
When Using macOS
1
Click [ ]
]  [System Preferences]
  [Printers & Scanners].
 [System Preferences]
  [Printers & Scanners].
The [Printers & Scanners] screen is displayed.
2
Click [+] at the bottom left.
The [Add] screen is displayed.
3
Click [ ], to display the shared printer.

Viewing the System Information of the Computer
When Using Windows
1
Right-click [ ] (Start), and click [System].
The [About] screen is displayed.
2
In [Device specifications], view the computer name and operating system version.

The computer name is displayed in [Device name].
The operating system version is displayed in [System type].
If the computer has a 32-bit operating system, "32-bit Operating System" is displayed.
If the computer has a 64-bit operating system, "64-bit Operating System" is displayed.
If the computer has a 32-bit operating system, "32-bit Operating System" is displayed.
If the computer has a 64-bit operating system, "64-bit Operating System" is displayed.
When Using macOS
1
Click [ ]
]  [System Preferences]
  [Sharing].
 [System Preferences]
  [Sharing].
The [Sharing] screen is displayed.
The name displayed in [Computer Name] on the [Sharing] screen may not be usable on the network. Use the following procedure to view the computer name used on the network.
The name displayed in [Computer Name] on the [Sharing] screen may not be usable on the network. Use the following procedure to view the computer name used on the network.
2
Click [Edit].
3
In [Local Hostname], view the computer name.

Parts displayed in gray are not included in the computer name.
4
Click [Cancel].
Viewing the Network Connection Information of the Computer
When Using Windows
1
Right-click [ ] (Start), and click [Network Connections].
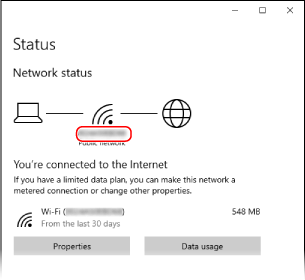
The [Status] screen is displayed.
2
View the network connection information.
 Viewing the SSID of the Wired LAN
View the SSID in [Network status].

 Viewing the IP Address and DNS Server
1 | Click [Properties] for the connected network. |
2 | In [Properties], view the IP address and DNS server.  |
When Using macOS
1
Click [ ]
]  [System Preferences]
  [Network].
 [System Preferences]
  [Network].
The [Network] screen is displayed.
2
View the IP address, DNS server, and other information.
 For Wired LAN

 For Wireless LAN

View the SSID in [Network Name].
View the IP address in [Status].
Click [Advanced], and view the DNS server on the [DNS] tab.
Viewing the Printer Port
1
Click [ ] (Start)
  [
[ ] (Settings)
  [Devices]
  [Printers & scanners].
 [
[ [Devices]
  [Printers & scanners].
The [Printers & scanners] screen is displayed.
2
Click the printer driver of the machine  [Manage]
  [Printer properties].
 [Manage]
  [Printer properties].
The printer driver properties screen is displayed.
3
On the [Ports] tab, view the port being used.

 |
If the IP Address of the Machine Is ChangedThe required action depends on the port you are using. If [Canon MFNP Port] is displayed in [Description], the connection is maintained as long as the machine and computer belong to the same subnet, so no action is required on the computer. If [Standard TCP/IP Port] is displayed in [Description], you must add a new port. Adding a Port |
Viewing Two-way Communication
1
Click [ ] (Start)
  [
[ ] (Settings)
  [Devices]
  [Printers & scanners].
 [
[ [Devices]
  [Printers & scanners].
The [Printers & scanners] screen is displayed.
2
Click the printer driver of the machine  [Manage]
  [Printer properties].
 [Manage]
  [Printer properties].
The printer driver properties screen is displayed.
3
On the [Ports] tab, check that the [Enable bidirectional support] checkbox is selected.
Printing a Test Page
Required Preparations |
Load A4 size paper in the paper drawer. Loading Paper in the Paper Drawer |
When Using Windows
1
Click [ ] (Start)
  [
[ ] (Settings)
  [Devices]
  [Printers & scanners].
 [
[ [Devices]
  [Printers & scanners].
The [Printers & scanners] screen is displayed.
2
Click the printer driver of the machine  [Manage]
  [Printer properties].
 [Manage]
  [Printer properties].
The printer driver properties screen is displayed.
3
On the [General] tab, click [Print Test Page].
When the print data is sent correctly, a test page is printed from the machine.
When Using macOS
1
Click [ ]
]  [System Preferences]
  [Printers & Scanners].
 [System Preferences]
  [Printers & Scanners].
The [Printers & Scanners] screen is displayed.
2
Select the machine, and click [Open Print Queue].
3
From the [Printer] menu, click [Print Test Page].
When the print data is sent correctly, a test page is printed from the machine.