Adjusting Gradation
0UUY-0J6 0UW1-0HR 0YRY-0HL 0X7F-0L6 0X7H-0KR 1100-0HU 0X6E-0L6 0X6W-0KR 10XJ-0HU 0X7C-0L6 0X7A-0KR 1106-0HU 0WXY-0L7 0X7E-0KR 10YY-0HU 10H3-0HR 0WR6-0LC 0WR7-0KY 108A-0HS 1116-0HS 10H4-0HR 0WR5-0LC 0WR8-0KY 0YWJ-0JK 0YWH-0KR 0YWR-0JC 0YWK-0KR 0YWE-0L6 0YWF-0KR 0YAS-0HU
If color gradation reproducibility has become so poor that the gradation in the printed or copied image differs markedly from the print data or original document, gradation adjustment may improve the problem.
 |
imageRUNNER ADVANCE DX C359i / C359P / imageRUNNER ADVANCE DX C259i OnlyThere are two types of adjustments: Full Adjustment and Quick Adjustment. imageRUNNER ADVANCE DX C359P OnlyThere are two types of adjustments: Visual Adjustment (imageRUNNER ADVANCE DX C359P Only) and Automatic Adjustment (imageRUNNER ADVANCE DX C359P Only) |

 |
Adjustments may not be performed effectively if there is not sufficient toner. |
Full Adjustment
Correct the gradation of an image accurately and optimize reproducibility during printing. Optimized information will be retained until the next accurate correction.
 |
imageRUNNER ADVANCE DX C359P OnlySee the following adjusting gradation methods. |
 |
You can use the following paper sizes/types. Size: A4, LTR Type: Thin 1, Plain 1 to 2, Recycled 1 to 2 |
1
Press  (Settings/Registration)
  <Adjustment/Maintenance>
  <Adjust Image Quality>
  <Auto Adjust Gradation>
  <Full Adjust>.
 (Settings/Registration)
  <Adjustment/Maintenance>
  <Adjust Image Quality>
  <Auto Adjust Gradation>
  <Full Adjust>.
2
Select the paper and press <OK>.
3
Press <Start Printing>.
A test page is printed.
4
Place the test page on the platen glass.
Place the test page as indicated by the on-screen instructions.
5
Close the feeder and press <Start Scanning>.
The machine starts scanning the test page.
6
Open the feeder, and remove the test page.
7
Repeat steps 3 to 6.
To complete the adjustment, print the test page two times, and scan it each time it is printed.
Quick Adjustment
This adjustment maintains the optimized status that was acquired by <Full Adjust>. If the result of this adjustment is not satisfactory, perform <Full Adjust>.
1
Press  (Settings/Registration)
  <Adjustment/Maintenance>
  <Adjust Image Quality>
  <Auto Adjust Gradation>
  <Quick Adjust>.
 (Settings/Registration)
  <Adjustment/Maintenance>
  <Adjust Image Quality>
  <Auto Adjust Gradation>
  <Quick Adjust>.
2
Press <Start>.
Visual Adjustment (imageRUNNER ADVANCE DX C359P Only)
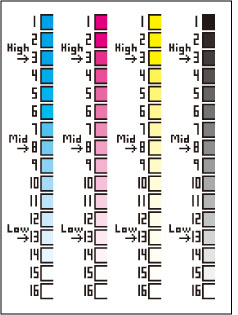
Precisely adjust the gradation of the image through visual observation so that printing is performed with optimal reproducibility. The data to ensure optimal reproducibility is saved until visual adjustment is performed next time.
 |
To perform visual adjustment, you need to use the color chart included with the machine. Have it at hand.  |
1
Press  (Settings/Registration)
  <Adjustment/Maintenance>
  <Adjust Image Quality>
  <Adjust Gradation>
  <Visually Adjust>.
 (Settings/Registration)
  <Adjustment/Maintenance>
  <Adjust Image Quality>
  <Adjust Gradation>
  <Visually Adjust>.
2
Select the paper source, and press <OK>.
3
Press <Start Printing>.
A test page is printed.

The test page refers to a sheet of paper with four color stripes printed, which you use in the following steps.
4
Press <Enter Values>.
5
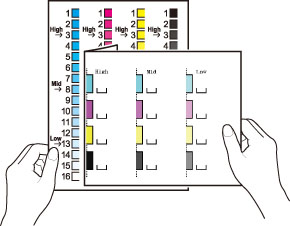
Compare the test page and the color chart for colors, and enter the values.
Example: Entering the "High" value for cyan
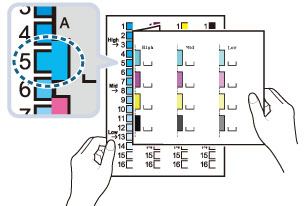
 | Make a mountain fold of the test page along the dotted line for "High," and hold the test page on the color chart. Position the test page on the sample sheet so that you can make proper comparison for tones of cyan.  |
 | Determine the tone of cyan on the color chart that most closely matches the "High" density of cyan on the test page, and identify the corresponding value indicated in the color chart.   It is convenient that you write the color chart value on  printed on the test page. printed on the test page. |
 | Enter the identified value in the <H Density (High)> cell for <Cyan> on the screen. Also for the other colors, perform color comparison and enter the value. |
6
Press <Start Printing>.
A post-adjustment test page is output.
To end the operation without checking the adjustment result, press <End>.
7
Check the adjustment result by comparing the post-adjustment test page and the color chart for the colors.
Check if the colors on the post-adjustment test page are the same as those of "High (3)", "Mid (8)", and "Low (13)" on the color chart.
 |
If you want to perform visual adjustment after value initialization, press <Use Initial Settings>  <On> before pressing <Visually Adjust> in step 1. <On> before pressing <Visually Adjust> in step 1. |
Automatic Adjustment (imageRUNNER ADVANCE DX C359P Only)
Perform simple adjustment before visual adjustment is performed next time.
1
Press  (Settings/Registration)
  <Adjustment/Maintenance>
  <Adjust Image Quality>
  <Adjust Gradation>
  <Auto Adjust>.
 (Settings/Registration)
  <Adjustment/Maintenance>
  <Adjust Image Quality>
  <Adjust Gradation>
  <Auto Adjust>.
2
Press <Start>.