Setting IPv4 Addresses
The machine's IPv4 address can either be assigned automatically using DHCP or entered manually.
By default, the IPv4 address is set automatically when connected to a wired or wireless LAN, but you can set it or change it manually according to your usage environment and purpose.
By default, the IPv4 address is set automatically when connected to a wired or wireless LAN, but you can set it or change it manually according to your usage environment and purpose.
This section describes how to configure the settings using the control panel.
You can also set the IPv4 address using Remote UI from a computer after it has been set on the machine. Managing the Machine from a Computer (Remote UI)
Administrator privileges are required. The machine must be restarted to apply the settings.
You can also set the IPv4 address using Remote UI from a computer after it has been set on the machine. Managing the Machine from a Computer (Remote UI)
Administrator privileges are required. The machine must be restarted to apply the settings.
1
On the control panel, press [Menu] in the [Home] screen. [Home] Screen
2
Press [Preferences]  [Network]
  [TCP/IP Settings]
  [IPv4 Settings]
  [IP Address Settings].
 [Network]
  [TCP/IP Settings]
  [IPv4 Settings]
  [IP Address Settings].
If the login screen appears, enter the System Manager ID and PIN, and then press [Log In]. System Manager ID and PIN
3
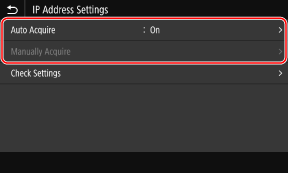
Set the IP address.

 When Manually Setting the IP Address
1 | Press [Auto Acquire]. The [IP Address Settings (Auto Acquire)] screen is displayed. |
2 | Set [Auto Acquire] to [Off], and press [Apply]  [OK]. [OK].The [IP Address Settings] screen is displayed. |
3 | Press [Manually Acquire]. The IP address input screen is displayed. |
4 | Enter the IP address, subnet mask, and gateway address, and press [Apply]. |
 When Assigning an IP Address Automatically
1 | Press [Auto Acquire]. The [IP Address Settings (Auto Acquire)] screen is displayed. |
2 | Set [Auto Acquire] to [On]. |
3 | Configure the Auto Acquire setting, as needed. [Select Protocol] Normally, set to [DHCP]. However, when [DHCP] is set in an environment where DHCP cannot be used, the machine will continue to confirm Auto Acquire in the network, creating unnecessary communication. When not using DHCP, set this to [Off]. [Auto IP] Normally, set to [On]. Although priority is given to the IP address allocated with DHCP, if there is no response from DHCP, Auto IP will be used. |
4 | Press [Apply]. |
4
Press [OK].
5
Restart the machine. Restarting the Machine
The settings are applied.
Perform a connection test to check whether the IPv4 address is correctly configured. Checking the Network Status and Settings
Perform a connection test to check whether the IPv4 address is correctly configured. Checking the Network Status and Settings
 |
Checking the Currently Set IP AddressOn the screen in Step 3, press [Check Settings] to check the current IP address setting. If the IP address is displayed as "0.0.0.0," it is not correctly configured. If the IP Address Is Changed after Installing the Printer DriverIn Windows, the required action depends on the port you are using. If you are using an MFNP port, the connection is maintained as long as the machine and computer belong to the same subnet, so no action is required on the computer. If you are using a standard TCP/IP port, you must add a new port. Adding a Port If you do not know which port is being used, see the following: Viewing the Printer Port In macOS, you must re-register the machine on the Mac. For details about registering the machine, see the manual of the driver at the online manual site. https://oip.manual.canon/ * If you are using DHCP to automatically obtain the IP address of the machine, the IP address may be changed automatically. |