
Removing Static Using the Static elimination rollers
When printing on Transparency, Translucent Film, Clear Film, Synthetic (Polypropylene), or Synthetic (Polyester), sheets of the paper may hold static so that they may stick together or output sheets of the paper may not be aligned neatly. In this case, removing static by using the Static elimination rollers may prevent sheets of the output paper from sticking together.
|
It is recommended to use a static measurement instrument to measure static to specify the static elimination adjustment value. If you do not use a static measurement instrument, it may take longer time to specify the static elimination adjustment value, there may be more sheets of printed paper, or static may not be removed properly. When the static elimination adjustment value is set to a higher range, an overcurrent may occur and the red indicator may be lit to warn an anomaly. In this case, shut down the machine and turn the machine ON again to turn off the red indicator. Then, decrease the static elimination adjustment value lower enough so that the red indicator is not lit and confirm the static elimination effect. Depending on a paper type, the number of sheets, or the usage environment, static may not be fully removed. When printing on paper other than Transparency, Translucent Film, Clear Film, Synthetic (Polypropylene), or Synthetic (Polyester), turning the Static elimination rollers switch ON and letting the paper pass through the Static elimination rollers may result in malfunctioning. When a sheet of paper is passing through the Static elimination rollers, do not change the setting dials or do not turn the Static elimination rollers switch ON or OFF. When printing is complete that needs removing static, be sure to turn the Static elimination rollers switch OFF. Even if static is removed, sheets of paper may stick together. In this case, fan the stack of paper thoroughly to clear sticking. Removing static can be performed only when the output delivery setting is specified to face-up* whether a job is 2-sided printing or 1-sided printing. * When using Clear Film, specify the output delivery setting to face-down. When the Static elimination rollers switch is turned ON, do not perform post processes such as 1-sided stapling or inserting a sheet; or do not perform a mixed media job or a merged job. |
 |
Change the setting dials within the range between 00 and 65. |
Preparation
1
Confirm the approximate value for a static elimination adjustment value suitable to the usage environment.
1-sided printing
Environment | Static Elimination Adjustment Value | |
Approximate Value | Maximum Value | |
Low temperature, low humidity | 40 | 65 |
Normal temperature, normal humidity | 30 | 50 |
High temperature, high humidity | 5 | 40 |

When printing 1-sided, specify the output delivery setting to face-up*.
* When using Clear Film, specify the output delivery setting to face-down.
2-sided printing
Environment | Static Elimination Adjustment Value | |
Approximate Value | Maximum Value | |
Low temperature, low humidity | 25 | 50 |
Normal temperature, normal humidity | 20 | 40 |
High temperature, high humidity | 5 | 30 |
 |
To determine the temperature and humidity pattern of the current usage environment, refer to the following graph. 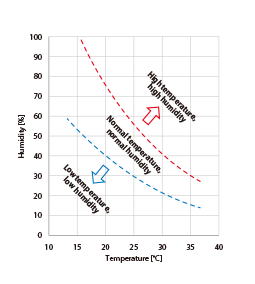 |
2
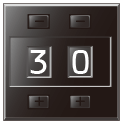
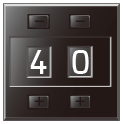
Change the setting dials to the "approximate value" of the static elimination adjustment value.
Example: When printing 1-sided in a normal temperature and normal humidity environment
3
Change the setting dials following the steps in "Adjustment using a static measurement instrument" or "Adjustment without using a static measurement instrument".
Adjustment using a static measurement instrument
|
For a recommended static measurement instrument, contact your dealer or service representative. Change the setting dials within the range between 00 and 65. |
1
Change the setting dials following "Preparation".
2
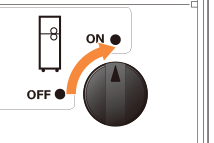
Turn the Static elimination rollers switch "ON".
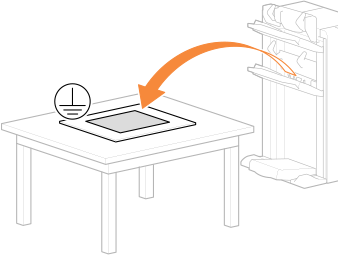
3
Load paper you want to use to a paper drawer and print a single page among the images you want to print.
When printing 1-sided, specify the output delivery setting to face-up*.
* When using Clear Film, specify the output delivery setting to face-down.
4
Move the printed paper onto a metal board or conductive mat that is grounded without changing the facing sides.
Move the output paper onto a metal board or conductive mat without changing the facing sides.
The surface of the metal board must not be covered by an insulated layer.
5
Measure the surface potential of the paper within ten seconds after the paper is put on the metal board or conductive mat.
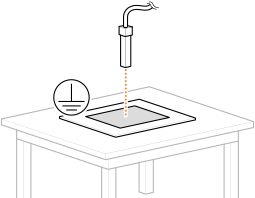
In order to measure the accurate surface potential of the paper, move the paper onto the metal board or conductive mat and perform measurement, soon after the paper is output (approximately within ten seconds).
Measure at the point where the paper and the grounded metal board or conductive mat are closely touching.
Perform measurement keeping the distance between the paper and the static measurement instrument to the distance that is recommended for the static measurement instrument you are using.
6
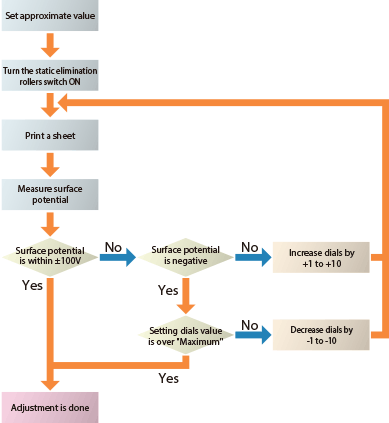
Confirm the measured electric potential and change the setting dials to adjust the static elimination adjustment value.
Surface potential | How to change |
Within ±100V | Adjustment is done |
Smaller than -100V | Increase the setting dials value. |
Greater than +100V | Decrease the setting dials value. |
7
Repeat Steps 3 to 6 and check again whether the surface potential is within ±100V.
|
Change the setting dials within the range between 00 and 65. When the setting dials value exceeds the designated maximum value, stop the adjustment with changing the setting dials value to the designated maximum value and confirm the static elimination effect. |
Adjustment without using a static measurement instrument
1
Change the setting dials following "Preparation".
2
Turn the Static elimination rollers switch ON.
3
Load paper you want to use to a paper drawer and print a single page among the images you want to print.
When printing 1-sided, specify the output delivery setting to face-up*.
* When using Clear Film, specify the output delivery setting to face-down.
4
Confirm whether you feel that the printed sheets of paper are sticking together.
When you do not feel sticking, the adjustment is done.
5
Increase the setting dials value by 10 and print several pages among the images you want to print.
Example: When printing 1-sided in a normal temperature and normal humidity environment
6
Confirm whether you feel that the printed sheets of paper are sticking together.
Sticking is not felt
Adjustment is done.
Sticking is felt weaker
Increase the setting dials value by 1 to 5 and repeat the adjustment.
Sticking is felt stronger
Decrease the setting dials value by 1 to 5 and repeat the adjustment.
|
Change the setting dials within the range between 00 and 65. |