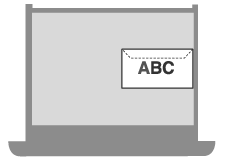
Orientation for Loading Envelopes (Paper Drawer)
When loading envelopes in the paper drawer, install the Envelope Feeder Attachment and pay attention to the envelope orientation.
Set the orientation in the [Orientation] setting of the printer driver. For details, click [Help] on the [Printing Preferences] screen to display help.
Set the orientation in the [Orientation] setting of the printer driver. For details, click [Help] on the [Printing Preferences] screen to display help.
Installing the Envelope Feeder Attachment and the Orientation of Envelopes (Paper Drawer 1)
Installing the Envelope Feeder Attachment
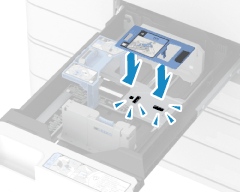
Install Envelope Feeder Attachment A and Envelope Feeder Attachment B to paper drawer 1. Prepare Envelope Feeder Attachment B.
* Envelope Feeder Attachment A is stored in paper drawer 2.
* Envelope Feeder Attachment B is not required when loading ISO-C5 envelopes.
* Envelope Feeder Attachment B is not required when loading ISO-C5 envelopes.
1
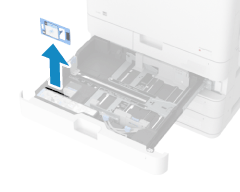
Remove Envelope Feeder Attachment A that is stored in paper drawer 2.
2
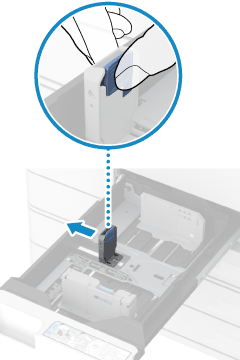
Slide the left paper guide on paper drawer 1 to the outside.
3
Install Envelope Feeder Attachment B after adjusting the left paper guide.
4
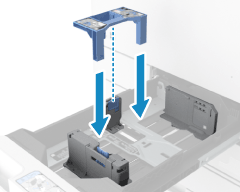
Install Envelope Feeder Attachment A while aligning the projection with the hole on the bottom of the paper drawer.
NOTE
Remove the Envelope Feeder Attachment when no longer using envelopes in the paper drawer.
Store the removed Envelope Feeder Attachment A in paper drawer 2. Keep Envelope Feeder Attachment B in a safe place so it does not become lost.
Store the removed Envelope Feeder Attachment A in paper drawer 2. Keep Envelope Feeder Attachment B in a safe place so it does not become lost.
Orientation for Loading Envelopes
Load up to 25 envelopes in portrait orientation with the print side face up and the long edge of the envelopes parallel with the long edge of the paper drawer.
The orientation of the flap and whether it is open or closed vary depending on the size of the envelope.
The orientation of the flap and whether it is open or closed vary depending on the size of the envelope.
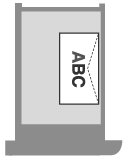
No. 10 (COM10), ISO-C5, DL, and Monarch
Load the envelopes with the flap closed and on the right side.
Example: When printing on the front side
Example: When printing on the front side
Nagagata 3
Load the envelopes with the flap open and at the back.
Example: When printing on the front side
Example: When printing on the front side
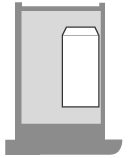
Yougatanaga 3
When Loading Envelopes with the Flap Closed
Load the envelopes with the flap on the right side.
Example: When printing on the front side
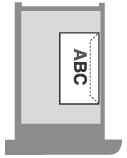
When Loading Envelopes with the Flap Open
Load the envelopes with the flap on the left side.
Example: When printing on the front side
Example: When printing on the front side
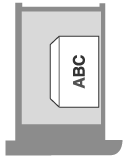
Installing the Envelope Feeder Attachment and Orientation of Envelopes (Paper Drawer 2)
Installing the Envelope Feeder Attachment
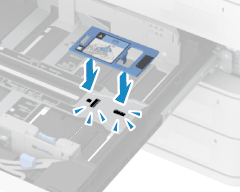
Install Envelope Feeder Attachment A to paper drawer 2.
* Envelope Feeder Attachment A is not required when loading Kakugata 2 envelopes.
1
Remove Envelope Feeder Attachment A that is stored in paper drawer 2.

2
Install Envelope Feeder Attachment A while aligning the projection with the hole on the bottom of the paper drawer.
NOTE
Remove the Envelope Feeder Attachment when no longer using envelopes in the paper drawer.
Store the removed Envelope Feeder Attachment A in paper drawer 2.
Store the removed Envelope Feeder Attachment A in paper drawer 2.
Orientation for Loading Envelopes
Load up to 50 envelopes in landscape orientation with the print side face up and the long edge of the envelopes parallel with the long edge of the paper drawer.
The orientation of the flap and whether it is open or closed vary depending on the size of the envelope.
The orientation of the flap and whether it is open or closed vary depending on the size of the envelope.
No.10 (COM10), ISO-C5, DL, and Monarch
Load the envelopes with the flap closed and at the front.
Example: When printing on the front side
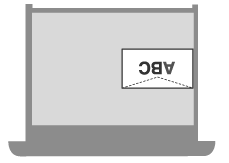
Nagagata 3 and Kakugata 2
Load the envelopes with the flap open and on the left side.
Example: When printing on the front side
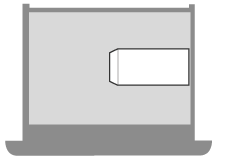
Yougatanaga 3
Load the envelopes with the flap closed and at the back.
Example: When printing on the front side
Example: When printing on the front side
