Adjusting the Saddle Stitch Fold Position and Staple Position
Adjust the saddle stitch fold position and staple position so that they are at the center of the paper. Print a test page, check the current state of the fold position and the shift width on the test page, and then perform adjustment.

* Adjustment can be performed only when an option that supports the saddle stitch function is installed on the machine.
Use the control panel to adjust the saddle stitch fold position and staple position. You cannot perform adjustment using Remote UI from a computer.
1
On the control panel, press [ Settings/Registration] in the [Home] screen or other screen. [Home] Screen
Settings/Registration] in the [Home] screen or other screen. [Home] ScreenThe [Settings/Registration] screen is displayed.
2
Press [Adjustment/Maintenance]  [Adjust Action] [Adjust Saddle Stitch Fold Position/Stitch Position].
3
Check the displayed instructions, and press [Next].
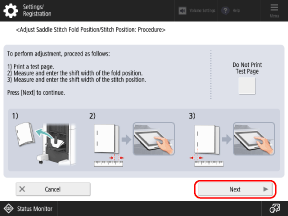
If the test page has already been printed, press [Do Not Print Test Page] to select it, and then press [Next].
4
Select the paper source with the loaded usable paper, and press [Start Printing].
A test page is printed.
Select the current state of the fold position and set the shift width.
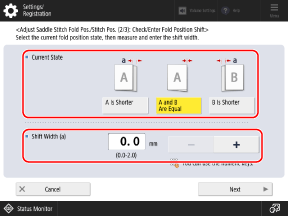
Check the current state of the fold position and the shift width on the test page, then select the current state and set the shift width.
6
Press [Next].
7
Select the current state of the staple position and set the shift width.
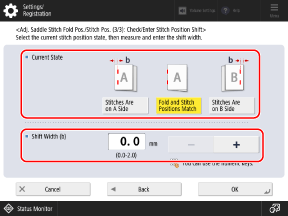
Check the current state of the staple position and the shift width on the test page, then select the current state and set the shift width.
8
Press [OK].
Press [Start Printing] to print the test page again, and check the adjustment results.
To end the adjustment without printing the test page, press [Done].
10
Press [Done].