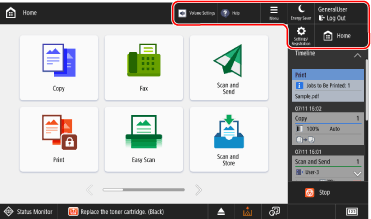
[Home] Screen
This screen is displayed when you press [ Home] on the control panel.
Function shortcuts as well as login and settings information are constantly displayed at the top of the screen for quick operations, as needed.
The function and setting buttons are displayed in the middle of the screen. Press [ ] or [
 ] at the bottom or flick the screen left or right to change the displayed function and setting buttons. Press these buttons to perform functions and change settings.
The right side of the screen displays a timeline (setting history and information about data waiting to be printed) and a cancel button.
The status of the machine and operation buttons are constantly displayed at the bottom of the screen for quick viewing and operations, as needed.
Home] on the control panel. Function shortcuts as well as login and settings information are constantly displayed at the top of the screen for quick operations, as needed.
The function and setting buttons are displayed in the middle of the screen. Press [
] or [] at the bottom or flick the screen left or right to change the displayed function and setting buttons. Press these buttons to perform functions and change settings. The right side of the screen displays a timeline (setting history and information about data waiting to be printed) and a cancel button.
The status of the machine and operation buttons are constantly displayed at the bottom of the screen for quick viewing and operations, as needed.
Function Shortcuts and Login and Settings Information
Function Shortcuts
Registered shortcuts of the functions. The shortcuts are constantly displayed, so you can call a function without having to return to the [Home] screen, even if you are operating another function. Registering Shortcuts to Frequently Used Functions
[ Menu]
Menu]
Menu]Customize the [Home] screen and configure the management settings. You can also press and hold the background of the [Home] screen to display the [ Menu] items.
Menu] items.[ Energy Saver]
Energy Saver]Puts the machine into Sleep Mode to reduce power consumption. Reducing Power Consumption (Sleep Mode)
[ Log In] and [
 Log Out]
Log In] and [ Log Out]Log in to and out from the machine. When a user is logged in, the login user name is displayed. Logging In to the Machine
[ Settings/Registration]
Settings/Registration]Configure the various settings of the machine. [Settings/Registration] Menu List
[ Home]
Home]Displays the [Home] screen.
Function and Setting Buttons
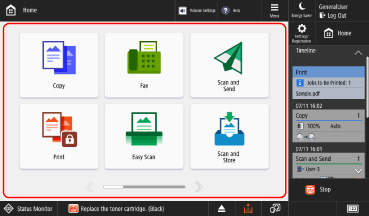
* The buttons that appear on the screen vary depending on the model, options, and setting status.
 | [Copy] Copies originals. Copy Operations |
 | [Fax] Faxes documents. Sending Faxes |
 | [Scan and Send] Sends scanned data. Sending Scanned Data |
 | [Print] Prints documents forcibly held in the machine. Printing Documents in Forced Hold State |
 | [Easy Scan and Send]/[Easy Scan] Scans and sends data with simple operations. After you select the destination, you can scan and send using the settings automatically selected by the machine. Sending with Easy Scan and Send/Easy Scan |
 | [Scan and Store] Saves scanned data to the following locations: Saving Scanned Data Mail Box Advanced Space Other device or server on the network USB memory device |
 | [Access Stored Files] Prints or sends data saved in the following locations: Using Storage Space Mail Box Advanced Space Other device or server on the network USB memory device |
 | [Fax/I-Fax Inbox] Displays, prints, and forwards faxes and I-Faxes received in the Memory RX Inbox and Confidential Fax Inbox. |
 | [Dest./Fwd. Settings] Registers destinations when sending and saving scanned data and faxes, and configures the forwarding settings for received faxes and I-Faxes. |
 | [Volume Settings] Adjusts the volume of sounds emitted by the machine. Adjusting the Volume |
 | [Adjust Brightness] Adjusts the brightness of the screen. |
 | [Mobile Portal] Connects a mobile device to the machine. Connecting a Mobile Device to the Machine |
 | [Scan for Mobile] Readies the machine to scan when operating and scanning from a mobile device. Using a Dedicated Application to Print and Scan (Canon PRINT) |
 | [Hold] Prints data held in the machine. Previewing a Document on the Machine Before Printing (Hold) (For C7100 Series and C5100 Series) |
 | [Scanner] Turns the machine online (ready to scan) when operating and scanning from a computer. Scanning from a Computer (Windows Only) |
 | [Web Access] Enables web access from the control panel. For more information, see the manual of the Web Access on the online manual site. |
 | [Settings/Regist. Shortcut] Register and recall shortcuts to setting items displayed when you press [ Settings/Registration]. Registering Shortcuts in the Settings Menu |
 | [Personal Settings] Configure the operation environment for each user logged in to the machine. Customizing the Display and Operations for Individual Users (Personal Settings) |
 | [Status Monitor] You can select [Job Status/Log] to check the processing status and history of each function and the remaining amount of consumables and parts. You can select [Operating Status] to check the status of the machine and operations, the causes of problems, and troubleshooting methods. |
 | [Help] You can scan the QR code with a mobile device to display the User's Guide (this manual) in the web browser on the mobile device. |
In addition to the above function and setting buttons, this screen also displays the registered Personal and Shared buttons. Adding Buttons to the [Home] Screen (Personal and Shared Buttons)
Timeline and Stop Button
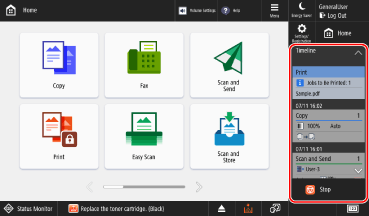
[Timeline]
Displays the setting history and information on jobs waiting to be printed for quick operations. Displaying and Operating the Timeline
[ Stop]
Stop]
Stop]Cancels an operation being executed.
Machine Status Items and Operation Buttons
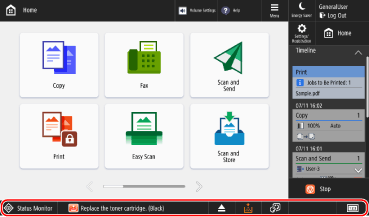
[ Status Monitor]
Status Monitor]You can select [Job Status/Log] to check the processing status and history of each function and the remaining amount of consumables and parts.
You can select [Operating Status] to check the status of the machine and operations, the causes of problems, and troubleshooting methods.
Status Display
Displays the machine status and error information using messages and icons. A Message Appears
Button Display
Displays the buttons below in order from left to right according to the machine status and settings.
* The buttons that appear on the screen vary depending on the model and options.
When a USB Memory Device Is Inserted
 Safely ejects the USB memory device. Removing the USB Memory Device
When Maintenance Is Required
Press a button to display the procedure for the required maintenance.
 Clearing a paper jam
 Removing jammed staples or adding staples
 Replacing toner cartridges
 Replacing the waste toner container
 Disposing of staple waste, punch waste, and trim waste.
 Replacing consumable parts
When the Display Language Can Be Switched by Button
 Select the display language.
[ ]
]
]Displays the total number of pages printed and sent. You can also check the machine's IP address and option configuration.