Use the control panel to adjust the color balance. You cannot perform adjustment using Remote UI from a computer.
Administrator or DeviceAdmin privileges are required.
Adjusting the Color Balance (For C7100 Series and C5100 Series)

Adjust the color balance of yellow, magenta, cyan, and black when printing in color. You can adjust the levels of the three density areas for each color.
1
Log in to the machine as an administrator. Logging In to the Machine
2
On the control panel, press [ Settings/Registration] in the [Home] screen or other screen. [Home] Screen
Settings/Registration] in the [Home] screen or other screen. [Home] ScreenThe [Settings/Registration] screen is displayed.
3
Press [Adjustment/Maintenance]  [Adjust Image Quality] [Color Balance].
The screen for selecting the paper type to adjust is displayed.
4
Select either [Non-Coated] or [Coated].
5
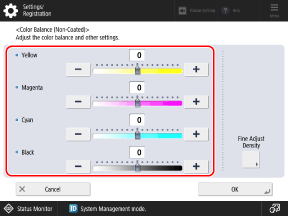
Move the slider for each color to the left or right to adjust the color balance.
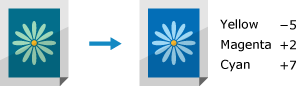
Adjustment example:
6
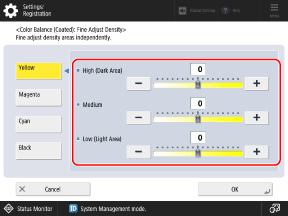
Press [Fine Adjust Density], as needed.
The [Fine Adjust Density] screen is displayed.
You can skip this step if you do not want to adjust the color balance for each density area. Proceed to Step 9.
7
Select the color to make fine adjustment, and move the slider for each density area to the left or right to adjust the color balance.
8
Press [OK].
The screen for adjusting the color balance is displayed again.
Press [OK].
The adjustments are applied.