Adjusting the Print Position for Each Paper Source
If the print position is shifted when you use a particular paper source, specify the paper source and adjust the print position.
You can adjust the print position either automatically by scanning a printed test page with the machine, or manually by entering the measured values.
You can adjust the print position either automatically by scanning a printed test page with the machine, or manually by entering the measured values.
Adjusting Automatically by Scanning
Scan the printed test page with the machine to automatically determine and adjust the print position.
Use the control panel to perform adjustment. You cannot perform adjustment using Remote UI from a computer.
1
On the control panel, press [ Settings/Registration] in the [Home] screen or other screen. [Home] Screen
Settings/Registration] in the [Home] screen or other screen. [Home] ScreenThe [Settings/Registration] screen is displayed.
2
Press [Adjustment/Maintenance]  [Adjust Image Quality] [Adjust Image Position for Each Paper Drawer].
The screen for selecting the adjustment method is displayed.
3
Press [Adjust Automatically].
Select where to place the test page for scanning and set the number of sheets to output, as needed.
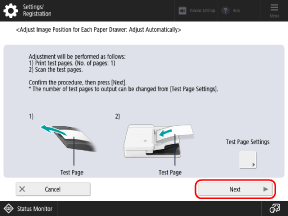
Press [Test Page Settings], select where to place the test page for scanning, set the number of sheets to output, and then press [OK] [Next].
Scanning the multiple sheets of test pages for adjustment may increase calibration accuracy.
If you do not want to configure the test page settings, press [Next] without configuring the settings.
5
Select the paper source that you want to adjust, and press [Start Printing].
The test page(s) is printed.
6
Scan the test page to perform adjustment.
Place the test page in the feeder or on the platen glass according to the setting configured in Step 4.
When Using the Feeder to Scan
1
Follow the instructions on the screen to place the test page(s) in the feeder.
2
Press [Start Scanning].
The test page(s) is scanned, and adjustment is performed.
When the print position adjustment is complete, [Adjustment is complete.] is displayed.
When the print position adjustment is complete, [Adjustment is complete.] is displayed.
When Using the Platen Glass to Scan
1
Press [Output Guide Sheet].
2
Select the paper source loaded with usable paper, and press [Start Printing].
The guide sheet is printed.
3
Place the guide sheet on the platen glass.
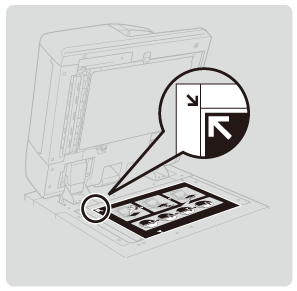
Place the guide sheet so that the arrow on the guide sheet is aligned with the arrow on the platen glass.
4
Place the test page so that the  (blue) mark is aligned with the mark on the guide sheet, and gently close the feeder.
(blue) mark is aligned with the mark on the guide sheet, and gently close the feeder.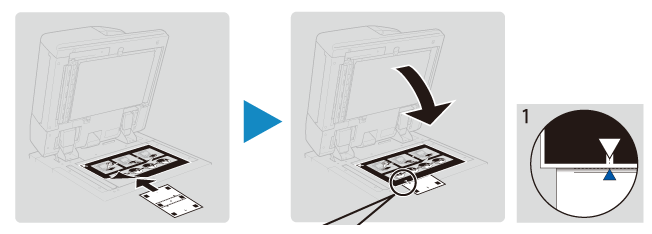
Make sure that the guide sheet does not move when you close the feeder.
5
Press [Start Scanning].
6
Repeat Steps 4 and 5 for the  (yellow),
  (green), and
  (red) marks, in that order.
(yellow), (green), and (red) marks, in that order.Turn the test page upside down or turn it over, depending on where each mark is located.
When the print position adjustment is complete, [Adjustment is complete.] is displayed.
7
Repeat Step 4 to 6 for the number of test pages printed in Step 4.
Adjusting by Entering Measured Values
Check the shift amount of the image on the printed test page, and adjust the print position.
Use the control panel to perform adjustment. You cannot perform adjustment using Remote UI from a computer.
1
On the control panel, press [Settings/Registration] in the [Home] screen or other screen. [Home] Screen
Settings/Registration] in the [Home] screen or other screen. [Home] ScreenThe [Settings/Registration] screen is displayed.
2
Press [Adjustment/Maintenance] [Adjust Image Quality] [Adjust Image Position for Each Paper Drawer].
The screen for selecting the adjustment method is displayed.
3
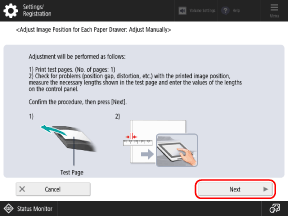
Press [Adjust Manually].
4
Check the instructions, and press [Next].
5
Select the paper source for which you want to adjust the print position, and press [Start Printing].
The test page is printed.
Measure the lengths on the test page, and adjust the print position for each item.
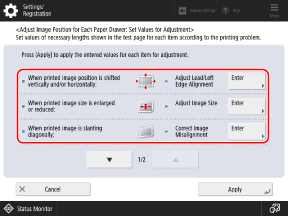
For any adjustment item you select, follow the instructions on the screen to measure each length on the front and back sides of the test page, and enter the values.
The front side has "1st side" printed on it, and the back side has "2nd side" printed on it.
The front side has "1st side" printed on it, and the back side has "2nd side" printed on it.
1
Press [Enter] for the item that you want to adjust.
2
Measure the lengths on the front side, enter the values, and press [Next].
3
Measure the lengths on the back side, enter the values, and press [OK].
7
Press [Apply].
Press [Start Printing] to print the test page again, and check the adjustment results.
To end the adjustment without printing the test page, press [Close].
9
Press [Done].