[Add User] and [Edit User Information] Screen
Log in to Remote UI as an administrator with Administrator privileges, click [Settings/Registration]  [User Management] [Authentication Management], and then click [Add User] or [Edit] for the user name to display the [Add User] or [Edit User Information] screen.
You can register new user information to the local device or edit registered user information on these screens.
You can register new user information to the local device or edit registered user information on these screens.
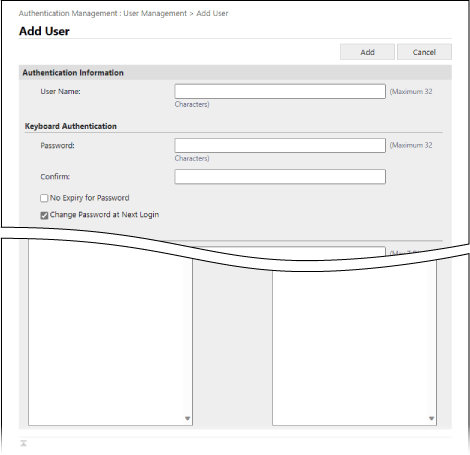
[Authentication Information]
Specify the user name and authentication information according to the login method.
[User Name]
Enter the user name.
[Keyboard Authentication]
[Password] and [Confirm]
Enter the password for logging in with keyboard authentication in both [Password] and [Confirm].
* To edit registered user information, select the [Change password] checkbox, and enter the information.
[No Expiry for Password]
Select this checkbox to set the password never to expire.
[Change Password at Next Login]
Select this checkbox to force the user to change the password at first login. When the user changes the password, the checkbox is cleared automatically.
[Remote UI Authentication]
[Use Two-Factor Authentication]
Select this checkbox if users enter a one-time password (two-factor authentication) when they log in to Remote UI.
* This setting is available only when login users edit their own user information.
[User Information]
[Displayed As]
Enter the name of the user to be registered.
The display name is used for the following:
The display name is used for the following:
The sender name when sending e-mail
The user name at forced hold
[E-Mail Address]
Enter the e-mail address of the user.
When scanned data is sent, the address entered here is also displayed together with the sender name. This address is also used when sending a document by pressing [Send to Myself]. When an I-Fax is sent, this address is displayed as the sender in the Sender line of the receiving device.
When scanned data is sent, the address entered here is also displayed together with the sender name. This address is also used when sending a document by pressing [Send to Myself]. When an I-Fax is sent, this address is displayed as the sender in the Sender line of the receiving device.
[IPP Print Information]
To associate IPP Printing with the user, specify the e-mail address used for IPP printing.
* You can configure the setting when the setting in [Settings/Registration] [Network Settings] [IPP Print Settings] is enabled.
* Users registered in the local device can configure the settings themselves, or an administrator can configure batch settings by using a CSV file. Associating IPP Printing Information with Users
[Information for Universal Print]
To associate a user with Universal Print, specify an e-mail address or telephone number associated with a Microsoft 365 account.
* To be able to use this setting, click [Settings/Registration] [Network Settings] [Settings for Universal Print], and confirm that [Settings for Universal Print] enabled.
* Users registered in the local device can configure the settings themselves, or an administrator can configure batch settings by using a CSV file. Associating Universal Print Information with Users
[Department ID Settings]
To use Department ID Management, specify the Department ID to which the user belongs.
Click [Department ID Settings], select the Department ID form the list, and click [OK].
Click [Department ID Settings], select the Department ID form the list, and click [OK].
* You can register the new Department ID in [Register New Department] on the screen for selecting the Department ID. Registering a Department ID and PIN
* If the Department ID assigned to a user is deleted, you must change the settings. Assigning a Department ID to a User
[Role Settings]
Select the user privileges (roles). Roles
[User Account Settings]
[Set expiration for the user account]
To set the account to expire, select the checkbox and enter the expiration date.
[Disable the user account]
Select this checkbox to disable the user account temporarily.
[User Group Association]
To associate a user with a user group, select a user group from the list, and click [Add].
* This setting is not displayed when using Department ID as a user group.
NOTE
When Logging In as a General User
A user with GeneralUser privileges can change the following information after logging in to Remote UI and clicking [Settings/Registration] [User Management] [Authentication Management]:
[Password] and [PIN]
[Use Two-Factor Authentication]
[Displayed As]
[E-Mail Address]
* In the authentication function settings, [Setting Changes by Users Without Administrator Privileges] in [Other Settings] needs to be set to allow users to configure e-mail address settings. [Edit Basic Settings] Screen