Saving Documents to Mail Box
You can save documents scanned with the machine as data, and you can save files sent from the printer driver of a computer to the machine.
Saving Documents Scanned with the Machine
On the control panel, scan a document with the machine from [Scan and Store] in the [Home] screen, and save the scanned data to Mail Box. Saving Scanned Data
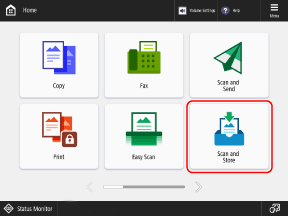
* You can also scan a document from [Copy], [Scan and Send], or [Access Stored Files] in the [Home] screen, and save the data to Mail Box.
Using [Copy] to save the data is useful if you want to print the scanned data at the same time. Storing the Data of Originals
Using [Scan and Send] to save the data is useful if you want to send the scanned data to an e-mail address or other destination at the same time. Sending Scanned Data
Using [Access Stored Files] to save the data is useful if you want to edit the saved file immediately before printing or sending it. Operating and Editing Files in Mail Box
Sending Files on a Computer to the Machine to Save
You can send files on a computer to the machine via the printer driver and save them to Mail Box.
If you change the printer driver settings when sending the files, the print settings, such as 2-sided printing, are saved together, saving you the trouble of having to reconfigure the settings when printing with the machine or printing several times with the same setting.
If you change the printer driver settings when sending the files, the print settings, such as 2-sided printing, are saved together, saving you the trouble of having to reconfigure the settings when printing with the machine or printing several times with the same setting.
This section describes the general procedure for this operation. Check the manual of the application you are using for detailed operations on how to use it.
Required Preparations
Install the printer driver on the computer. Installing Software and Drivers to the Computer
When Using Windows
1
Open the document you are sending to Mail Box on your computer.
2
In the application used to open the document, select the command to print.
3
Select the printer driver of the machine, and click [More settings] or [Properties].
The [Printing preferences] screen of the printer driver is displayed.
4
In [Output Method], select [Store].
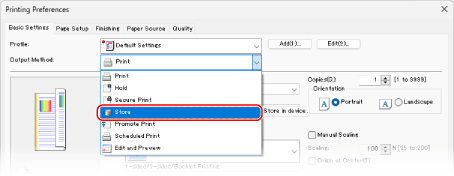
The [Information] screen is displayed.
5
Click [Yes].
The [Store Details] screen is displayed.
Specify the file name when saved and the Mail Box to be used as the store location.
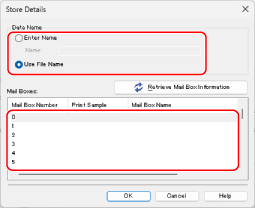
[Data Name]
If you select [Use File Name], the file is saved with the file name on the computer.
If you want to change the file name when saving, select [Enter Name], and enter a file name.
If you want to change the file name when saving, select [Enter Name], and enter a file name.
[Mail Boxes]
Select the Mail Box to be used as the store location.
You can select multiple Mail Boxes by pressing the [Ctrl] or [Shift] key on the keyboard while making your selection, thereby saving the same file to each Mail Box.
You can click [Get Box Information] to display the registered Mail Box names.
7
Click [OK].
The [Printing Preferences] screen reappears.
8
Configure the print settings, as needed.
Configure 2-sided printing and adjust the image quality and other settings to suit your document and purpose. For more information, click [Help] on the [Printing Preferences] screen to display help.
The print settings configured here are saved to the file.
9
Click [OK], and click [Print] or [OK].
The file is saved to the Mail Box specified in Step 6.
When Using macOS
1
Open the document you are sending to Mail Box on your computer.
2
From the menu in the application used to open the document, click [Print].
The printing dialog box appears.
3
In [Printer], select the printer driver of the machine.
4
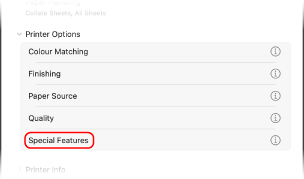
Click [Printer Options]  [Special Features].
 [Special Features].
5
In [Job Processing], select [Store], and click [OK].
6
Configure the print settings, as needed.
Configure 2-sided printing and adjust the image quality and other settings to suit your document and purpose. For more information, click [ ] in the printing dialog box to display help.
The print settings configured here are saved to the file.
7
Click [Print].
The [Store Destination] screen is displayed.
Specify the file name when saved and the Mail Box to be used as the store location.
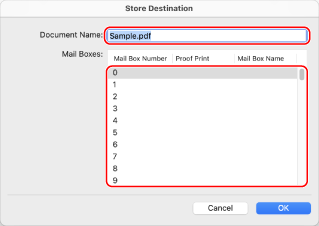
[Document Name]
Enter the file name when saving to Mail Box.
[Box]
Select the Mail Box to be used as the store location.
You can select multiple Mail Boxes by pressing the [command] key on the keyboard while making your selection, thereby saving the same file to each Mail Box.
You can select multiple Mail Boxes by pressing the [command] key on the keyboard while making your selection, thereby saving the same file to each Mail Box.
9
Click [OK].
The file is saved to the Mail Box specified in Step 8.