Sending Scanned Data
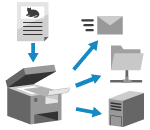
Scan the original and send the scanned data to the following destinations:
E-mail
Shared folder on a computer
File server (FTP server, Windows server, etc.)
You can specify multiple types of destinations at the same time.
For example, by sending scanned data to an e-mail address and shared folder simultaneously, you can back up data sent by e-mail by sending it to a shared folder at the same time.
For example, by sending scanned data to an e-mail address and shared folder simultaneously, you can back up data sent by e-mail by sending it to a shared folder at the same time.
To scan and send originals, you can either send with the Easy Scan and Send/Easy Scan function or configure the detailed settings when sending.
With Easy Scan and Send/Easy Scan, you can configure basic functions such as the specified destinations and color settings by performing simple button operations.
NOTE
If you configure the detailed settings when sending, you can also send to the following destinations:
Mail Box or Advanced Space
Fax destination [Display Fax Function]
Sending with Easy Scan and Send/Easy Scan
Required Preparations
Make preparations according to the scanned data sending destination. Preparing to Send and Save Scanned Data
1
Place the original. Placing Originals
If the screen for selecting the thickness of the original appears, select the thickness of the placed original.
2
On the control panel, press [Easy Scan and Send]/[Easy Scan] in the [Home] screen. [Home] Screen
The Easy Scan and Send (Europe and Americas)/Easy Scan (Asia/Oceania) screen is displayed.
3
Specify the destination.
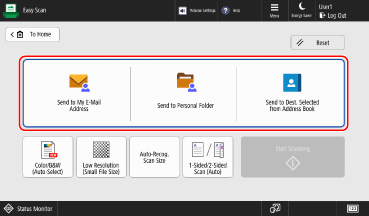
To specify the login user's e-mail address as a destination, press [Send to My E-Mail Address].
To specify a folder for a login user (Personal Folder) as a destination, press [Send to Personal Folder].
* [Send to Personal Folder] is displayed only when [Personal Folder Specification Method] is set to [Home Folder] or [Use Login Server]. [Personal Folder Specification Method]
* If [Send to Personal Folder] is not displayed, use [Scan and Send] to specify the Personal Folder as the destination when sending. Configuring the Detailed Settings When Sending
To specify a destination from the Address Book, press [Send to Dest. Selected from Address Book].
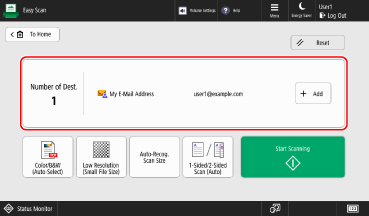
When Specifying Multiple Destinations
Press [Add] in the destination displaying area, and select the address to be added.
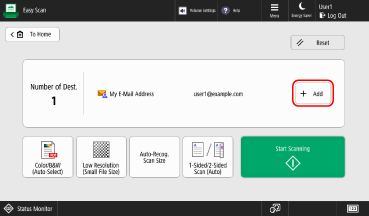
Up to 10 destinations can be specified at one time.
When Deleting the Specified Destination
1
Press the destination displaying area.
2
Select the address you want to delete, and press [Delete].
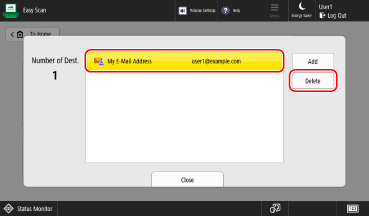
3
Press [Close].
4
Configure the scan settings.
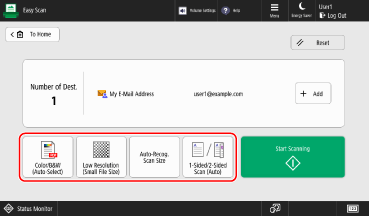
To cancel changes to the settings and return to the default settings, press [Reset].
Selecting the Color When Scanning
Press the color setting button, and select a color.

[Color/B&W (Auto-Select)]
Detects the color of the original automatically. Color originals are scanned in color, and black and white originals are scanned in grayscale.
* Color originals may be detected as black and white depending on the condition of the original and the size, such as when only the edges of the original are in color. In this case, select [Color].
[Color]
Scans in color, regardless of the color of the original.
* When set to [Color], black and white originals also count as color scans.
[Black & White]
Scans in shades of gray from white to black, regardless of the color of the original.
Setting the Resolution
Press the resolution setting button, and select the resolution.
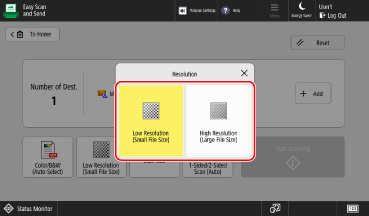
Increase the resolution when you want to scan originals more finely, and decrease the resolution for a smaller file size.
Setting the Scan Size
Press the scan size setting button, and select the scan size.
* You cannot specify the original size.
* You cannot specify the original size.

[Auto-Recog. Scan Size]
Select this when you want the machine to automatically recognize the size of the original.
[Free Size]
Select this when you scan a custom size original.
* When [Free Size] is selected, the original can only be placed in the feeder.
* When [Free Size] is selected, the original can only be placed in the feeder.
Scanning Both Sides of an Original
Press the 2-sided scan setting button, and select 1-sided or 2-sided.
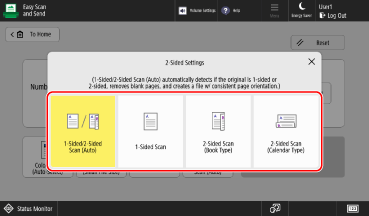
[1-Sided/2-Sided Scan (Auto)]
Scans originals as follows:
The machine automatically recognizes whether the original is 1-sided or 2-sided.
The machine automatically deletes (skips) pages determined to be blank.
The machine performs OCR processing when the original is scanned, and a text-searchable PDF file is created.
The machine detects the orientation of the text in the original and creates a file with the same orientation.
[1-Sided Scan]
Scans 2-sided originals one side at a time.
[2-Sided Scan (Book Type)]
Select this if the top and bottom orientation of the front and back sides of the original are the same.
[2-Sided Scan (Calendar Type)]
Select this if the top and bottom orientation of the front and back sides of the original are opposite.
When Creating a File Name by Extracting the Characters at the Beginning of the Original
On the [Easy Scan and Send] screen, set [Menu]  [Specify File Name from OCR (Text Searchable) Result] to [On].
This setting is available only when [1-Sided/2-Sided Scan (Auto)] is configured in the 2-sided scan settings.
You can change the characters extracted as a file name. [OCR (Text Searchable) Settings]
When [Specify File Name from OCR (Text Searchable) Result] is enabled, the file name is not applied to the following:
Send status displayed in the status display at the bottom of the screen [Home] Screen
TX report Printing a TX Report
TX log when a sending error occurs Checking the Send or Save Status and Log of Scanned Data
5
Click [ Start Scanning].
Start Scanning].Scanning of the original starts.
To cancel scanning, press [Cancel] [Yes]. Canceling Scanning
When scanning of the original is completed, the scanned data is sent. Use [ Status Monitor] to view the send status and log. Checking the Send or Save Status and Log of Scanned Data
Status Monitor] to view the send status and log. Checking the Send or Save Status and Log of Scanned DataWhen [Scan Next Original] Is Displayed
When an original is placed on the platen glass and is scanned, the screen for scanning additional originals is displayed.
1
To continue scanning originals, place the next original, and press [Scan Next Original].
The next original is scanned, and the same screen is displayed.
Repeat this process until scanning of all originals is completed.
Repeat this process until scanning of all originals is completed.
2
Press [Start Sending].
The scanned data is sent.
When the User Name and Password Input Screen and Confirmation Screen Are Displayed
Enter the user name and password and confirm these while following the instructions on the screen.
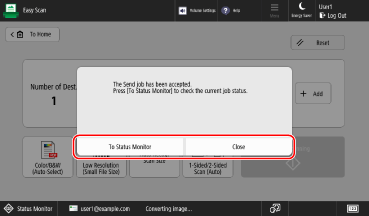
When [To Status Monitor] Is Displayed
To check the send status and log, press [To Status Monitor]. Checking the Send or Save Status and Log of Scanned Data
Press [Close] to return to the Easy Scan and Send/Easy Scan screen.
NOTE
When Multiple Originals Are Fed during Scanning and Operations Are Canceled (Detect Multiple Sheet Feed)
A message is displayed on the screen. Remove the jammed original while following the instructions in the message. Paper and Staple Jams
When the jammed original is removed, the screen for resuming operations is displayed.
If multi sheet feeding was detected incorrectly, press [Do Not Detect Multi. Sheet Feed] to resume scanning.
When the jammed original is removed, the screen for resuming operations is displayed.
If multi sheet feeding was detected incorrectly, press [Do Not Detect Multi. Sheet Feed] to resume scanning.
Change the default settings to prevent detection of multi sheet feeding. [Set Detection of Feeder Multi. Sheet Feed as Default]
* Depending on the model, the optional document feeder double feeding detection kit may be required in order to use the multiple sheet feed detection function. 

Configuring the Detailed Settings When Sending
Required Preparations
Make preparations according to the scanned data sending destination. Preparing to Send and Save Scanned Data
1
Place the original. Placing Originals
If the screen for selecting the thickness of the original appears, select the thickness of the placed original.
2
On the control panel, press [Scan and Send] in the [Home] screen. [Home] Screen
The scanning screen is displayed.
3
Specify the destination. Specifying Destinations
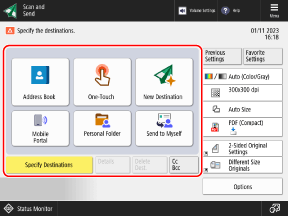
To specify a folder for a login user (Personal Folder) as a destination, press [Personal Folder].
To specify the e-mail address of a login user as a destination, press [Send to Myself].
When Specifying an E-Mail Address as a Cc or Bcc Destination
1
Press [Cc Bcc].
2
Press [Cc] or [Bcc].
3
Press [Specify Destinations], and specify a destination. Specifying Destinations
To change the type (To, Cc, or Bcc) of specified destination, press [To/Bcc|Cc] or [To/Cc|Bcc], specify the destination to change in Cc or Bcc, and press [OK].
4
Press [OK].
4
Configure the scan settings. Scan Settings
When "Favorite Settings" are registered, you can call them up by pressing [Favorite Settings]. Registering and Recalling Favorite Settings
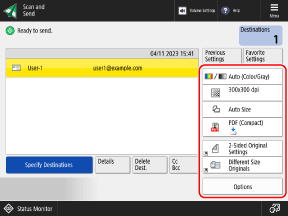
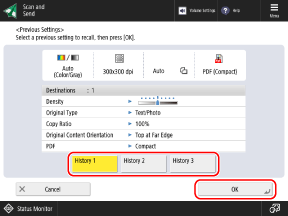
When Recalling Previous Settings (Setting History)
You can press [Previous Settings] to call up the settings used to send scanned data in the past. You can also apply the destination used to send data together with the setting.
When you call up the setting history, the specified destinations and scan settings are overwritten.
When you call up the setting history, the specified destinations and scan settings are overwritten.
* You cannot use the setting history when managing the destination with an access number. Hiding Destinations (Access Number Management)
On the [Previous Settings] screen, select the history you want to recall, and press [OK].
You can change the called up destination and scan settings, and send scanned data.
Each login user can select from their own setting history.
For users who are not logged in or guest users, you can select the setting history common to unauthorized users.
For users who are not logged in or guest users, you can select the setting history common to unauthorized users.
When entry of new destinations is restricted, the setting history is cleared regardless of the type of restricted destination. Sending Only to Registered Destinations
5
Click [ Start].
Start].Scanning of the original starts.
To cancel scanning, press [Cancel] [Yes]. Canceling Scanning
When scanning of the original is completed, the scanned data is sent. Use [ Status Monitor] to view the send status and log. Checking the Send or Save Status and Log of Scanned Data
Status Monitor] to view the send status and log. Checking the Send or Save Status and Log of Scanned DataWhen [Press the [Start] key to scan the next original.] Is Displayed
When an original is placed on the platen glass and is scanned or scanning is performed using Job Build, the screen for scanning additional originals is displayed.
1
To continue scanning originals, place the next original, and press [ Start].
Start].The next original is scanned, and the same screen is displayed.
Repeat this process until scanning of all originals is completed.
Repeat this process until scanning of all originals is completed.
When placing originals on the feeder to scan, remove the scanned original (original ejected to the original output tray) before placing the next original.
When Changing the Scan Settings for Each Original
On the screen with the displayed message, press [Change Settings]. You can change the following settings:
[Select Color]
[Scan Size]
[Copy Ratio]
[2-Sided Original]
[Density]
[Original Type]
For example, when scanning a 2-sided original after scanning a 1-sided original, press [Change Settings], and set [2-Sided Original].
2
Press [Start Sending].
The scanned data is sent.
When the User Name and Password Input Screen and Confirmation Screen Are Displayed
Enter the user name and password and confirm these while following the instructions on the screen.
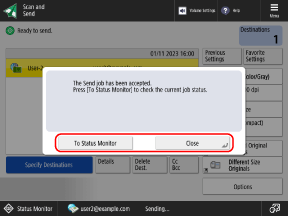
When [To Status Monitor] Is Displayed
To check the send status and log, press [To Status Monitor]. Checking the Send or Save Status and Log of Scanned Data
Press [Close] to return to the scan screen.
Press [Close] to return to the scan screen.
NOTE
When Multiple Originals Are Fed during Scanning and Operations Are Canceled (Detect Multiple Sheet Feed)
A message is displayed on the screen. Remove the jammed original while following the instructions in the message. Paper and Staple Jams
When the jammed original is removed, the screen for resuming operations is displayed.
If multi sheet feeding was detected incorrectly, press [Do Not Detect Multi. Sheet Feed] to resume scanning.
When the jammed original is removed, the screen for resuming operations is displayed.
If multi sheet feeding was detected incorrectly, press [Do Not Detect Multi. Sheet Feed] to resume scanning.
To prevent detection of multi sheet feeding, configure either of the following settings:
On the scan screen, press [Options] [Detect Feeder Multi Sheet Fd.] each time you scan, to cancel detection of multi sheet feeding.
Change the default settings to prevent detection of multi sheet feeding. [Set Detection of Feeder Multi. Sheet Feed as Default]
* Depending on the model, the optional document feeder double feeding detection kit may be required in order to use the multiple sheet feed detection function.
Previewing Contents before Sending
You can display a preview screen to check the content before sending scanned data. You can also change the page order and delete pages on the preview screen. Checking the Scanned Data and Organizing Pages (Preview)
Enhancing the Security of Scanned Data
You can enhance the security of scanned data by encrypting the PDF file or adding a digital signature to the PDF or XPS file. Enhancing the Security of Scanned Data