Adjusting the Contrast of the Watermark and Background
You can print a sample print of the watermark and background, and adjust the contrast (density balance) of the watermark and background while referring to the sample print.
Perform this adjustment in cases such as when the watermark content is visible due to poor contrast between the watermark and background, or when the text of the original is difficult to read because the background density is too dark.
Perform this adjustment in cases such as when the watermark content is visible due to poor contrast between the watermark and background, or when the text of the original is difficult to read because the background density is too dark.
Use the control panel to perform adjustment. You cannot perform adjustment using Remote UI from a computer.
Administrator or DeviceAdmin privileges are required.
Administrator or DeviceAdmin privileges are required.
Required Preparations
Load any of the following sizes of Plain or Heavy paper in the machine: Loading Paper
A3
A4
Letter
11" x 17"
1
Log in as an administrator. Logging In to the Machine
2
On the control panel, press [ Settings/Registration] in the [Home] screen or other screen. [Home] Screen
 Settings/Registration] in the [Home] screen or other screen. [Home] Screen
The [Settings/Registration] screen is displayed.
Press [Function Settings]  [Common]
  [Print Settings]
  [Secure Watermark Settings]
  [Adjust Background/Character Contrast].
 [Common]
  [Print Settings]
  [Secure Watermark Settings]
  [Adjust Background/Character Contrast].
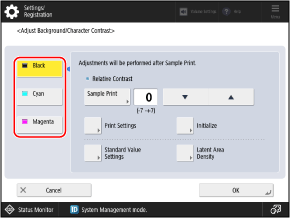
The [Adjust Background/Character Contrast] screen is displayed.
4
Select the color you want to adjust.

5
Configure the sample print settings.
1
Press [Print Settings].
The [Print Settings] screen is displayed.
2
Set the background pattern and character format for the sample print.
These character format settings are applied only to the sample print for adjusting the contrast. The settings are not applied to the watermark that is embedded when documents are actually printed or copied.
3
Press [OK].
The settings are applied, and the [Adjust Background/Character Contrast] screen is displayed again.
6
Adjust the contrast of the watermark and background.
When Adjusting the Density Balance Between the Watermark and Background

1
Press [Sample Print].
The [Sample Print] screen is displayed.
2
Select the paper to use for the sample print, and press [Start Printing].
The sample print is printed, and the [Adjust Background/Character Contrast] screen is displayed again.
3
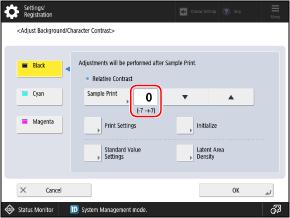
Adjust the contrast values.

The sample print shows samples of the combined watermark and background printed using different contrast values. Refer to the sample print to set the optimal contrast value.
* The framed sample in the sample print shows the result of printing with the currently set contrast value.
The background becomes darker when you increase the contrast value, and it becomes lighter when you decrease the contrast value.
* When white letters are used in the watermark, the watermark becomes darker when you increase the contrast value, and it becomes lighter when you decrease the value.
When Adjusting the Density of the Watermark and Background

1
Press [Standard Value Settings].
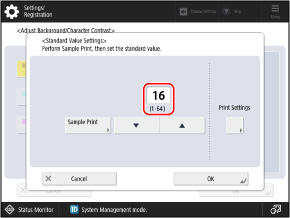
The [Standard Value Settings] screen is displayed.
2
Press [Sample Print].
The [Sample Print] screen is displayed.
3
Select the paper to use for the sample print, and press [Start Printing].
The sample print is printed, and the [Standard Value Settings] screen is displayed again.
4
Adjust the standard value (density of the background).

The sample print shows samples of the combined watermark and background printed using different standard values. Refer to the sample print to adjust the standard value.
* The framed sample in the sample print shows the result of printing with the currently set standard value.
When white letters are used in the watermark, the watermark becomes darker when you increase the standard value, and it becomes lighter when you decrease the value.
5
Press [OK].
The [Adjust Background/Character Contrast] screen is displayed again.
6
Press [Latent Area Density].
The [Latent Area Density] screen is displayed.
7
Adjust the latent area density (density of the watermark).
Refer to the standard value sample print, and adjust the latent area density so that it is similar to the background density (density of the outer square) of the standard value set in Step 4.
When white letters are used in the watermark, the background becomes darker when you increase the latent area density, and it becomes lighter when you decrease the latent area density.
8
Press [OK].
The [Adjust Background/Character Contrast] screen is displayed again.
7
Press [OK].
The settings are applied.
NOTE
Resetting the Adjusted Contrast Values to the Factory Default Settings
On the [Adjust Background/Character Contrast] screen, press [Initialize]  [Yes].
 [Yes].