Preparations for Using Another Machine or Server on the Network
To directly access and use Advanced Box on another machine or a file server (Windows server) on the network, you must register the information used to access that as a connection destination.
To select a registered connection destination, on the control panel, press [Network] in [Scan and Store] or [Access Stored Files] in the [Home] screen.
To select a registered connection destination, on the control panel, press [Network] in [Scan and Store] or [Access Stored Files] in the [Home] screen.
This section describes how to register a Department ID and PIN using Remote UI from a computer.
On the control panel, select [ Settings/Registration] in the [Home] screen or other screen, and then select [Function Settings] to configure the settings. [Network Place Settings]
On the control panel, select [
 Settings/Registration] in the [Home] screen or other screen, and then select [Function Settings] to configure the settings. [Network Place Settings]
Required Preparations
Prepare the information for accessing the connection destination, including the host name or IP address of the connection destination and the method of opening the connection destination (communication protocol).
1
Log in to Remote UI. Starting Remote UI
2
On the Portal page of Remote UI, click [Settings/Registration]. Remote UI Portal Page
3
Click [Store/Access Files]  [Network Place Settings].
 [Network Place Settings].
The [Network Place Settings] screen is displayed.
4
Click [Register New Connection Destination].
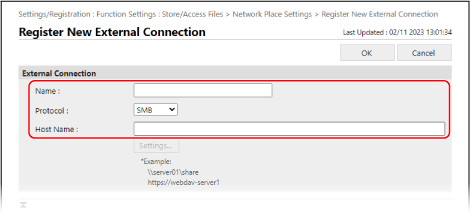
The [Register New External Connection] screen is displayed.
5
Set the information of the connection destination.

[Name]
Enter the name of the connection destination.
The name is displayed in a list of connection destinations when you press [Network] in [Scan and Store] or [Access Stored Files].
The name is displayed in a list of connection destinations when you press [Network] in [Scan and Store] or [Access Stored Files].
[Protocol]
Select the opening method (communication protocol) of the connection destination.
When the connection destination is opened as an SMB server, select [SMB].
When the connection destination is opened as a WebDAV server, select [ WebDAV].
[Host Name]
Enter the network path of the connection destination.
When [SMB] Is Selected in [Protocol]

When connecting to a Shared Space, enter the following:
\\<host name or IP address of connection destination>\share |
Input example:
\\192.168.1.21\share
\\192.168.1.21\share
When connecting to a Personal Space, enter the following:
\\<host name or IP address of connection destination>\users |
Input example:
\\192.168.1.21\users
\\192.168.1.21\users
When [WebDAV] Is Selected in [Protocol]

Enter [Host Name], and click [Settings]. On the [Folder Path Settings] screen, enter [Folder Path], and click [OK].
Enter the following into [Host Name]:
http(s)://<host name or IP address of connection destination> |
Input example:
https://192.168.1.21
https://192.168.1.21
Enter the following into [Folder Path]:
When connecting to a Shared Space, enter "/share".
When connecting to a Personal Space, enter "/users".
6
Click [OK].
The registered connection destination is added to the [Network Place Settings] screen.
7
Log out from Remote UI.
IMPORTANT
Do not register anything other than Advanced Box on another machine or Windows server as a connection destination. This can result in a malfunction.
NOTE
Editing the Information of a Registered Connection Destination
Click the name of the connection destination you want to edit in the [Network Place Settings] screen to edit the registered information.
Restricting the Communication Protocol When Connecting
By restricting the communication protocols that can be used when connected to Advanced Box on another machine or Windows server, you can increase security. [Protocol for External Reference]
Verifying the Server Certificate When Using TLS Encrypted Communication
When the connection destination uses TLS, you can configure the settings to verify a server certificate sent from the connection destination. In the event of an error, the connection is terminated, reducing the risk of spoofing by a third party. [Confirm TLS Certificate for Network Access]