Installing the Manager
This section describes the method for installing the Manager of this software.
When operating the Manager and the Agent on the same computer, install the Agent at the same time.
IMPORTANT |
When using an instance of SQL Server running on another computer, several settings must be configured before installing the Manager. For details, see the following. When operating the Agent on a different computer, follow the procedure below to install the Manager, and then install the Agent while specifying the initial settings. For details, see the following. |
NOTE |
To upgrade an instance of this software that is already operating, see the following. |
1.
Log on to the computer as a user with Administrator privileges.
2.
Exit all application software that is running.
3.
Execute the [manager_installer.msi] file.
NOTE |
The ZIP file in the same folder as [manager_installer.msi] is a file used for upgrading. It is not used for a new installation. |
4.
On the [Welcome to the setup wizard for iW Enterprise Management Console Manager] screen, click [Next].
5.
Select [I accept the terms in the license agreement], and click [Next].
6.
Select the database to use in [Database].
When using the database software included with this software
Select [SQLite], and click [Next].
When using SQL Server
Select [SQL Server], and click [Next].
Select the database to use in [Database].
Enter a name in [Server Name] and [Instance Name].
When using a database created for this software in advance, in [Server Name], enter the IP address and port number of the computer where SQL Server is installed.
Example: 192.168.100.200,1433
The name displayed in [Database Name] cannot be changed.
Select the authentication mode to use in [Authentication Mode].
If you selected [SQL Server Authentication], enter the authentication information of a user set for this software in advance in [User Name] and [Password].
Click [Next].
7.
On the [Port Settings] screen, enter the HTTP/HTTPS port number to use with this software, and click [Next].
Enter the port number for accessing the Manager from the web browser and Agents in [Ports for Applications].
In [Ports for Extended Functionality], enter the port numbers used for distributing firmware. Enter numbers that are not used by other applications.
NOTE |
These ports are used when the Agent communicates with Local CDS in the Manager. |
8.
Enter the IP address or FQDN (fully qualified domain name) of the Manager in [Site Address], and click [Next].
When a device set to communicate with an IPv6 address only is included in the devices for management with this software, enter the FQDN.
NOTE |
If the IP address may be subject to change, it is recommended that you specify the FQDN. |
9.
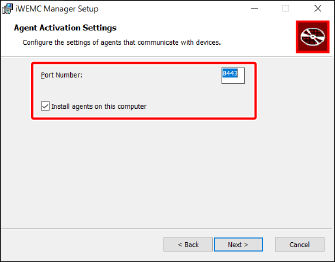
On the [Agent Activation Settings] screen, configure the Agent.

Enter the port number for accessing the Agent from the Manager in [Port Number].
If you do not want to install the Agent to the same computer as the Manager, deselect [Install agents on this computer].
10.
Click [Next].
11.
Specify the destination folder to install to in [Install in], and click [Next].
12.
On the [Ready to Install] screen, click [Install].
If the [User Account Control] dialog box is displayed, click [Continue] or [Yes].
13.
On the [Setup of iW Enterprise Management Console Manager is complete.] screen, click [Finish].
After the wizard is closed, your default web browser will start and the [Administrator Settings] screen of this software will be displayed. Before the screen is displayed, a security warning may be displayed in the web browser. For details, see the following.