Scan Settings (Touch Panel Model)
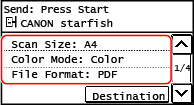
When scanning with the machine, you can use the scanning screen to set the original size and adjust the image quality.

If the scanned data does not appear as expected, you can change the settings and scan again.
* To save scanned data to a computer, configure the settings with MF Scan Utility or ScanGear MF installed on the computer. You cannot use the control panel to configure the settings.
* To save scanned data to a computer, configure the settings with MF Scan Utility or ScanGear MF installed on the computer. You cannot use the control panel to configure the settings.
 |
Registering the Frequently Used Scan Settings as the Default SettingsYou can change the default scan settings according to the frequently used scan settings. Changing the Default Settings Recalling Past Settings - TX Job LogYou can use the TX Job Log to recall the scan settings used to send or save scanned data in the past. Specifying Destinations (TX Job Log) |
Setting the Original Size and Orientation
Set the size and orientation according to the original to be scanned.
[Scan Size]
Select the size of the placed original.
Select the size of the placed original.
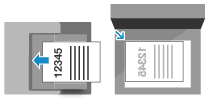
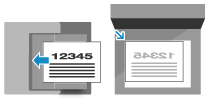
[Original Orientation]
Select [Portrait] or [Landscape] to suit the placed original.
Select [Portrait] or [Landscape] to suit the placed original.
[Portrait] | [Landscape] | |
 |  |
Adjusting Image Quality
You can adjust the image quality such as when the scanned data image is not clear or the text is difficult to read.
[Color Mode]
Select the scanning color mode (Black & White/Color).
Select the scanning color mode (Black & White/Color).
[Density]
Adjust the density to suit the original.
Press [+] to increase the density and [-] to lower it.
Adjust the density to suit the original.
Press [+] to increase the density and [-] to lower it.
[Original Type]
Select the original type.
Scanning is performed using the image quality to suit the content of the original.
Select the original type.
Scanning is performed using the image quality to suit the content of the original.
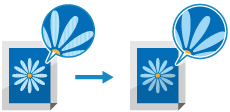
[Sharpness]
Adjust the sharpness.
Emphasize the contours and lines to make them clearer, or weaken them to make them softer.
Adjust the sharpness.
Emphasize the contours and lines to make them clearer, or weaken them to make them softer.
Adjustment example: To make blurry text or shapes clearer Press [+].  |
To reduce moire (vertical pattern noise) in pictures Press [-].  |
 |
When the File Format of the Scanned Data Is JPEGThe image quality varies depending on the compression ratio selected in [Data Size]. Setting File / Division |
2-Sided Scan Settings
When scanning a 2-sided original, place the original on the feeder, and set [2-Sided Original].
* This setting is available only when the machine is equipped with a feeder that supports 2-sided scanning. Supported Functions
* This setting is available only when the machine is equipped with a feeder that supports 2-sided scanning. Supported Functions
[2-Sided Original]
When scanning a 2-sided original, select [Book Type] or [Calendar Type]. Select this according to the top and bottom orientation of the front and back sides of the placed original.
When scanning a 2-sided original, select [Book Type] or [Calendar Type]. Select this according to the top and bottom orientation of the front and back sides of the placed original.
[Book Type] | [Calendar Type] | |
 |  | |
Top and bottom have same orientation | Top and bottom have opposite orientation |
To cancel scanning of a 2-sided original, select [Off].
Setting File / Division
Set the scanned data format and file name.
You can compress data and enable recognition of text in an original. You can also combine multiple originals into one file or create separate files for each original.
You can compress data and enable recognition of text in an original. You can also combine multiple originals into one file or create separate files for each original.
[File Format]
Select the scanned data format from PDF, JPEG, or TIFF according to your purpose and environment.
Select the scanned data format from PDF, JPEG, or TIFF according to your purpose and environment.
Reducing the Data Size
When using PDF format
Select [PDF (Compact)].
The data size is reduced, but the image quality and the number of sheets that can be scanned at a time may also be reduced depending on the original type.
Select [PDF (Compact)].
The data size is reduced, but the image quality and the number of sheets that can be scanned at a time may also be reduced depending on the original type.
When using JPEG format
Select [JPEG], and set [Data Size] to [Small: Memory Priority].
Select [JPEG], and set [Data Size] to [Small: Memory Priority].
Combining Multiple Originals into One File
Select PDF or TIFF format.
Dividing the Original into Separate Files
When using PDF format or TIFF Format
Select [Set PDF/TIFF Details] select PDF format or TIFF Format
  press [On] in [Divide into Pages].
Select [Set PDF/TIFF Details]
 select PDF format or TIFF Format
  press [On] in [Divide into Pages].
When using JPEG format
Select [JPEG].
Select [JPEG].
[Data Size]
Select the data size when using JPEG format for the scanned data. The compression ratio varies according to the selected data size.
Select the data size when using JPEG format for the scanned data. The compression ratio varies according to the selected data size.
[Small: Memory Priority]
Increases the compression ratio but lowers the image quality.
Increases the compression ratio but lowers the image quality.
[Large: Image Quality Priority]
Lowers the compression ratio but increases the data size.
Lowers the compression ratio but increases the data size.
[File Name]
Specify a string to add to the start of the file name of the scanned data.
Specify a string to add to the start of the file name of the scanned data.
E-mail Settings
You can configure the e-mail settings when sending scanned data by e-mail.
[Subject/Message]
Set the subject and main body of the e-mail.
Set the subject and main body of the e-mail.
[Reply To]
Select an e-mail address (Reply-To) from the Address Book to be used for e-mail recipients to reply to.
If no e-mail address is selected here, the e-mail address of the machine is used as the Reply-To e-mail address.
* If the e-mail address you want to use is not registered in the Address Book, register it, and then select it. Address Book Function
[Priority]
Select the priority level.
Select the priority level.
 | |
E-mail SenderThe e-mail address of the machine becomes the sender e-mail address (From) regardless of the [Reply To] setting. To send the sender's name along with the e-mail address of the machine, use the following procedure to set the unit name.
On the control panel, select [Menu] in the [Home] screen, and then select [Function Settings] to configure the settings. [Register Unit Name (E-Mail)] The e-mail sender is the setting shared with the machine. |