Paper Jams in the Front Cover of the Main Unit
Remove the paper jammed in the front cover of the main unit. Follow the instructions on the control panel to check the location of the paper jam and remove the jammed paper.
If the paper tears, be sure to remove all parts so that no pieces remain.
If you cannot remove the paper, do not try to remove it forcibly. Check the control panel and remove the jammed paper at another location.
If the paper tears, be sure to remove all parts so that no pieces remain.
If you cannot remove the paper, do not try to remove it forcibly. Check the control panel and remove the jammed paper at another location.

The fixing unit and its surroundings are subject to high-temperatures. When removing jammed paper in Step 3, take care not to touch anything in this area.
The inner output guide and its surroundings are subject to high-temperatures. When removing jammed paper in Step 7, take care not to touch anything in this area.
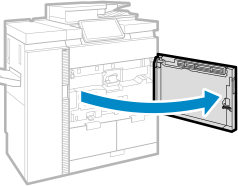
1
Open the front cover of the main unit.
2
Turn the delivery knob (C1).

Turn the knob about 15 times until the light ( ) turns off.
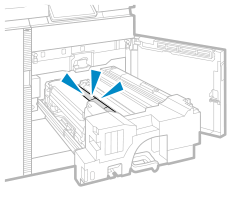
) turns off.Check whether paper is jammed in the fixing transport unit.
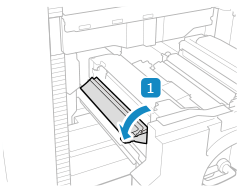
1
Tilt the C2 lever to the left.
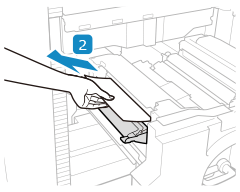
2
Holding the C2 lever, pull the fixing transport unit out.
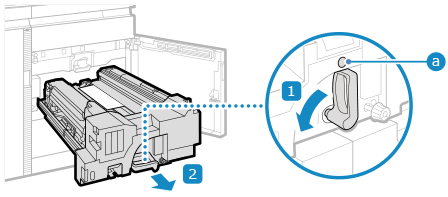
If the C2 lever lock indicator () lights up in red, the C2 lever cannot be unlocked. Follow the instructions on the screen to remove the jammed paper.
) lights up in red, the C2 lever cannot be unlocked. Follow the instructions on the screen to remove the jammed paper.4
Check whether paper is jammed in the duplexing guide (C3).
1
Open the duplexing guide (C3).
2
If paper is jammed, gently pull it out in the direction of the arrow.
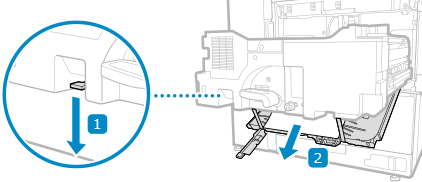
3
Close the duplexing guide (C3).
5
Check whether paper is jammed in the upper pre-realignment guide (C4).
1
Open the upper pre-realignment guide (C4).
2
If paper is jammed, gently pull it out in the direction of the arrow.
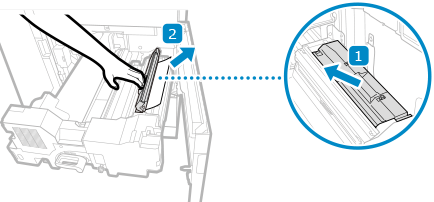
When you release the upper pre-realignment guide (C4), it closes.
6
Remove all the paper left on the feeding belt (C5).
Check whether paper is jammed in the inner output unit.
1
Open the inner output unit guide (C6).
2
If paper is jammed, gently pull it out in the direction of the arrow.
3
Close the inner output unit guide (C6).
8
Return the fixing transport unit to its original position.
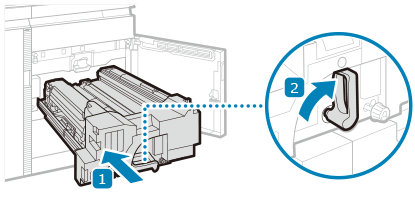
1
Holding the C2 lever, gently push the fixing transport unit back into the machine.
When pushing in the fixing transport unit, the C2 lever you hold may move so that it pops up.
2
Turn the C2 lever to the right.
9
Close the front cover of the main unit.
When the paper jam is cleared, the screen indicating a paper jam disappears, and printing resumes automatically.
If a screen indicating a paper jam at a different location appears, continue following the instructions on the screen to remove the jammed paper.
If a screen indicating a paper jam at a different location appears, continue following the instructions on the screen to remove the jammed paper.
NOTE
If Paper Jams Occur Repeatedly
Check the status of the machine and paper. Paper Jams That Occur Repeatedly