Paper Jams in Staple Finisher-AC and Booklet Finisher-AC (Option)
Remove the paper jammed in Staple Finisher-AC and Booklet Finisher-AC. Follow the instructions on the control panel to check the location of the paper jam and remove the jammed paper.
If the paper tears, be sure to remove all parts so that no pieces remain.
If you cannot remove the paper, do not try to remove it forcibly. Check the control panel and remove the jammed paper at another location.
If the paper tears, be sure to remove all parts so that no pieces remain.
If you cannot remove the paper, do not try to remove it forcibly. Check the control panel and remove the jammed paper at another location.
Required Preparations
Remove all paper output to the booklet tray.
Paper Jams Inside the Front Cover
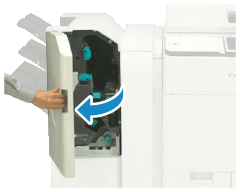
1
Open the front cover of the finisher.
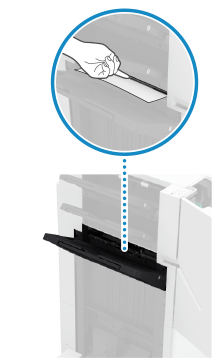
2
Lift up the output tray guide of Tray C.
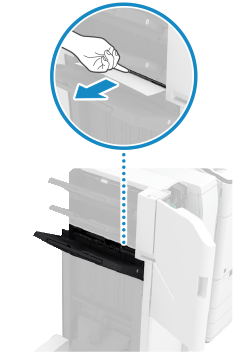
When Long Sheet Paper Is Jammed in the Output Area of the Lower Tray (Tray C)
Gently pull out the jammed paper along the tray.
After you remove jammed Long Sheet paper, a screen may appear prompting you to open the front cover of the finisher. You can make this screen disappear by opening and then closing the front cover.
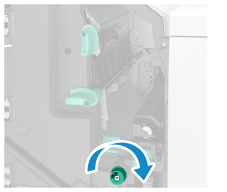
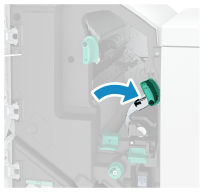
3
Turn the delivery knob and feed any jammed paper to the Tray C side.
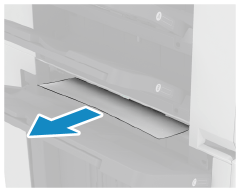
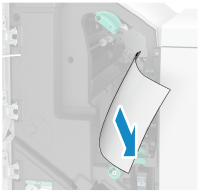
4
If paper comes out of the output area of Tray C, gently pull it out in the direction of the arrow.
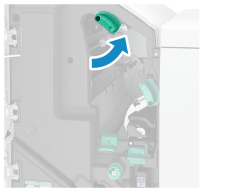
5
Open the delivery guide.
1
Open the lower delivery guide.
2
Open the upper delivery guide.
6
Check whether paper is jammed.
1
If paper is jammed, gently pull it out in the direction of the arrow.
2
Close the upper delivery guide.
7
Lift the primary flapper.
8
Check whether paper is jammed.
1
If paper is jammed, gently pull it out in the direction of the arrow.
2
Lower the primary flapper.
3
Close the lower delivery guide.
9
Check whether paper is jammed in the puncher unit or entrance guide.
When the Puncher Unit Is Attached
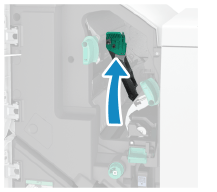
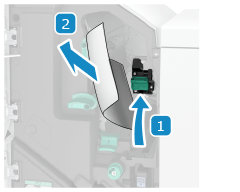
1
Lift the puncher unit.
2
If paper is jammed, gently pull it out in the direction of the arrow.
3
Lower the puncher unit.
When the Puncher Unit Is Not Attached
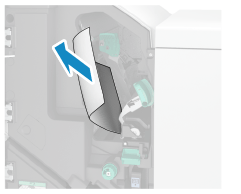
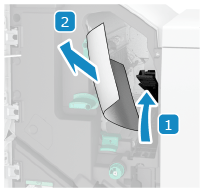
1
Open the entrance guide.
2
If paper is jammed, gently pull it out in the direction of the arrow.
3
Close the entrance guide.
10
Close the front cover of the finisher.
When the paper jam is cleared, the screen indicating a paper jam disappears, and printing resumes automatically.
If a screen indicating a paper jam at a different location appears, continue following the instructions on the screen to remove the jammed paper.
If a screen indicating a paper jam at a different location appears, continue following the instructions on the screen to remove the jammed paper.
NOTE
If Paper Jams Occur Repeatedly
Check the status of the machine and paper. Paper Jams That Occur Repeatedly
Paper Jams Inside the Saddle Stitch Unit (For Booklet Finisher-AC Only)
This section describes how to clear paper jams inside the front cover. Follow the instructions on the control panel to check the location of the paper jam and remove the jammed paper.
1
Open the front cover of the finisher.
2
Turn the knob at the top of the saddle stitch unit and pull out the saddle stitch unit.
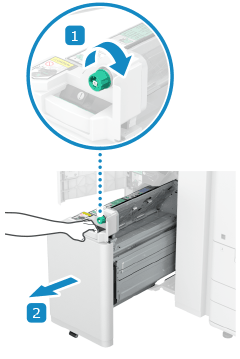
Turn the knob about 10 times.
3
Check whether paper is jammed.
1
Open the transparent guide.
2
If paper is jammed, gently pull it out in the direction of the arrow.
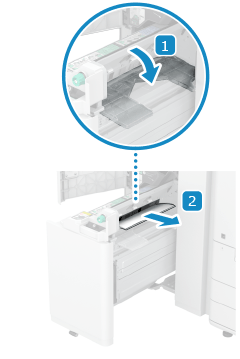
3
Close the transparent guide.
4
Gently push the saddle stitch unit into the finisher.
5
Close the front cover of the finisher.
When the paper jam is cleared, the screen indicating a paper jam disappears, and printing resumes automatically.
If a screen indicating a paper jam at a different location appears, continue following the instructions on the screen to remove the jammed paper.
If a screen indicating a paper jam at a different location appears, continue following the instructions on the screen to remove the jammed paper.
NOTE
If Paper Jams Occur Repeatedly
Check the status of the machine and paper. Paper Jams That Occur Repeatedly