Placing Originals
Place documents, photos, and other printed materials ("originals") to be scanned, faxed, or copied on the platen glass or in the feeder.
Determine whether to use the platen glass or feeder depending on the document type and usage.
Determine whether to use the platen glass or feeder depending on the document type and usage.
Platen Glass
Scans originals in a stationary position. Originals must be placed one at a time, but this ensures highly accurate scanning.
You can also place the following originals on the platen glass:
You can also place the following originals on the platen glass:
Books, thick paper, thin paper, and other originals that cannot be placed in the feeder
Tracing paper, transparencies, and other transparent originals
Feeder
You can place several sheets of originals in the feeder. The placed originals are fed and scanned automatically one sheet at a time.
Both sides of originals can be scanned at the same time.
Both sides of originals can be scanned at the same time.
Regardless of whether you use the platen glass or feeder, when copying to paper with a logo or using staple function (for the model with the finisher), be careful of the orientation of the original.
IMPORTANT
Place Dry Originals
Before placing originals, make sure that any ink, correction fluid, or glue on them has completely dried.
Placing Originals on the Platen Glass
For the size of the originals that can be placed on the platen glass, see the basic specifications of the machine. Basic Specifications
1
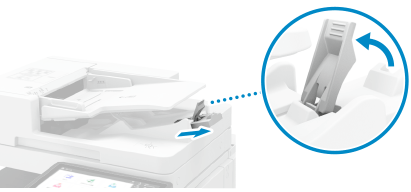
Open the feeder.
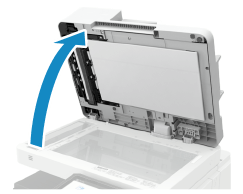
2
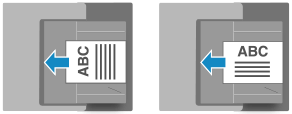
Place the side of the original scanned face down on the platen glass while aligning the corner of the original with the top left corner of the platen glass.
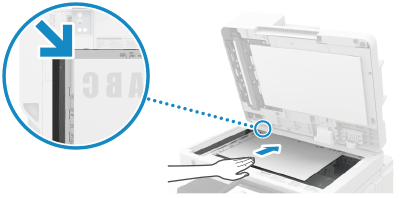
Place the original so that the top and bottom of the original are correctly positioned from your viewpoint.

When Scanning Transparent Originals
When scanning tracing paper, transparencies, and other transparent originals, place a sheet of plain white paper on top.
When Copying an A5 Size Original
When copying an A5 size original, place the original while paying attention to the orientation.
When Placing the Original in Portrait Orientation

Set the size of copy paper to [A5].
When Placing the Original in Landscape Orientation

Set the size of copy paper to [A5R].
3
Gently close the feeder.
Before starting the scanning, specify the paper size and scanning size to match the size of the original.
Do not forcefully push the feeder to close it when placing a book, magazine, or other thick original.
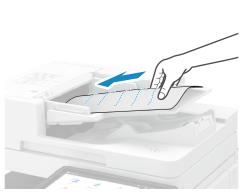
4
When scanning of the original is complete, remove the original from the platen glass.

When closing the feeder, take care that your eyes are not exposed to light emitted through the platen glass.
Placing Originals in the Feeder
For the size and type of the originals that can be placed in the feeder, see the specifications of the feeder. 2-Sided Single Pass Feeder Specifications
IMPORTANT
To prevent paper jams inside the feeder, do not place the following originals:
Wrinkled, creased, curled, or torn paper
Carbon paper, coated paper, thin translucent paper, or transparencies
Stapled or clipped paper, or paper with sticky notes
Paper printed by a thermal transfer printer
Paper with punched holes
1
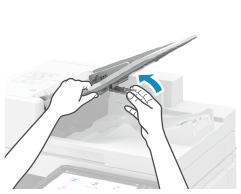
Align the slide guides to fit the size of your originals.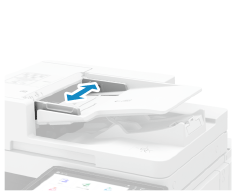
2
Fan the originals and align the edges.

Fan the paper in small batches, and align the edges by tapping the paper on a flat surface a few times.
3
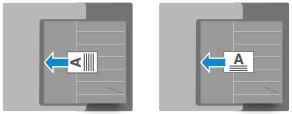
Place the sides of the originals to be scanned face up in the feeder.

When the original is placed correctly, the original set indicator ( ) lights up.
) lights up.Place the original so that the top and bottom of the original are correctly positioned from your viewpoint.

Insert the paper until the edge of the original is against the feeder.
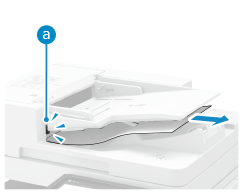
Make sure the placed originals do not exceed the load limit line ( ). If they exceed the load limit line, there may be misfeeds or a paper jam.
). If they exceed the load limit line, there may be misfeeds or a paper jam.When scanning thin originals (52 g/m² (14 lb bond) or less) or A6R size or smaller originals, raise the original retainer.
When Copying an A5 Size Original
When copying an A5 size original, place the original while paying attention to the orientation.
When Placing the Original in Portrait Orientation

Set the size of copy paper to [A5].
When Placing the Original in Landscape Orientation
Set the size of copy paper to [A5R].
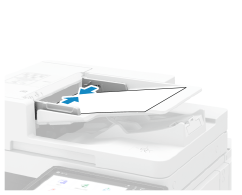
When Placing a LGL Size Original
Pull out the original supply tray extension and raise the original stopper before placing the original so as to prevent the original from drooping or falling.
If the output originals are not stacked evenly, just raise the original stopper.
If the output originals are not stacked evenly, just raise the original stopper.
When Placing a Thin Paper Original
Thin paper originals may be difficult to place or may become wrinkled due to a usage environment with high temperature and humidity.
For thin paper originals that are difficult to place in the feeder, place the original while gently curving it and not inserting it too far. If the original is inserted too far, it will not be fed correctly, and may result in a paper jam.
When Scanning an Original with Short Edges of 87 mm (3 1/2") or Less
Place the original so that the top and bottom are correctly positioned from your viewpoint.
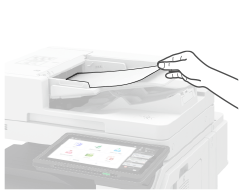
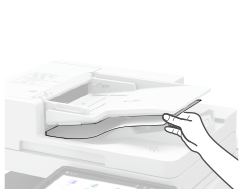
When Placing a Long Original
Support the original with your hand when scanning it or outputting it.
For details on the size of long originals that can be placed in the feeder, see the specifications for the feeder of the machine. 2-Sided Single Pass Feeder Specifications
4
Align the slide guides against the edges of the originals.
Slide guides that are aligned and too loose or too tight can cause misfeeds or a paper jam.
5
When scanning of the originals is complete, remove the ejected originals from the original output tray.
Do not add originals or remove them during scanning.
Leaving ejected originals on the original output tray may result in a paper jam.
To prevent originals from being left in the original output tray, the original output indicator () lights while the originals are being output, and blinks for a while after all the originals have been output.
) lights while the originals are being output, and blinks for a while after all the originals have been output.