
Basic Paper Loading Method
This section describes the general method for loading paper such as plain or recycled paper. Load frequently used paper types or sizes in the paper drawer. When temporarily using paper that is not loaded in the paper drawer, load it in the multi-purpose tray.
|
For the optional Paper Feeder PF-C, follow the procedure of paper drawer to load paper. If there are instructions on the paper package about which side of the paper to load, follow those instructions. Paper may overlap when it is fed or a paper jam may occur, depending on the cut surface of the paper. Changing the paper orientation and loading it again may reduce the effect of the cut surface. If paper runs out and printing is stopped, load a new paper stack. Printing restarts after the new paper stack is loaded. |
Loading Paper in the Paper Drawer
Paper Orientation
See the table below to load available paper in correct orientation.
Paper | Orientation |
A4, B5, A5 (portrait), A6, Legal, Legal (India), Letter, Statement, Executive, Oficio, Brazil-Oficio, Mexico-Oficio, Government Letter, Government Legal, Australia Foolscap, Foolscap/Folio, 16K, F4A, Custom (portrait) |  |
A5 (landscape), Custom (landscape) |  |
Loading Standard Size Paper
To load paper whose size is found in the paper size markings on the paper drawer, use the following procedure. For paper whose size is not found in the paper size markings, see Loading a Custom Size Paper.
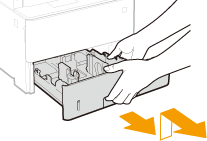
1
Pull out the paper drawer until it stops, and remove it while lifting the front side.
2
Adjust the positions of the paper guides to the paper size you want to use.
While pressing the lock release lever, move the paper guide to align the projection to the appropriate paper size marking.
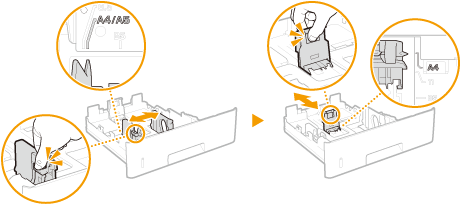

When loading Legal size paper
Press the lock release lever, and extend the paper drawer.
3
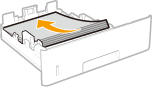
Load the paper so that the edge of the paper stack is aligned against the paper guide on the rear side of the paper drawer.
Insert the paper with the print side face down.
Fan the paper stack well, and tap it on a flat surface to align the edges.

Do not exceed the load limit line when loading paper
Make sure that the paper stack does not exceed the load limit line ( ). Loading too much paper can cause paper jams.
). Loading too much paper can cause paper jams.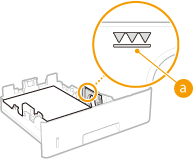

When loading paper with a logo, see Loading Preprinted Paper.
4
Insert the paper drawer into the machine.
»
When changing the paper size or type
The factory default settings for paper size and type are <A4> and <Plain 2>, respectively. If you load a different size or type of paper into the machine, make sure to change the setting. If you do not change the paper size or type setting, the machine cannot print properly.
 Printing on the back side of printed paper (2nd Side of 2-Sided Page)You can print on the back side of printed paper. Flatten any curls on the printed paper and insert it into the paper drawer with the print side face down or into the multi-purpose tray with the print side face up. Then press <2nd Side of 2-Sided Page> on the screen for selecting the paper type. When using the multi-purpose tray, load one sheet of paper each time you print. Use only the paper printed with this machine. You cannot print on the side that has previously been printed on. If you are using A5 size paper, the reverse side may not be printed correctly. |
Loading a Custom Size Paper
To load custom size paper or other paper whose size is not found in the paper size markings on the paper drawer, use the following procedure.
1
Pull out the paper drawer until it stops, and remove it while lifting the front side.
2
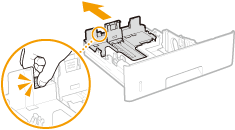
Slide the paper guides apart.
Press the lock release lever to slide the paper guides outward.
When loading longer paper than A4 size
Press the lock release lever, and extend the paper drawer.
3
Load the paper so that the edge of the paper stack is aligned against the front side of the paper drawer.
Place the paper stack with the print side face down.
Fan the paper stack well, and tap it on a flat surface to align the edges.
Do not exceed the load limit line when loading paper
Make sure that the paper stack does not exceed the load limit line (). Loading too much paper can cause paper jams.
). Loading too much paper can cause paper jams.When loading paper with a logo, see Loading Preprinted Paper.
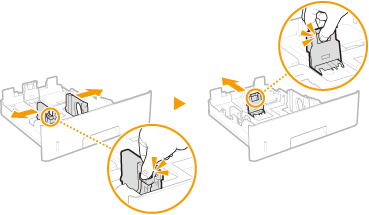
4
Align the paper guides against the edges of the paper.
Press the lock release lever and slide the paper guides inward until they are aligned securely against the edges of the paper.
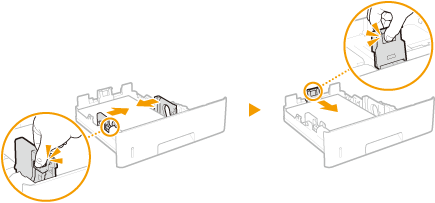
Align the paper guides securely against the edges of the paper
Paper guides that are too loose or too tight can cause misfeeds or paper jams.
5
Insert the paper drawer into the machine.
»
When changing the paper size or type
If you load a different size or type of paper into the machine, make sure to change the settings. If you do not change the paper size or type setting, the machine cannot print properly.
Printing on the back side of printed paper (2nd Side of 2-Sided Page)You can print on the back side of printed paper. Flatten any curls on the printed paper and insert it into the paper drawer with the print side face down or into the multi-purpose tray with the print side face up. Then press <2nd Side of 2-Sided Page> on the screen for selecting the paper type. When using the multi-purpose tray, load one sheet of paper each time you print. Use only the paper printed with this machine. You cannot print on the side that has previously been printed on. If you are using A5 size paper, the reverse side may not be printed correctly. |
Loading Paper in the Multi-Purpose Tray
 |
Make sure to insert the paper drawerThe machine only prints when the paper drawer is inserted, even if paper is loaded in the multi-purpose tray. An error message is displayed if you attempt to print without inserting the paper drawer. |
Paper Orientation
See the table below to load available paper in correct orientation.
Paper | Orientation |
A4, B5, A5 (portrait), A6, Legal, Legal (India), Letter, Statement, Executive, Oficio, Brazil-Oficio, Mexico-Oficio, Government Letter, Government Legal, Australia Foolscap, Foolscap/Folio, 16K, F4A, 3" x 5", Custom (portrait) | |
A5 (landscape), Custom (landscape) | |
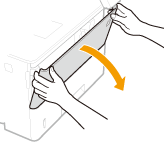
1
Open the cover.
Hold the left and right side handles, and open the cover.
2
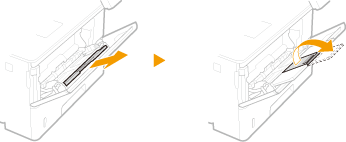
Pull out the paper tray and the tray extension.
Pull out the tray extension when loading large paper.
3
Spread the paper guides apart.
Press the lock release lever to slide the paper guides outward.
4
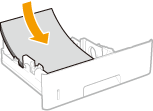
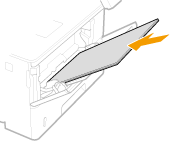
Insert the paper into the multi-purpose tray until the paper stops.
Insert the paper with the print side face up.
Fan the paper stack well, and tap it on a flat surface to align the edges.
Do not exceed the load limit guide when loading paper
Make sure that the paper stack does not exceed the load limit guide (). Loading too much paper can cause paper jams.
). Loading too much paper can cause paper jams.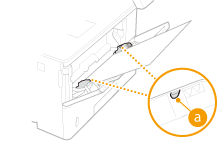
If you use envelopes or paper with a logo mark, pay attention to the orientation when loading them in the paper source.
Loading Envelopes
Loading Preprinted Paper.
Loading Envelopes
Loading Preprinted Paper.
5
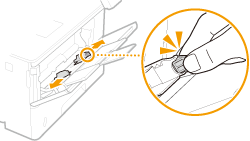
Align the paper guides against the edges of the paper.
Press the lock release lever and slide the paper guides inward until they are aligned securely against the edges of the paper.

Align the paper guides securely against the edges of the paper
Paper guides that are too loose or too tight can cause misfeeds or paper jams.
»
When changing the paper size or type
The factory default settings for paper size and type are <A4> and <Plain 2>, respectively. If you load a different size or type of paper into the machine, make sure to change the setting. If you do not change the paper size or type setting, the machine cannot print properly.
|
Printing on the back side of printed paper (2nd Side of 2-Sided Page)You can print on the back side of printed paper. Flatten any curls on the printed paper and insert it into the paper drawer with the print side face down or into the multi-purpose tray with the print side face up. Then press <2nd Side of 2-Sided Page> on the screen for selecting the paper type. When using the multi-purpose tray, load one sheet of paper each time you print. Use only the paper printed with this machine. You cannot print on the side that has previously been printed on. If you are using A5 size paper, the reverse side may not be printed correctly. |